


Value IP Series Network Cameras – H265, 2MP / 5MP / 8MP
9
3.2
EZN Series
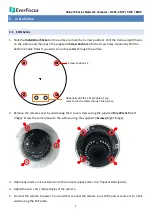
1
Optionally insert a micro SD card into the card slot on the rear panel of the camera. To do this, unscrew
the 2 screw, remove the SD card slot cover and then insert the micro SD card.
2
Drill three holes on the surface according to the Camera Base and then push the supplied 3
Screw
Anchors
into the holes. Drill another hole in the middle within the 3 screw holes if you wish to run the
wires into the surface. Screw the camera to the surface using the supplied 3
Screws
.
Screw Anchor
Screw
Surface
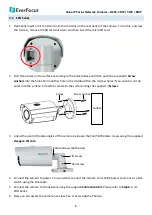
3
Adjust the pan/tilt/rotate angles of the camera by loosen the Pan/Tilt/Rotate screws using the supplied
Hexagon Wrench
.
Tilt Screw
Pan Screw
Rotate Screws (both sides)
4
Connect the camera to power. You can either connect the camera to a 12VDC power source or to a PoE
switch using the PoE cable.
5
Connect the camera to the network using the supplied
Cable Gland Kit
. Please refer to
Step 6
in
3.1
EHN Series
.
6
Now you can access the camera live view. See
4. Accessing the Camera
.


