background image

CHAPTER 3 

EXAMPLE APPLICATIONS


Revised: 19 Jan 16 

3-17 

EST P/N AA107-Horizon 

5.    Verify the encryption settings are correct for the 802.11 

AP network in which the EtherStation modem will be 

working  and  press  the  Finish  button  to  return  to  the 

configuration page. 


Station Router and Station Masquerade 


6.    To  configure  the  two  other  modems,  double-click  on 

their icons to bring up the ESTeem Summary window 

and press the Edit button (Figure 20).  


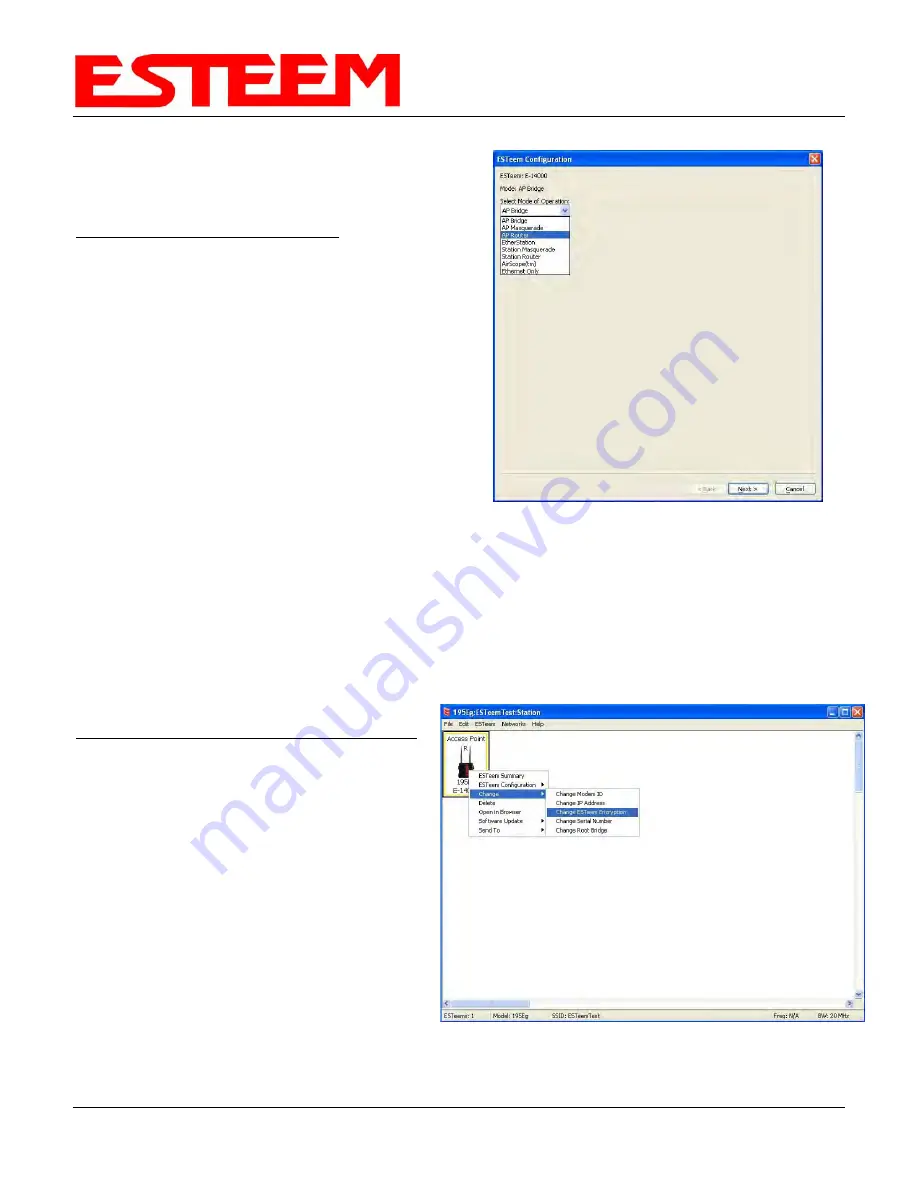
7.   Select  Station  Router  for  E-14001  and  Station 

Masquerade  for  E-14002  in  the  Mode  of  Operation 

(Figure 26).  Press the Next button at the bottom of the 

window to continue.   


8.    Continue through the configuration screens setting the 

Station Router/Masquerade addressing to match the IP 

address ranges for your network.  For help with setting 

the router addressing please refer to Router Address 

Examples later in this chapter. 


9.    Verify the encryption settings are correct for the 802.11 

AP network in which the EtherStation modem will be 

working and press the Finish button to return to the configuration page. 


10.   Verify all ESTeem modems are connected to the same switch as the computer running the ENC Utility and send 

the  configuration  to  all    modems  at  the  same  time  by  selecting  ESTeem>ESTeem  Configuration>Send 

Configuration  to  All  ESTeems.    Once  the  ENC  Utility  has  downloaded  the  configuration  for  both  ESTeem 

Horizons,  the  status  box  around  the  ESTeems  will  change  from  yellow  to  blue.    This  indicates  that  the 

configuration was completed successfully and the ESTeem Horizons are ready to be installed in the application. 


802.11 Access Point Modes (Figures 6-8) 


Access Point Bridge, Router or Masquerade Modes 


Configuring  the  ESTeem  Horizon  as  an  Access 

Point  for  802.11  clients  (as  seen  Figures  6-8)  is 

exactly the same as configuration for AP Bridge, AP 

Router and AP Masquerade as shown above.  The 

only  difference  being  that  a  wireless  link  is  only 

added between ESTeem Horizons where a wireless 

connection is necessary.  In figures 6 and 7 there 

would be no wireless link listed in the ENC Utility.  In 

figure  8,  the  configuration  would  be  exactly  as 

shown  in  Figure  2  with  the  addition  of  the  mobile 

clients in the network. 


The  802.11  clients  will  use  the  SSID  configured 

during the setup of the network with the ENC Utility. 

The  encryption  will  be  set  at  the  factory  default 

settings  for  clients  (WPA  PSK).    To  adjust  the 

encryption type, right-mouse click on the ESTeem 


Figure 26: Mode of Operation Selection 


Figure 27: Encryption Configuration 


Summary of Contents for ESTeem Horizon 216An

Page 1: ...ESTeem Horizon Series User s Manual Model 216An Manual Revision 1 0 January 2016 Electronic Systems Technology Inc ...

Page 2: ... All rights reserved Printed in the United States of America No part of this publication may be reproduced stored in a retrieval system or transmitted in any form or by any means electronic mechanical photocopying recording or otherwise without the prior written permission of Electronic Systems Technology Author Date Name Eric P Marske Title Product Support Manager Approved by Date Name Mike Eller...

Page 3: ...Materials Authorization Number before shipment of product or parts to EST for any reason b If the whole unit is shipped it must be in its original carton and shipping components or a carton and shipping components supplied by EST or it parts only are shipped they must be packaged and cushioned so as to prevent damage in transit and shipped freight prepaid PRODUCT WILL BE CONSIDERED OUT OF WARRANTY...

Page 4: ...rnet Bridge Mode 3 1 Router Modes 3 3 Mobile Client Modes 3 4 802 11 Access Point Modes 3 5 Programming Examples 3 7 Using ESTeem Network Configuration ENC Utility 3 7 Example 1 Point to Point Ethernet Bridge 3 9 Example 2 Point to Point Ethernet Bridge with Repeater 3 10 Example 3 Point to Multipoint with Mesh Repeater 3 11 Example 4 Point to Multipoint Router Mode 3 13 Example 5 Mobile Client Mo...

Page 5: ...Second Connections 6 3 Second Configuration 6 3 CHAPTER 7 Repeating and Mesh Networking ESTeem Mesh Network 7 1 Configuration 7 1 Rapid Spanning Tree Protocol RSTP 7 2 Spanning Tree Protocols STP 7 3 Overview 7 3 Phases 7 4 Priority and Path Cost 7 4 Root Bridge 7 4 Redundant Backup 7 5 Redundant Master Configuration 7 5 CHAPTER 8 Antenna Setups Antenna and Cable Configurations 8 1 Model 195Eg 195...

Page 6: ...Out B 2 RS 232 Data Port Pin Out B 2 APPENDIX C Radio Configuration Frequency of Operation C 1 Setting RF Bandwidth C 2 Setting Data Rates C 2 Setting RF Power Level C 3 Average RF Output Power C 4 APPENDIX D Security APPENDIX E Troubleshooting Testing Communication Link E 1 Viewing RF Data Rates E 3 Signal Strength vs Data Rates E 4 Setting Maximum Distance Value E 4 Troubleshooting Tips E 5 APPE...

Page 7: ...nistrator privileges to the computer and network you are configuring If using routing protocols you must be able to identify and configure the network routers gateways and firewalls You must be familiar with using web browser software such as Internet Explorer Netscape or Mozilla If you are unfamiliar with any of the above networking concepts you may need to contact your network administrator for ...

Page 8: ... both provide wireless access to mobile clients Access Point and bridge all Ethernet data connected to the Ethernet ports The AP Bridge mode will pass all network traffic between connected devices including global network broadcasts See Figure 2 2 Access Point Router Mode In this mode the ESTeem Horizon will function as a router between wired Ethernet networks connected to the Horizon s Ethernet p...

Page 9: ... is required Access Point Repeater The Access Point Repeater is a unique enhancement of the ESTeem Horizon series The Access Point Repeater can be used with any of the above Access Point modes With this repeater feature enabled the Access Points do not have to be hardwired together on the same physical LAN to provide seamless Ethernet communication for roaming clients In addition to greatly extend...

Page 10: ...rks will need to be on separate subnets To communicate from wireless network to devices on the wired Station Router network a separate router connected to the Ethernet side of the Access Point is required This mode would be used where multiple Ethernet devices will be connected to a single Horizon in a mobile client application and the connected Ethernet devices will need to be accessible from the...

Page 11: ...oadband network can be used in a point to point or point to multi point application for networking serial RS 232C devices providing serial connections to legacy hardware in a new Ethernet network or providing for high bandwidth devices such as Video or Voice over IP in an existing serial network To begin setup of your wireless Ethernet network continue to Chapter 2 Staring Out of this User s Manua...

Page 12: ... is available both on the ESTeem Resource Disk and in the Help section of the program itself The ESTeem Horizon can also be programmed through the internal Web interface discussed in detail in Chapter 5 if you do not have access to the ENC Utility Phase 3 Install the ESTeem hardware and test communication After the ESTeem Horizon programming install the hardware in each remote location Chapter 8 o...

Page 13: ...CHAPTER 2 STARTING OUT Revised 19 Jan 16 2 2 EST P N AA107 Horizon Figure 1 Horizon Front Panel Overview Figure 2 Horizon Antenna Overview ...

Page 14: ... connector on the Horizon Figure 3 For a single antenna use Antenna Port 1 and connect both if using dual antennas 2 Assemble the Horizon hardware as shown in Figure 4 Figure 3 Antenna Configuration Diagram Technical Tips 1 Configure the Horizon prior to mounting 2 Attach antenna to the Horizon before powering up Figure 4 Hardware Configuration Diagram Leave Open Single Antenna Configuration Dual ...

Page 15: ...CHAPTER 2 STARTING OUT Revised 19 Jan 16 2 4 EST P N AA107 Horizon ...

Page 16: ...ill connect two or more ESTeem Horizon s while passing all network traffic that arrives in both the wireless and connected Ethernet ports including all global network traffic Figure 1 This mode will work in most wireless applications of the Horizon to wirelessly connect two or more remote Ethernet devices or networks The Ethernet bridge mode is also used in repeating Figure 2 and in self healing M...

Page 17: ...CHAPTER 3 EXAMPLE APPLICATIONS Revised 19 Jan 16 3 2 EST P N AA107 Horizon Figure 3 Multipoint Bridge with Mesh Networking Figure 2 Ethernet Bridge with Repeater ...

Page 18: ...reless network The Ethernet firewall mode AP Masquerade will allow Ethernet devices in the wireless network to request information from the Ethernet LAN network and receive a response but no traffic can be generated from the Ethernet LAN side Example Applications Wireless Ethernet networks connected to large company or plant Ethernet LAN networks AP Router Wireless Ethernet networks with a require...

Page 19: ...gure 5 The EtherStation mode is used to connect a single Ethernet device to the ESTeem Horizon If you are connecting the Horizon to multiple Ethernet devices in a mobile mode the Station Router or Station Masquerade will be required The Station Router will allow bi directional communication between the Ethernet devices connected to the Horizon and the wireless network while the Station Masquerade ...

Page 20: ...P Masquerade The Access Point mode will provide either a single wireless connection Figure 6 or overlapping coverage Figure 7 to create a canopy of wireless coverage for 802 11 devices The ESTeem Horizon in AP mode can function as both an Ethernet bridge or router and 802 11 AP simultaneously Figure 8 Example Applications Industrial long range 802 11 Wi Fi networks Hybrid networks of Ethernet brid...

Page 21: ...CHAPTER 3 EXAMPLE APPLICATIONS Revised 19 Jan 16 3 6 EST P N AA107 Horizon Figure 7 Overlapping Access Point Coverage Figure 8 Access Point and Ethernet Bridge ...

Page 22: ...NC Utility s User Guide on how the create a new wireless network Once you have a blank network configuration page Figure 9 select ESTeem from the menu items to display the drop down menu then select New New ESTeem 2 Enter in the ESTeem Horizon serial numbers used for the example for example enter E 14000 in the Set Serial Number Box and press the OK button Figure 10 The ENC Utility will look up th...

Page 23: ... Main Office or any other location name to match the example configuration Right Mouse click on the ESTeem icon and select Change Change Modem ID Figure 12 Enter Main Office in the pop up window and select OK 4 Duplicate the above procedure for each ESTeem Horizon added to the network Figure 11 Main Office ESTeem Horizon Figure 12 Change Modem ID ...

Page 24: ... a line to the other modem Figure 13 5 Verify both ESTeem modems are connected to the same switch as the computer running the ENC Utility and send the configuration to both modems at the same time by selecting ESTeem ESTeem Configuration Send Configuration to All ESTeems Figure 14 6 Once the ENC Utility has downloaded the configuration for both ESTeem Horizons the status box around the ESTeems wil...

Page 25: ...15 3 Verify all ESTeem modems are connected to the same switch as the computer running the ENC Utility and send the configuration to both modems at the same time by selecting ESTeem ESTeem Configuration Send Configuration to All ESTeems Once the ENC Utility has downloaded the configuration for both ESTeem Horizon s the status box around the ESTeem s will change from yellow to blue This indicates t...

Page 26: ...me by location Your layout should appear like Figure 16 2 Move the ESTeem Horizon icons on the screen to simulate the layout of the diagram Draw connection lines between the primary wireless links modems in the same order as the network layout Figure 17 3 To create the backup link between Remote 1 and Remote 2 and the other backup link from Remote 2 to the Remote Office draw a wireless connection ...

Page 27: ...ter running the ENC Utility and send the configuration to all modems at the same time by selecting ESTeem ESTeem Configuration Send Configuration to All ESTeems Once the ENC Utility has downloaded the configuration for both ESTeem Horizon s the status box around the ESTeem s will change from yellow to blue This indicates that the configuration was completed successfully and the ESTeem Horizon s ar...

Page 28: ...2 E 14003 Remote Site 3 1 Using the above procedure for adding ESTeem Horizons add the four ESTeem Horizons for this example and rename by location Your layout should appear like Figure 18 2 Move the ESTeem Horizon icons on the screen to simulate the layout of the diagram Draw connection lines between the wireless links modems in the same order as the network layout Figure 19 Figure 18 Router Mode...

Page 29: ...Continue through the configuration screens setting the AP Router addressing to match the IP address ranges for your network For help with setting the router addressing please refer to Router Address Examples later in this chapter You will end on the screen in Figure 22 Press the Finish button to return to the configuration page 6 Verify all ESTeem modems are connected to the same switch as the com...

Page 30: ...m s Once the ENC Utility has downloaded the configuration for both ESTeem Horizons the status box around the ESTeem s will change from yellow to blue This indicates that the configuration was completed successfully and the ESTeem Horizons are ready to be installed in the application ...

Page 31: ...of operation select Station Figure 23 2 Add the three mobile client modems to the ENC Utility configuration page as instructed above and set the Modem ID to match the three modes of operation Your configuration will appear as in Figure 24 EtherStation 3 By default the ENC Utility sets all station mode ESTeem modems to EtherStation mode The only adjustment necessary to the EtherStation modem in our...

Page 32: ...Utility and send the configuration to all modems at the same time by selecting ESTeem ESTeem Configuration Send Configuration to All ESTeems Once the ENC Utility has downloaded the configuration for both ESTeem Horizons the status box around the ESTeems will change from yellow to blue This indicates that the configuration was completed successfully and the ESTeem Horizons are ready to be installed...

Page 33: ...CHAPTER 3 EXAMPLE APPLICATIONS Revised 19 Jan 16 3 18 EST P N AA107 Horizon icon and select Change Change ESTeem Encryption Figure 27 ...

Page 34: ...1 6 Netmask 255 255 0 0 Default Route 172 17 1 6 Ethernet IP Address 172 17 1 6 Netmask 255 255 0 0 Static Route 172 20 0 0 255 255 0 0 gateway 172 16 2 22 Station Router Wireless IP Address 172 16 2 22 Netmask 255 255 0 0 Default Route 172 16 1 6 Ethernet IP Address 172 20 2 22 Netmask 255 255 0 0 Device IP address 172 17 X X Netmask 255 255 0 0 Default gateway 172 17 1 6 Device IP address 172 20...

Page 35: ...st Be on Separate Subnets ESTeem Horizon in Access Point Router Mode Ethernet IP Address 172 17 1 6 Wireless IP Address 172 16 1 6 Netmask 255 255 0 0 Default Route 172 17 1 6 ESTeem Horizon in Station Router Mode Netmask 255 255 0 0 Wireless IP Address 172 16 2 20 Ethernet IP Address 172 18 2 20 Gateway Route 172 16 1 6 Connected Ethernet Devices IP Address 172 18 X X Netmask 255 255 0 0 Gateway ...

Page 36: ...way 172 16 2 20 Routes for 172 19 0 0 network use gateway 172 16 2 21 Routes for 172 20 0 0 network use gateway 172 16 2 22 Routes for 172 16 0 0 network use gateway 172 16 1 6 Note Wireless Networks and Station Devices Must Be on Separate Subnets ESTeem Horizon in Access Point Router Mode Ethernet IP Address 172 17 1 6 Wireless IP Address 172 16 1 6 Netmask 255 255 0 0 Default Route 172 17 1 6 ES...

Page 37: ...STeem wireless modem for the network as designed Figure 1 The ENC Utility will eliminate the need to program or update each ESTeem wireless modem individually The ENC Utility can send all wireless modem configuration changes simultaneously to a new or existing network The ENC Utility will be used for all wireless network programming in this User s Manual For detailed instructions on the use of the...

Page 38: ... drive Note The ESTeem Resource Disk is a stand alone copy of the ESTeem Web site Figure 2 Navigation of the Resource Disk is as simple as using your web browser All technical documentation User s Manuals and the ESTeem Utility Program are available on the disk 1 Place the ESTeem Utility CD in your CD ROM drive The CD will auto load the ESTeem main page Note If the page does not auto load open you...

Page 39: ...Teem Discovery Program and press the Discover Modems button The Model 195E will be displayed in the program by the Ethernet MAC address and Current IP Address Figure 4 Note The SSID Mode of Operation and Modem ID will be adjusted through the ENC Utility or the Web Configuration Manager 5 Double click on the 195E you want to program and the Configure IP Address window will be displayed Figure 5 Ent...

Page 40: ...idate and then reboot with the updated operating system Opening Web Browser To quickly open a web browser page to the IP address programmed in the 195 modem right mouse click on the 195 s MAC address and select Open Browser from the menu Figure 6 If your computer is configured for the same IP subnet at the ESTeem 195 wireless modem you will be asked to sign in with the Username and Password Figure...

Page 41: ...ty Program are available on the disk 1 Place the ESTeem Utility CD in your CD ROM drive The CD will auto load the ESTeem main page Note If the page does not auto load open your web browser and set your address line to D index html Where D is the drive letter for your CD ROM drive 2 From the Main Page select ESTeem Utilities and click on EtherStation Status Utility Note This program is saved in a c...

Page 42: ...e for accurate log file entries 1 Select Advanced from the top Menu then Wireless LAN Settings wlan0 device Press the Next button Figure 9 2 Select Global Settings Set System Time from the menu and press the Next button to continue 3 Select the correct date and time from the drop down menus Figure 10 and press the Set System Time button to save the time to the real time clock Figure 9 Advanced Fea...

Page 43: ... to keep the time on the system accurate To allow time synchronization the Model 195E must be configured with the NTP Daemon enabled and the appropriate IP address of the upstream network NTP server 1 Select Advanced from the menu items and Global Variables Figure 11 2 Press the Next button and Figure 11 will be displayed At the bottom of the page are the NTP server configurations Figure 11 Advanc...

Page 44: ... time services from upstream services to keep the time on this system accurate 4 Next the NTP SERVICE ENABLE should be configured to YES if you want to allow the system to provide NTP service for clients wishing time synchronization Figure 12 5 The final step in configuring NTP services is to enter the IP address or the host name of the upstream NTP server Figure 12 NTP Settings ...

Page 45: ... the configuration changes and reboot Figure 13 VLAN OPERATION Virtual LAN VLAN systems are rapidly becoming the desired configuration on larger Ethernet networks The ESTeem 195E software will allow the Ethernet modems to transparently pass the VLAN packets for these networks The 195E currently can not be used as a VLAN switch but will pass VLAN tagged Ethernet packets through the wireless bridge ...

Page 46: ...andwidth is the second scaling problem Smart bridges or switches help alleviate the bandwidth problem by only passing traffic across the bridge if the destination host was on the other side This greatly increases the capacity and efficiency of the network by allowing two pairs of hosts communicating simultaneously on each side of the switched bridge Only when the packet needs to go to the other si...

Page 47: ...er all multicast traffic is wrapped in a Unicast frame and sent to all other repeater peers Figure 14 This operation allows the ESTeem network to receive an acknowledge packet and retransmit the data if the packet is lost during transmission This unicast encapsulation will work regardless if the protocol can support IGMP or not Figure 14 Repeater Peer Operation ...

Page 48: ...led and the network supports IGMP protocol the 195E will begin to identify the connected Ethernet devices using Multicast transmissions and report this information to the network As this process continues all sites that have Multicast traffic on the wireless network will only send these requests to the specific ESTeem reporting the Ethernet device see Figure 15 Figure 15 Repeater Peer with IGMP En...

Page 49: ...s that will increase the reliability of Multicast traffic The first phase is encapsulation of the multicast packets as described in the Repeater Peer and the second is IGMP Snooping if the network will support the protocol The encapsulation of the Multicast packets will operate regardless of the IGMP support to increase the reliability Figure 16 Unicast Packet to All Clients Figure 17 Unicast Pack...

Page 50: ...capsulateMulitcast to either Multicast for all Multicast including Broadcast or Broadcast Broadcast only Press the Accept Button and then Commit and Reboot Enabling IGMP Snooping To enable the ESTeem 195E for IGMP Snooping select Advanced Bridge Variables and press the Next Button Figure 19 Select IGMP Snoop to YES press the Accept Button and then Commit and Reboot Figure 18 Multicast Enable Figur...

Page 51: ...ree Memory UCD SNMP MIB memTotalFree 0 Total Free Memory Idle CPU UCD SNMP MIB ssCpuIdle 0 Percentage of CPU Idle per interface IP Address IF MIB ifAddress Port Speed IF MIB ifSpeed In bps Port Status IF MIB ifOperStatus Mac Address IF MIB ifPhysAddress per wlandev entry EST MIB wirelessDevicesNumber 0 Wireless Port Identification Device Name EST MIB wirelessDeviceTable 1 wName 1 Name of device wl...

Page 52: ...1 pFreq 1 Frequency in MHz current rate set EST MIB wirelessPeerTable 1 pCurRates 1 Current Operating Rates last rx signal EST MIB wirelessPeerTable 1 pSignal 1 Receive Signal in dBm last rx noise EST MIB wirelessPeerTable 1 pNoise 1 Background Noise in dBm BSSID EST MIB wirelessPeerTable 1 pBssid 1 Basic Service Set ID In Hex SSID EST MIB wirelessPeerTable 1 pSSID 1 SSID in Text isValid EST MIB w...

Page 53: ...a User Name and Password 3 For the User Name enter admin and press the Enter key Enter The User Name is defined at the factory and is not changeable 4 Enter your Password and press the Enter key Enter Note If this is the first time the Horizon has been programmed and the Password was not changed from the factory default values proceed with the steps below to access the Configuration Menu The facto...

Page 54: ...t password This page will also display the Modem ID field that can be used to easily identify the Horizon you are programming This Modem ID field can be set to any text combination for example location name GPS coordinates or addresses Setting the Modem ID 1 The Modem ID field can be adjusted under the Global Variables of the Advanced Menu tab Select Global Variables and press the Next button Figu...

Page 55: ...ation Manager Peer Status Table The Peer Status submenu lists the connected wireless devices Horizon s or 802 11 clients their signal strength data rate and time of last packet sent Press the View Peer Table link and Repeater Peer Status Table will be displayed Figure 6 For a detailed analysis of the information provided in this table please review Appendix E Troubleshooting Associated Station Thi...

Page 56: ...eaters see Chapter 6 Repeating Features Access Points This section will list all other 802 11 Access Points that are sharing the operating channel frequency of the Horizon You can also note that the Repeater Peers listed above are also included in this list Counter Details The Counter Details submenu will summarize all transmitted and receive data packets for the Horizon Figure 5 Figure 6 Peer Tab...

Page 57: ...See Figure 7 The System Details button will display a more detailed system diagnostics that may be requested by ESTeem technical support Setup Screen The Setup screen allows the step by step configuration of the Horizon Please see Chapter 5 for complete description on System Setup menu and examples for system configurations See Figure 8 Figure 7 System Log Screen Figure 8 Setup Screen ...

Page 58: ...zon enter this section unless instructed by ESTeem technical support See Figure 9 Backup Screen The Backup Screen saves the current configuration in the Horizon to a file on the computer or network See Figure 10 Pressing the Backup Button will create a configuration file that can be saved to the computer This saved file can then be later opened if necessary by the Restore menu to quickly replace a...

Page 59: ...itted Changes This button will remove any changes to the modem that have been done since the last committed changes The last committed changes will be read from the Flash file and reset in the Horizon File Pressing this button will bring up a selection of where the restore file was saved during the Backup Figure 12 Select Upload via web browser to browse for files saved on a local computer or sele...

Page 60: ...or the Internet to the Horizon s flash memory To upload from a file on your computer select Upload via web browser and a file selection window will be displayed To upload directly from the Internet select Download from an http or ftp URL and enter the site address See Figure 13 System Reboot Screen The Reboot screen allows the user to reset the Horizon See Figure 14 Figure 13 Software Update Scree...

Page 61: ...upply The Power over Ethernet PoE LED on the front of the ESTeem should be illuminated 4 If your computer is configured properly you will see the ESTeem Horizon booting sequence on your Terminal Emulation program Once the ESTeem boot sequence is complete approximately 45 seconds you will receive this message Please press Enter to active this console If you don t see this message press the Reset bu...

Page 62: ...oute pressing the Enter key after each entry 10 After the basic parameters have been entered into the Horizon you will need to commit the changes to the Horizon Figure 3 Press the C key and then Enter The changes will be saved to flash memory You can use programming features in the ESTeem Web Configuration Manager to configure the unit for your application Figure 2 RS 232 Welcome Screen Figure 3 R...

Page 63: ... during the standard setup of the Horizon After completion of the Repeater Peer configuration screen the Serial Port Setup screen Figure 5 will be displayed Each section in the Serial Port Setup screen is described in detail with the following Enable the RS 232 Data Port Enabling the serial data port allows the modem to send RS 232 data over the broadband wireless connection established with the E...

Page 64: ...ect the number of data bits on the RS 232 connection to match your serial device Stop Bits Select the number of stop bits on the RS 232 connection to match your serial device Parity Select the parity of the RS 232 connection to match your serial device Figure 5 Serial Configuration Screen ...

Page 65: ...et to the IP address of the Root Bridge modem Serial IP Port Number The ESTeem configured for the correct destination IP and port number will send and receive the serial data from another modem Set the IP port numbers to match where the serial data will be sent The serial data will not be sent if both the IP address and port number is not correct Maximum Packet Size This number represents the maxi...

Page 66: ...CHAPTER 6 SERIAL APPLICATIONS Revised 19 Jan 16 6 6 EST P N AA107 Horizon Figure 6 Serial Full Redirector Example ...

Page 67: ...te will be based upon the priority level set during configuration This wireless Meshing technology allows the RF network to self heal if any of the communication paths fail The routing priority is manually set during the configuration of the Horizon A manual path configuration is far superior to standard self discovery networks because you have direct control over the best RF paths and can easily ...

Page 68: ...N WLAN MAC address of each Model Horizon that will have direct communications must be added to the Repeater Peer List Finally enabling the link allows the corresponding Horizon to be included in the communication routing Mobile clients do not require input in the repeater peer table If multiple Mesh routes are configured you will also need to set the values for Priority and Path Costs explained in...

Page 69: ... MAC address All path costs are evaluated against this Root Bridge device to determine routing and which paths will be blocked On a wired Ethernet network the location of the Root Bridge is not really important but in a wireless network selection of the Root Bridge is critical to the wireless network routing Let s use one of the Example network diagrams from Chapter 3 to continue the discussion Fi...

Page 70: ...n the two sites is the shortest route lowest Path Length and will be selected as the primary route unless overridden by manually changing the Path Length in the configuration Path Length If more than one communication path to the Root Bridge is found the Horizon must determine which route to take based upon the lowest Path Length The default path length to all links in the Horizon network is 1 If ...

Page 71: ...kup The ESTeem Model Horizon configured in Access Point Repeater mode will automatically function as a redundant backup if two Model Horizon s are installed at the same location Figure 7 If two Model Horizon s are connected to the same switch one of the Model Horizon s will be Blocked when the Spanning Tree Protocol is completed The network will continue to use this route until any problem with th...

Page 72: ...ti point system or 15dB in a point to point network Antennas not included in this list or having a gain greater 6 dB in a multi point system or 15dB in a point to point network are strictly prohibited for use with this device The required antenna impedance is 50 ohms Part Number AA20DMEg Omni directional direct mount antenna 5 dBi gain Indoor and outdoor applications There must be a minimum separa...

Page 73: ...oning or removal is not recommended after 2 minutes of wrapping 3 Apply an electrical coating sealing agent over the vapor barrier patch for added protection See Note 3 NOTES 1 Dow Corning RTV 3140 or equivalent 2 CoaxWrap CW10B or equivalent 3 SCOTCHKOTE 3 M Company or equivalent ANTENNA DIVERSITY The dual diversity antenna configuration on the ESTeem Model 216An allows the radio to operate more ...

Page 74: ...be configured for either a single receive antenna external mount antennas or dual diversity antenna setup To access the port configuration open ESTeem Web page using your computer s Web Browser as per instructions in Chapter 5 Select Advanced from the menu items and Radio Settings wlan0 device Figure 1 Figure 2 Advanced Settings Menu ...

Page 75: ...u will be displayed The receive antenna is configured by selecting the wlan0_dot11CurrentRXAntenna drop down Figure 3 and selecting the receive antenna A value of 0 Dual diversity Both antenna Ports A B will be used to receive A value of 1 Single receive source Antenna Port A only Figure 3 Receive Antenna Settings Menu ...

Page 76: ... of 2 25 OD Any mounting structure greater than 2 requires hose clamp strapping run through the Pole Mount Brackets The mounting kit requires the following assembly 1 If you purchased an AA195PM mounting kit with your Model 216Ang the kit will be packed in the same packing box as the ESTeem Figure 4 2 Remove and inventory the two 2 Pole Mounting Brackets one 1 Two Hole Face Plate Cover with single...

Page 77: ...nventory the AA195PM Hardware bag for all the components listed in Figure 5 4 Assemble the two Pole Mounting Brackets with the included U bolts hardware and Pole Mount Clamps Reference Figure 6 5 Place the four supplied 10 24 x 1 Phillips Pan Head screws through the mounting holes of the Heat Shield and attach to the top of the ESTeem 216Ang Figure 7 Figure 6 Pole Mount Assembly ...

Page 78: ...to the ESTeem Model 216Ang with the 10 24 x 1 Phillips Pan Head screws through the top of the heat shield Reference Figure 8 Heat Shield removed for detail Figure 7 Heat Shield Attachment Figure 8 Pole Mount Connection to Case Heat Shield Removed for Detail Ethernet Cable Boot Figure 9 Ethernet Cable Assembly ...

Page 79: ...train relief fins in the Face Plate Cover Figure 11 to secure the cable and provide strain relief for the connector If a second Ethernet cable is installed remove the second port cover and route cable 10 Plug the CAT 5e Ethernet cable to the Model 216Ang s Ethernet port and secure the Face Plate Cover with the attached thumb screw Verify that the weatherproof seal on the Face Plate Cover is sealed...

Page 80: ...CHAPTER 8 ANTENNA SETUPS Revised 10 Mar 16 8 9 EST P N AA107 Horizon ...

Page 81: ...aution Always mount the 216Ang vertically with the antenna ports on top Figure 12 Face Plate Cover Installed on ESTeem Figure 13 Completed AA195PM Mounts Direct Mount Antenna Boots Port A EST Approved Direct Mount Antenna Only Port B EST Approved External Antenna With Factory Installed Boot Weather Proof Boot NOTE Remove Plastic Connector Cover Before Installation Face Towards The South North Amer...

Page 82: ... outdoor shielded CAT 5E Ethernet cable This cable provides three necessary elements Ethernet data DC Power over Ethernet PoE applications and a ground from the 216An case to the AA166 surge protector The Ethernet cable is outdoor rated and protected from UV breakdown Installation The following diagram outlines all the critical components and connections in the 216An series system The Earth ground...

Page 83: ...esnel Zone blockage introduces little signal loss to the link Beyond 40 blockage signal loss will become significant This calculation is based on a flat earth It does not take into account the curvature of the earth It is recommended for RF path links greater than 7 miles to have a microwave path analysis done that takes the curvature of the earth and the topography of the terrain into account Fre...

Page 84: ...ormation Model 216An Direct Sequence OFDM Spread Spectrum Device USA FCC ID ENPEST216AN Canada IC No 2163A 216AN The equipment has been tested and found to comply with the limits for a Class B digital device pursuant to Part 15 of the FCC Rules These limits are designed to provide reasonable protection against harmful interference when the equipment is operated in a commercial environment This equ...

Page 85: ...ans Office OR 2424 Edenborn Ave Suite 460 Metarie LA 70001 MARYLAND 1017 Geo Fallon Building 31 Hopkins Plaza Baltimore MD MASSACHUSETTS Boston Office BS 1 Batterymarch Park Quincy MA 02169 7495 MICHIGAN Detroit Office DT 24897 Hathaway Street Farmington Hills MI 48335 1552 MINNESOTA 691 Federal Building 316 N Robert St St Paul MN MISSOURI Kansas City Office KC 520 NE Colbern Road Second Floor Lee...

Page 86: ...nt with IEEE 802 3at 2009 Power Over Ethernet Plus PoE to provide both data and power over the same CAT 5E grade Ethernet cable The port is compatible with TIA EIA 568B cable configuration Figure 1 A second Ethernet port is included with the ESTeem Horizon This second Ethernet port can be configured to bridge to the primary Ethernet port or configured to communicate on the Wireless or Ethernet sid...

Page 87: ...orizon Ethernet port supports both client and server Dynamic Host Configuration Protocol DHCP Figure 2 shows the DHCP host configuration screen that will be shown if DHCP server is selected in the setup screens Enter the values that match the DHCP configuration for your network Figure 2 DHCP Server Configuration ...

Page 88: ...PROGRAMMING PORT PIN OUT TABLE ESTeem Model AA0621 RS 232C Port Pin Out Table RJ 45 Pin No Function DB 9 Pin No 4 Signal Ground GND 5 5 Receive Data RxD 2 6 Transmit Data TxD 3 RS 232C DATA PORT CONFIGURATION The ESTeem Horizon has an RS 232C data interface in a RJ 45 connector on the front panel See Chapter 6 for further information on serial data port configuration To interface the Horizon to th...

Page 89: ...y drops below the required minimums for reliable communications the Horizon will reduce the data rate to the next lowest step to increase signal quality Conversely if the signal quality increases above the minimums the Horizon will increase the RF data rate the next highest level The ESTeem Horizon is set at the factory to operate at maximized scaling speed data rates and should not need adjustmen...

Page 90: ...from the advanced configuration menu The output power is adjusted on the Advanced Menu Wireless LAN Settings Wlan0 Device screen Figure 4 of the Web Configuration Manager Select the value and press the Save Settings button Max Maximum Full Power Hi High 75 Power Lo Low 50 Power Min Minimum 25 Power Figure 5 Power Level Settings Figure 4 Advanced Global Variables ...

Page 91: ...the secure wireless networking session Wi Fi Protected Access 2 with Enterprise Server WPA Enterprise Like WPA2 PSK WPA2 Enterprise verifies the authenticity of the Access Point and client but uses an 802 1x backend authentication server handling the authentication decision The most commonly type of authentication server is a RADIUS server The ESTeem Horizon can be configured to operate with an es...

Page 92: ...e changed The MAC address is traceable through the IEEE governing body to the manufacturer and is the fingerprint for all Ethernet devices Using a combination of both the WPA or 128 Bit WEP encryption and the ACL filter provide the ESTeem an extremely secure wireless networking layer DISABLING BROADCAST PROBES AND HIDING SSID A simple but very effective way of securing a network is to make the net...

Page 93: ...s points allow you to control access based on the MAC address of the NIC attempting to associate with it If the MAC address of your NIC isn t in the table of the access point you won t associate with it And while it s true that there are ways of spoofing a MAC address that s been sniffed out of the air it takes an additional level of sophistication to spoof a MAC address The downside of deploying ...

Page 94: ...Status Screen from the Web Interface After press the Status tab at the top of the screen the Status Summary will be displayed showing the status of all ports and memory in the Horizon Under the Wireless Status heading click on the View Peer Table Figure 2 The Peer Table will list all other Wifi Horizong and Horizona only or mobile client wireless activity seen by the Horizon and how it is classifi...

Page 95: ...the last data packet received by the Horizon This may not be the data rate between the radio modems Note that the speed is listed in kbps so that 11000 kbps is equal to 11 Mbps Note The ESTeem Horizon uses spread spectrum technology that analyzes each data packet for signal strength and data quality strength vs noise The higher your signal the mare background noise you can sustain without causing ...

Page 96: ...F link To view the link information click on the Opposite Modems WLAN MAC address in the Repeater Peer list Figure 2 and further link status information will be displayed Figure 3 Once loaded click on View Peer Rate Control Information Figure 4 The value of the Current TX rate is the RF data rate between the two ESTeem Horizon Figure 3 Peer Summary Table Figure 4 Rate Control Information ...

Page 97: ...ation is required LONG RANGE POINT TO POINT APPLICATIONS The factory configuration on the Horizon is optimized for distances up to 10 miles If your application has an RF link with a range greater than 10 miles you will need to set the maximum range value on both ESTeem Horizon s on this communication link To access the Maximum Distance value select Advanced from the top Menu then Wireless LAN Sett...

Page 98: ... Mode have a matching SSID or ESSIS set the same as the Horizon and that all encryption codes are the same My Wireless LAN card shows a solid connection but I can not pass any data Verify the encryption and the ACL setting on the Horizon match the wireless LAN card Access Point Repeater Mode How long does it take to re establish the Wireless Ethernet Network If a communication link is lost and the...

Page 99: ... use the EtherStation Status program What IP address do I configure the ESTeem in EtherStation mode The Horizon will not have an IP address in EtherStation mode I can not link my device into the wireless network Verify that the MAC address of the device is exactly the same as configured in the Horizon The MAC address must have colons between the values Can I connect my Horizon in EtherStation mode...

Page 100: ...Off Receiver On Off Power Requirements Receive 600ma 12 VDC Transmit 1 350A Cont 3A Peak 12 VDC PoE Power Supply IEEE 802 3at 30 watts opt External Power Input 10 to 28 VDC 3A Input Output Connectors Ethernet Port 1 10 100 RJ 45 Female Ethernet Port 2 10 100 802 11 Compatibility 802 11n g b RS 232C Comm Port 2 400 to 115 2 K baud RJ 45 Female RS 232C Programming Port 38 400 N 8 1 Antenna Input Out...

Page 101: ...APPENDIX F 216An SPECIFICATIONS Model 195Eg Case Specifications Revised 10 Mar 16 APX F 2 EST P N AA107 Horizon ...

Page 102: ...Vertical Impedance 50 ohms Gain 5 dBi 3 dBd VSWR 2 1 Power 10 W Front To Back Ratio n a Horizontal Beamwidth n a Vertical Beamwidth n a Antenna Material Polyurethane Plastic Radome Recommended Mounting Hardware n a Antenna Connector TNC R Male Flexibility 20 Antenna Envelope 8 28 in length by 54 in width Temperature 40 to 70 C Weight 33 grams Model AA20DMEg Caution Omni directional antenna should ...

Page 103: ... degrees power Antenna Material Sealed in UV stable fiberglass enclosed radome Mounting Hardware Stainless steel U bolts included for mounting up to 1 5 8 in diameter pipe Antenna Connector TNC R Male with 36in pig tail Maximum Power Input 5 Watts Antenna Envelope 4 5 in length by 3 in diameter Windload RWV 125 mph Lateral Thrust at Rated Wind 5 8 lbs Wind Surface Area 0 060 ft2 Weight 1 lbs Model...

Page 104: ...te with mounting hardware Designed for masts of up to 2 5 in O D Antenna Connector TNC R Male with 36 in pig tail Maximum Power Input 10 Watts Wind Survival 100 mph Wind Load 16 mph Antenna Envelope 34 in length by 17 in width by 11 in height Weight 3 lbs Use of the AA204Eg 1 directional antenna is limited to fixed point to point applications only In accordance with FCC Section 15 247 b iii this a...

Reviews: