


324
Status Menu Error Codes
If a job does not complete successfully, you can check the error code on the product control panel. Press
the
Status
button, select
Job History
, and locate the incomplete job. Select the job to display the error
code and additional information.
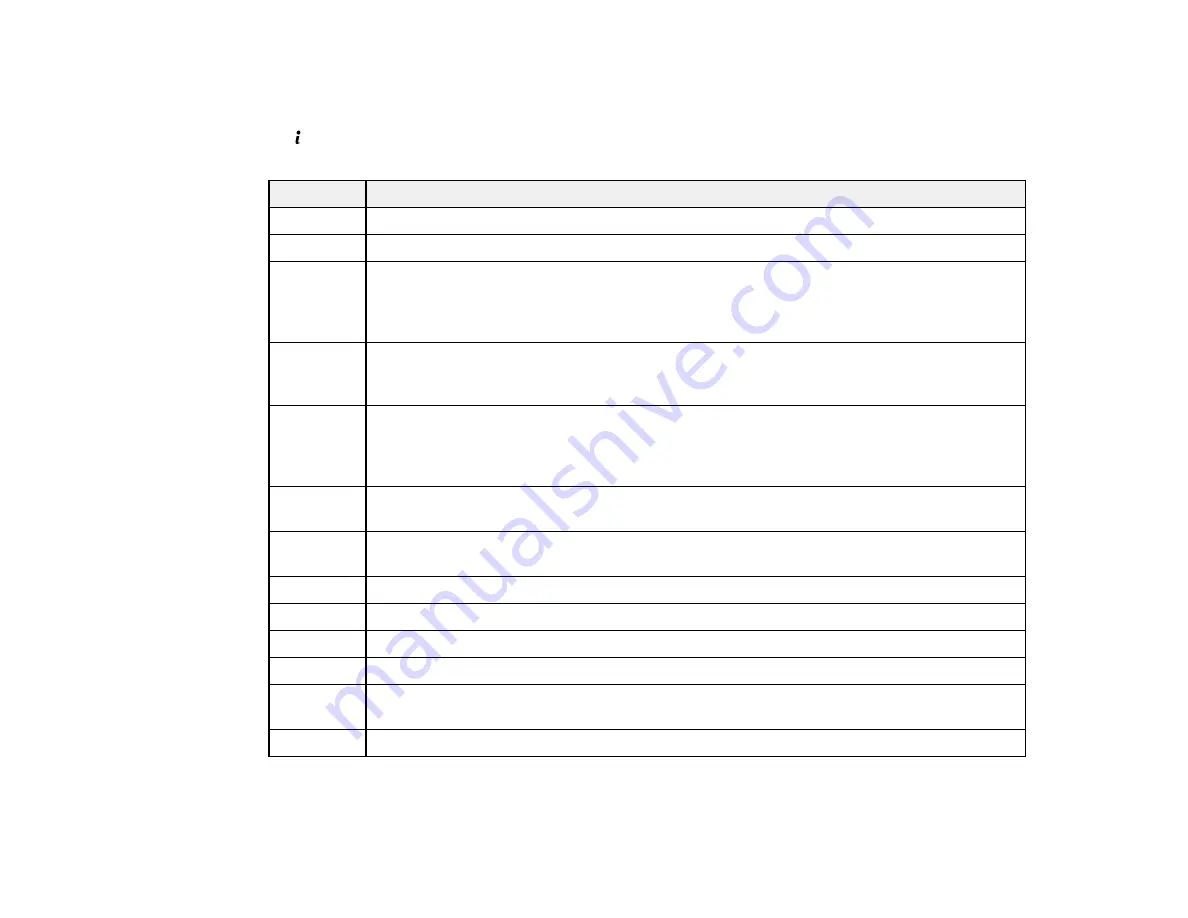
Code
Condition/solution
001
The product was turned off by a power failure. Resend the job.
101
Memory is full. Reduce the size of the print job.
102
Collated printing has failed due to a lack of available memory. Clear fonts and macros
from the product's memory by selecting
Setup
>
System Administration
>
Clear
Internal Memory Data
>
Clear Font and Macro
. You can also try reducing the size of
the print job or print one copy at a time.
103
Print quality was decreased due to a lack of available memory. If the quality of the printout
is unacceptable, try simplifying the page by reducing the number of graphics or the
number and size of the fonts.
104
Reverse printing has failed due to a lack of available memory. Clear fonts and macros
from the product's memory by selecting
Setup
>
System Administration
>
Clear
Internal Memory Data
>
Clear Font and Macro
. You can also try reducing the size of
the print job.
106
Cannot print from the computer due to access control settings. Contact your network
administrator.
107
User authentication failed and the job has been canceled. Contact your network
administrator.
108
Confidential job data was deleted when the product was turned off.
109
The received fax was already deleted.
110
The job was printed 1-sided because the loaded paper does not support 2-sided printing.
111
Available memory is running low. Reduce the size of the print job.
201
The product's memory is full. You can send pages individually, or print received faxes and
delete them to free up memory space.
202
The line was disconnected by the recipient's fax machine. Wait a moment, then try again.
Summary of Contents for WF-R5690
Page 1: ...WF R5690 User s Guide ...
Page 2: ......
Page 42: ...42 Parent topic Using Google Cloud Print Related topics Wi Fi or Wired Networking ...
Page 74: ...74 2 Open the feeder guard and pull up the paper support 3 Slide out the edge guides ...
Page 193: ...193 You see this window ...
Page 215: ...215 4 Click OK Parent topic Scanning ...
Page 238: ...238 You see this window 3 Select Fax Settings for Printer Select your product if prompted ...
Page 249: ...249 You see this window 3 Select Fax Settings for Printer Select your product if prompted ...
Page 250: ...250 You see this window 4 Select Speed Dial Group Dial List ...
Page 416: ...416 3 16 CPD 41354R2 Parent topic Copyright Notice ...


