


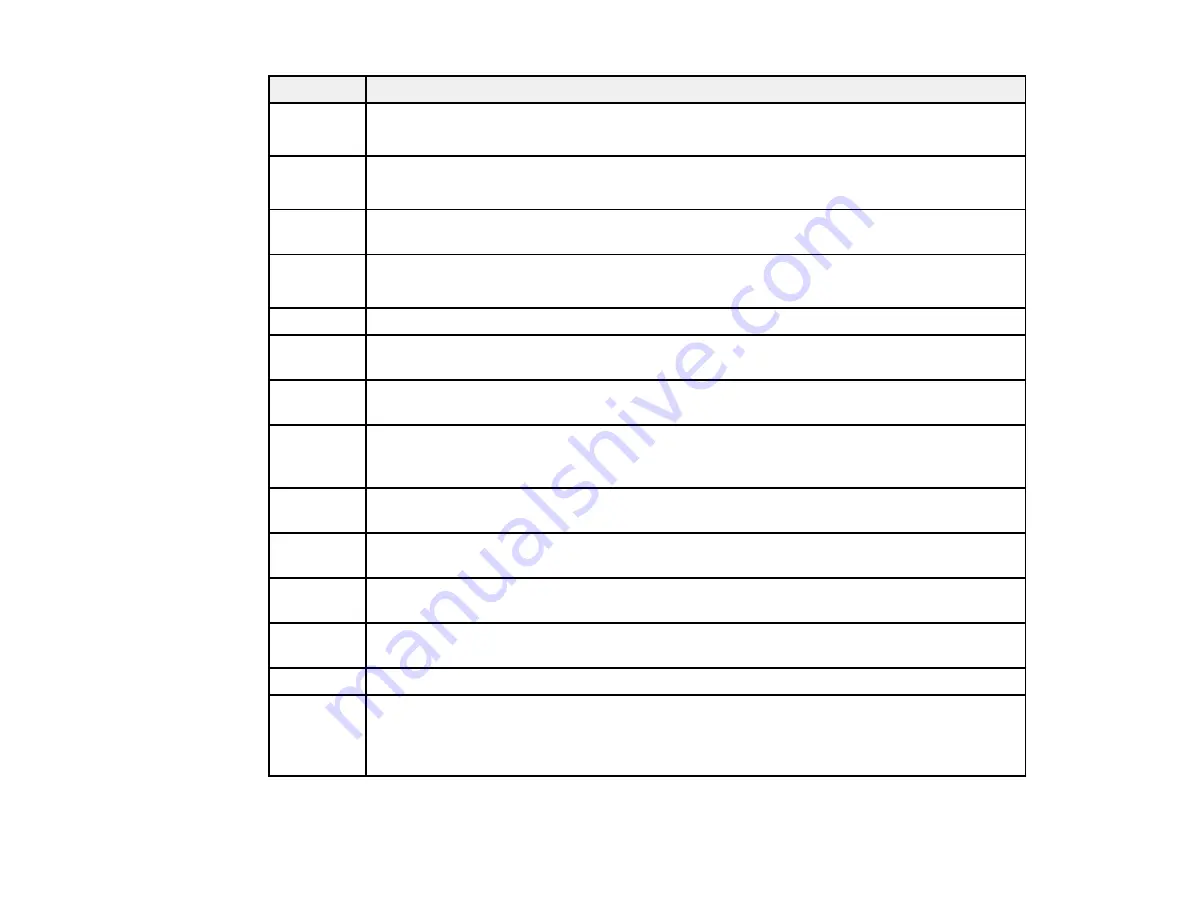
368
Code
Condition/solution
312
412
An authentication error has occurred. Check the Server Settings in the Setup menu.
313
413
A communication error has occurred. Check the network connection or Server Settings in
the Setup menu.
314
The data size exceeds the maximum size for the attached files. Increase the
Attached
File Max Size
setting in the scan settings or lower the file size of the scanned image.
315
327
The memory is full. Retry after other ongoing jobs have finished.
322
An authentication error occurred. Check the
Location
settings.
323
A communication error has occurred. Check the
Location
settings or the network
connection.
324
A file with the same name already exists in the specified folder. Delete the duplicate file or
change the file name prefix in
File Settings
.
325
326
There is not enough storage space available in the specified folder. Increase the storage
space in the specified folder, delete unnecessary files, or lower the file size of the
scanned image.
328
The destination was wrong or the destination does not exist. Check the
Location
settings.
331
A communication error occurred while acquiring the destination list. Make sure the
product is connected to the network correctly.
332
There is not enough space available for saving the scanned files in the specified folder.
Delete unnecessary files from the specified folder.
333
The destination could not be found because the destination information was uploaded to
the server before sending the scanned data. Select the destination again.
334
An error occurred while sending the scanned data.
341
A communication error has occurred. Make sure the product is connected to the computer
or network correctly. Make sure you have installed Document Capture Pro or Document
Capture. Make sure the Event Manager program is not being blocked by your firewall or
security software.
Summary of Contents for WF-C869R
Page 1: ...WF C869R User s Guide ...
Page 2: ......
Page 20: ...20 8 Attach the front cover to the stands 9 Remove the output tray from the product ...
Page 25: ...25 5 Remove the output tray 6 Remove paper cassette 2 from the product ...
Page 56: ...56 8 Optional cabinet 1 Rear paper feed edge guides 2 Paper support and extension ...
Page 74: ...74 Parent topic Product Basics Related topics Wi Fi or Wired Networking ...
Page 223: ...223 You see an Epson Scan 2 window like this ...
Page 225: ...225 You see an Epson Scan 2 window like this ...
Page 230: ...230 You see this window ...
Page 246: ...246 DSL connection 1 Telephone wall jack 2 DSL filter 3 DSL modem ...
Page 247: ...247 ISDN connection 1 ISDN wall jack 2 Terminal adapter or ISDN router ...
Page 329: ...329 6 Pull out rear cover 2 D2 7 Remove the roller cover inside the printer ...
Page 334: ...334 5 Open the rear cover E that matches with the paper cassette you removed ...
Page 343: ...343 You see a window like this 4 Click Print ...
Page 354: ...354 Parent topic Adjusting Print Quality Related topics Loading Paper ...
Page 388: ...388 3 Carefully remove any jammed paper 4 Pull out rear cover 2 D2 ...
Page 390: ...390 2 Open rear cover E on the optional paper cassette unit with the jammed paper ...
Page 393: ...393 4 Carefully remove any jammed pages ...
Page 394: ...394 5 Close the ADF cover then raise the document cover ...
Page 395: ...395 6 Carefully remove any jammed pages 7 Lower the document cover ...


