153
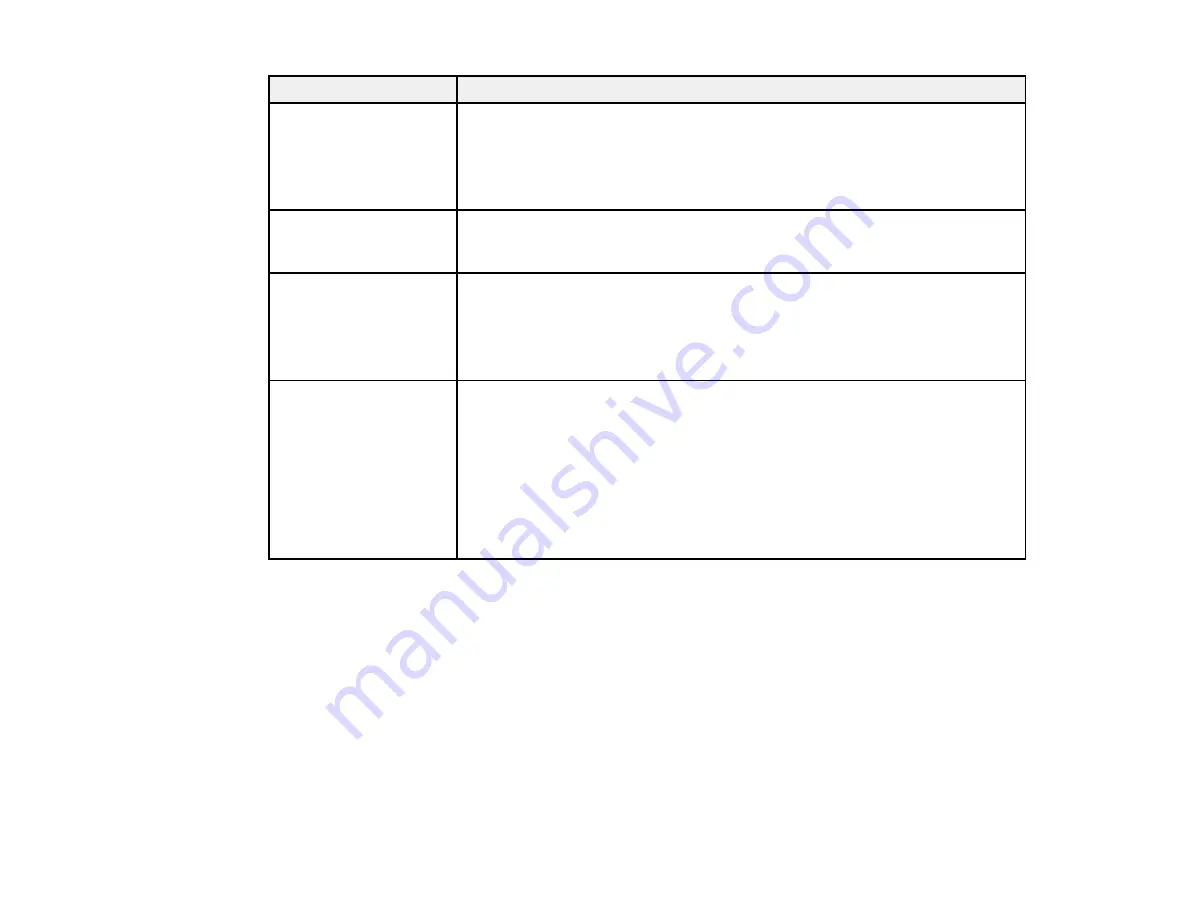
LCD screen message
Solution
Roll Type Error
Release and then reset
the media loading lever,
then match Roll Type
setting to actual media.
Make sure the
Roll Type
setting is correct for the loaded media. Follow the
on-screen instructions to clear the error.
Refer to manual and
perform regular
cleaning.
You have not peformed regular cleaning for one month. If you do not clean
the print head, nozzle clogs or print head damage may occur.
Maintenance Request
Replace Part
Now/Replace Part Soon
XXXXXXXXXX
The indicated product part is nearing or at the end of its service life. Contact
Epson for support and provide them with the service code shown on the LCD
screen.
You must replace the part before printing again. If you continue to print, a call
for service occurs.
Call For Service
XXX Error XXX
Power off and then on. If
this doesn't work, note
the code and call for
service.
A call for service occurs when:
• The power cable is not connected securely
• An error occurs that cannot be cleared
When a call for service has occurred, the printer automatically stops printing.
Turn off the printer, disconnect the power cable from both the outlet and the
printer, and then reconnect them. Turn the printer on and off several times. If
the same call for service is displayed on the LCD screen, contact Epson for
support and provide them with the service code shown on the LCD screen.
Parent topic:
Related references
Where to Get Help
Environmental Specifications
Media Setup Menu Settings
Printer Setup Menu Settings
Related tasks
Replacing the Waste Ink Bottle
Replacing the Chip Unit and Refilling Ink
Cleaning the Print Head
Summary of Contents for SureColor F9370
Page 1: ...Epson SureColor F9370 User s Guide ...
Page 2: ......
Page 30: ...30 11 Firmly push the right roll core holder into the roll core ...
Page 55: ...55 3 Align the right roll core holder with the right edge of the media ...
Page 94: ...94 1 Open the ink inlet cover for the High Density Black ink shown here ...
Page 95: ...95 2 Grasp the loop at the top of the ink inlet cap and slowly remove the ink inlet cap ...
Page 104: ...104 8 Open the ink inlet cover ...
Page 107: ...107 Rest the stirring stick on the tab at the edge of the tank as shown ...
Page 108: ...108 10 Cut or tear off the ink pack spout seal ...
Page 127: ...127 1 Raise the stopper on the waste ink bottle ...
Page 128: ...128 2 Lift up the waste ink bottle and remove it from the holder as shown ...
Page 133: ...133 8 Lift up the tab on the flushing pad and remove the pad ...
Page 137: ...137 5 Align the white line on a new media edge guide with the edge of the platen ...
Page 146: ...146 Maintenance Supplies Maintenance Menu Settings ...
Page 170: ...170 14 Rotate the left roll core handle until part A is fully inserted as shown ...
Page 179: ...179 28 Remove the roll core 29 Remove the adjustment tool from the roll core ...


