Epson STYLUS CX3600 Basic Operation Manual Download Page 17

Product Information

17

Eng

lish

Product Information

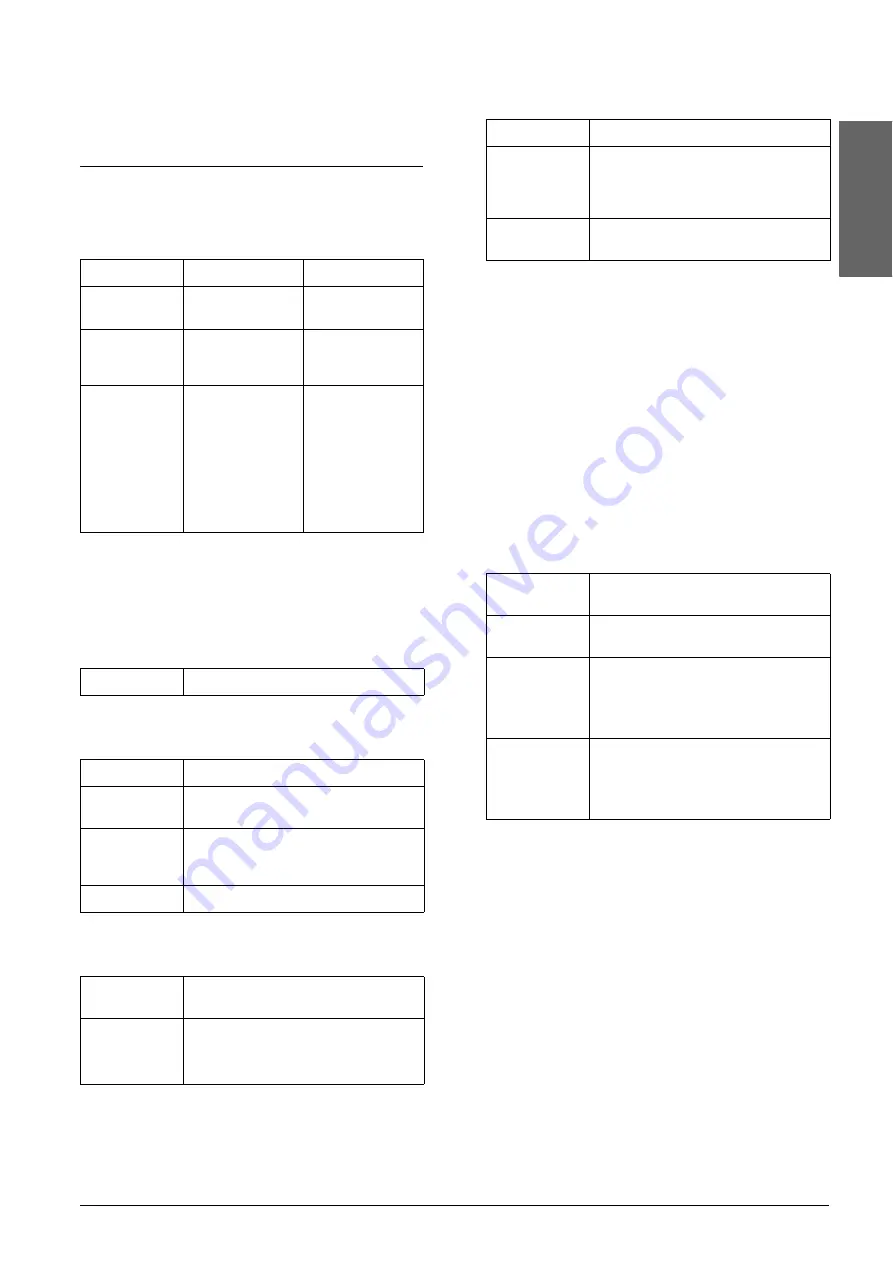
Product Specifications

Electrical

Note:

Check the label on the back of this product for the voltage 
information.

Environmental

Mechanical

Printing

Scanning

Paper

Note:

Since the quality of any particular brand or type of paper 
may be changed by the manufacturer at any time, EPSON 
cannot guarantee the quality of any non-EPSON brand 
or type of paper. Always test a sample of paper stock before 
purchasing large quantities or printing large jobs.

Paper specifications

These specifications are only those for when the 
product is used as a stand-alone copier or printer. 
See the 

Online Reference Guide

 for the full 

specifications of this product.

Note:

Poor quality paper may reduce the print quality and 
cause paper jams or other problems. If you have print 
quality problems, switch to a higher grade paper.

Do not load curled or folded paper.

Use paper under normal conditions:
Temperature 15 to 25°C (59 to 77°F)
Humidity 40 to 60% RH

The temperature and humidity values listed above are 
the recommended storage conditions for paper and are 
not the specifications for the operating conditions of 
this product.

Model

100-120V

220-240V

Input voltage 
range

90 to 132V

198 to 240V

Rated 
frequency 
range

50 to 60 Hz

50 to 60 Hz

Power 
consumption

Approx. 12 W 
(Standalone 
copying 
ISO10561 Letter 
pattern)
Approx. 2.5 W in 
sleep mode 
Approx. 0.2 W in 
power-off mode

Approx. 12 W 
(Standalone 
copying 
ISO10561 Letter 
pattern)
Approx. 2.5 W in 
sleep mode 
Approx. 0.4 W in 
power-off mode

Temperature

Operation:10 to 35°C (50 to 95°F)

Paper path

Sheet feeder, rear entry

Sheet feeder 
capacity

About 100 sheets at 64 g/m² (17 lb) 
paper

Dimensions

430 mm 

×

 344 mm 

×

 170 mm 

(W 

×

 D 

×

 H, not including rubber feet 

and loading tray)

Weight

6.52 kg (14.4 lb) without ink cartridges

Printing 
method

On-demand ink jet

Nozzle 
configuration

Monochrome (black) 90 nozzles

Color (cyan, magenta, yellow) 270 
nozzles (90 nozzles per color)

Scanner type

Flatbed color image scanner

Document 
size

8.5 

×

 11.7" (216 

×

 297 mm) A4 or US 

letter size
(The reading area can be specified 
from your software.)

Scanning 
resolution

600 dpi (main)
1200 dpi (sub)

Size

A4 (210

×

297 mm)

10

×

15 cm/4

×

6" (101.6

×

152.4 mm)

Paper types

Plain bond paper,
DURABrite Photo Paper

Thickness

For plain bond paper:
0.08 to 0.11 mm (0.003 to 0.004 inch)

For photo paper:
0.23 mm (0.009 inch)

Weight

For plain bond paper:
64 g/m² (17 lb) to 90 g/m² (24 lb)

For photo paper:
206 g/m

2

 (55 lb)

Summary of Contents for STYLUS CX3600

Page 1: ...Printing or Scanning Printing from Your Computer 9 Scanning to Your Computer 9 Canceling Printing 9 Replacing Ink Cartridges Choosing Ink Cartridges 10 Precautions on Ink Cartridge Replacement 10 Replacing an Ink Cartridge 11 Maintenance Checking the Print Head Nozzles and Remaining Ink Levels 13 Cleaning the Print Head 13 Aligning the Print Head 14 Troubleshooting Using the Error Light and Other ...

Page 2: ...ing and maintenance instructions Seiko Epson Corporation shall not be liable for any damages or problems arising from the use of any options or any consumable products other than those designated as Original Epson Products or Epson Approved Products by Seiko Epson Corporation Seiko Epson Corporation shall not be held liable for any damage resulting from electromagnetic interference that occurs fro...

Page 3: ...t the total ampere rating of all devices plugged into the wall outlet does not exceed the wall outlet s ampere rating If you plan to use this product in Germany the building installation must be protected by a 10 or 16 amp circuit breaker to provide adequate short circuit protection and over current protection for this product When handling ink cartridges Do not shake the ink cartridge after remov...

Page 4: ...ll be made To make between 10 and100 copies make sure that is displayed then insert the same amount of sheets in the feeder as the number of copies you want made If you make up to 99 copies a paper outerror will occur when this product finishes making copies and runs out of paper To clear the error press the y Stop button 1 appears in the LED window if this button is pressed when is displayed Plai...

Page 5: ...to use it until it is empty On Indicates that an ink cartridge is empty or missing Copy LED window 1 to 9 Indicates the number of copies Indicates that 100 copies will be made E Indicates that an error has occurred H Indicates that the adjust lever has been set to the position L Indicates that the adjust lever has been set to the standard m position dot Indicates that the control panel is operatin...

Page 6: ...ide it into the sheet feeder 5 Slide the left edge guide so that it meets the left edge of the paper Note Always load paper short edge first into the sheet feeder Make sure that the paper stack is flush with or lower than the triangular load limit mark on the edge guide Make sure that the paper is loaded under the tabs inside the edge guides Ensure that you set the adjust lever to the m position I...

Page 7: ... as shown in the following table Refer to the appropriate section that follows for the detailed procedures on making copies with each mode Standard Copying 1 Follow the steps in Loading Paper on page 6 2 Follow the steps in Placing a Photo or Document on the Document Table on page 7 3 Press the Copy button repeatedly until the desirednumberofcopiesisdisplayedintheLED window Note To make between 10...

Page 8: ...hoto Paper 5 Press the paper size button to select A4 or 10x15 For moreinformation aboutselectingpapersize see Buttons on page 4 6 Press the Fit to Page button The Fit to Page light comes on 7 Proceed with step 6 in Standard Copying on page 7 Small Margin Copying 1 Follow steps 1 to 3 in Standard Copying on page 7 2 Press the paper type button to select Photo Paper Note You cannot make a copy with...

Page 9: ...ation you are using For details see the documentation provided with your application For detailed information on print settings see the Online Reference Guide Scanning to Your Computer 1 Follow the steps in Placing a Photo or Document on the Document Table on page 7 2 Start EPSON Smart Panel For more information see Starting EPSON Smart Panel in the Online Reference Guide 3 Click the Scan and Save...

Page 10: ...tely following the removal of the current ink cartridge If the ink cartridge is not installed promptly the print head may dry out rendering it unable to print Be careful not to break the hooks on the side of the ink cartridge when you remove it from its package Do not remove or tear the label on the cartridge otherwise ink will leak This product uses ink cartridges equipped with an IC chip The IC ...

Page 11: ...ves to the ink cartridge replacement position without moving to the ink cartridge check position Proceed to step 5 c Caution Do not move the print head by hand as this may damage this product Always press the H Ink button to move it 4 Press the H Ink button If more than one ink cartridge is empty or low the print head moves so that the empty or low ink cartridge is indicated by the _ mark This occ...

Page 12: ...icks into place then close the scanner unit 10 Press the H Ink button The unit begins charging the ink delivery system This process takes about one minute to complete When the ink charging process is finished The On light stops flashing and remains lit and the Ink light goes out c Caution The On light continues to flash while this product performs the ink charging operation Never turn off this pro...

Page 13: ...e these problems by cleaning the print head which ensures that the nozzles are delivering ink properly Note Print head cleaning uses both color and black ink To avoidwastingink cleantheprintheadonlyifthecopy quality drops for example blurred printout incorrect or missing color Before cleaning the print head perform the nozzle check first to see if it really needs to be cleaned This saves ink If th...

Page 14: ...ded 1 Make sure that this product is turned off 2 Make sure that the adjust lever is set to the m position 3 Load A4 paper in the sheet feeder 4 Press the P On button while pressing the Copy button An alignment pattern is printed 5 Look at the alignment pattern and find the patch which is most evenly printed with no noticeable streaks or lines Press the Copy button until the number for that patch ...

Page 15: ...or button to continue Press the y Stop button to cancel Multiple pages have been fed into the sheet feeder Remove and reload the paper and then press the x Start Color button to continue Press the y Stop button to cancel Flashing A Paper jam has occurred Press the x Start Color button If the paper jam is not cleared remove the jammed paper by hands See Clearing Jammed Paper on page 15 Off Ink ligh...

Page 16: ... accéder à l AIDE EN LIGNE http www epson fr support services index shtml pour accéder aux SERVICES du support technique For user in Germany EPSON Service Center c o Exel Hünxe GmbH Werner Heisenberg Strase 2 46569 Hünxe For user in Italy EPSON Italia S p a Via M Viganò de Vizzi 93 95 20092 Cinisello Balsamo MI Tel 02 660 321 Fax 02 612 36 22 Assistenza e Servizio Clienti TECHNICAL HELPDESK 02 268...

Page 17: ...s for the operating conditions of this product Model 100 120V 220 240V Input voltage range 90 to 132V 198 to 240V Rated frequency range 50 to 60 Hz 50 to 60 Hz Power consumption Approx 12 W Standalone copying ISO10561 Letter pattern Approx 2 5 W in sleep mode Approx 0 2 W in power off mode Approx 12 W Standalone copying ISO10561 Letter pattern Approx 2 5 W in sleep mode Approx 0 4 W in power off m...

Page 18: ...nt quality may decline in the top and bottom areas of the printout or these areas may be smeared The precise margins vary slightly depending on the loading conditions Standard Copy Small Margins Copy Borderless Copy A top margin 3 0 mm 0 12 1 5 mm 0 6 0 mm B L left margin 3 0 mm 0 12 1 5 mm 0 6 0 mm B R right margin 3 0 mm 0 12 1 5 mm 0 6 0 mm C bottom margin 3 0 mm 0 12 1 5 mm 0 6 0 mm A C B L B ...

Page 19: ...English ...

Page 20: ...Printed in XXXXXX XX XX XX ...

Reviews: