


Troubleshooting
15
Eng
lish
Troubleshooting
Using the Error Light and Other
Lights to Diagnose Errors
You can identify many common problems by
checking the Error light and other lights on the
control panel. If the product stops working and the
Error light is on, use the following table to diagnose
the problem, and then try the recommended
solution.
Note:
The problems and solutions listed in this table apply when
the product is being used as a stand-alone product. Refer
to the Online Reference Guide for detailed solutions on
problems that may occur when using the product from a
computer.
Clearing Jammed Paper
If paper is jammed inside this product, the Error light
flashes. You may be able to clear the jammed paper
using the Control Panel. Follow the instructions
below.
1.
Press the
x
Start Color button to eject the
jammed paper. If the jammed paper is not
ejected, go on to the next step.
2.
Locate where the paper is jammed.
If the paper is jammed at the paper feeding
position or the ejecting position
, gently pull all
of the paper out by hand.
If the paper is jammed inside this product
,
press the
P
On button to turn off this product.
Open the scanner unit, and then remove all of
the paper inside by hand, including any torn
pieces. Then close the scanner unit and press the
P
On button.
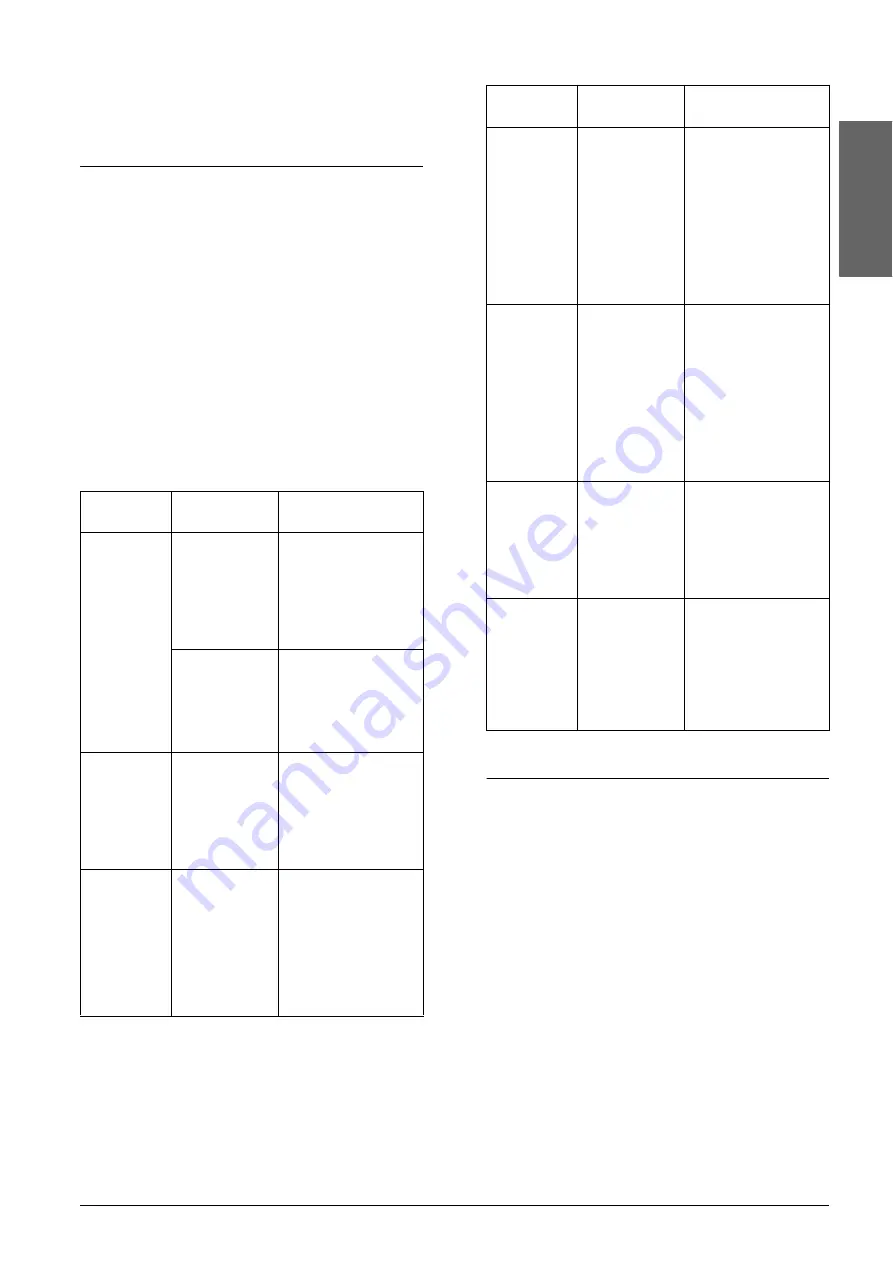
Error light
status
Cause
Solution
On
No paper is
loaded in the
sheet feeder.
Load paper in the
sheet feeder, and
then press the
x
Start
Color button to
continue. Press the
y
Stop button to
cancel.
Multiple pages
have been fed
into the sheet
feeder.
Remove and reload
the paper, and then
press the
x
Start Color
button to continue.
Press the
y
Stop
button to cancel.
Flashing
A Paper jam
has occurred.
Press the
x
Start Color
button. If the paper
jam is not cleared,
remove the jammed
paper by hands. See
“Clearing Jammed
Paper” on page 15.
Off/
Ink light
flashing
An ink
cartridge is
running low on
ink.
Open the scanner
unit, and then press
the
H
Ink button to
move the print head
to the affected
cartridge. Obtain a
replacement
cartridge for that
color ink.
Off/
Ink light on
An ink
cartridge is
empty, or not
installed.
An error has
occurred with
an ink
cartridge.
Open the scanner
unit, and then press
the
H
Ink button to
move the print head
to the
_
position of
the empty cartridge
and replace or install
the cartridge.
See “Replacing an
Ink Cartridge” on
page 11.
Flashing
fast/
“H” flashing
in the LED
window
The adjust
lever
is set at the
^
position
when copying
using the
control panel.
Set the adjust lever to
the
m
position. If you
set the adjust lever to
the
^
position to
avoid blurry or
smeared printouts,
press the
x
Start
Color button to
continue.
Press the
y
Stop
button to cancel.
On/
Ink light on/
All other
lights and
“E” in the
LED window
flashing
A part in this
product needs
replacing.
Contact your dealer.
All lights
and “E” in
the LED
window
flashing
Error occurs in
the parts in this
product.
Turn this product off,
and then back on.
Then make sure the
transportation lock is
released. If the error
message still
appears, contact
your dealer.
Error light
status
Cause
Solution
Summary of Contents for STYLUS CX3600
Page 19: ...English ...
Page 20: ...Printed in XXXXXX XX XX XX ...


