2.
To display on both the laptop's monitor and the projector, try pressing the same keys again.
3.
If the same image is not displayed by the laptop and projector, check the Windows
Display
utility to
make sure the external monitor port is enabled and extended desktop mode is disabled. (See your
computer or Windows manual for instructions.)
4.
If necessary, check your video card settings and set the multiple display option to
Mirror
or
Duplicate
.
Parent topic:
Solutions When "No Signal" Message Appears
Displaying From a Mac Laptop
If you see the "No Signal" message when you display from a Mac laptop, you need to set up the laptop
for mirrored display. (See your laptop manual for details.)
1.
Open the
System Preferences
utility and select
Displays
.
2.
Click the
Arrangement
tab.
3.
Select the
Mirror Displays
checkbox.
Parent topic:
Solutions When "No Signal" Message Appears
Solutions When "Not Supported" Message Appears
If the "Not Supported" message appears, try the following solutions:
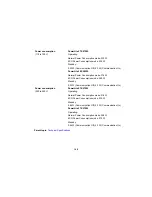
• Make sure the correct input signal is selected on the Signal menu.
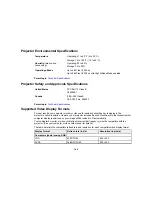
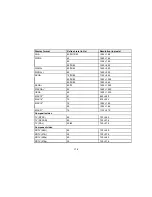
• Make sure the computer's display resolution does not exceed the projector's resolution and frequency
limit. If necessary, select a different display resolution for your computer. (See your computer manual
for details.)
Parent topic:
Solving Image or Sound Problems
Related references
Input Signal Settings - Signal Menu
Supported Video Display Formats
Solutions When Only a Partial Image Appears
If only a partial computer image appears, try the following solutions:
• Press the
Auto
button on the remote control to optimize the image signal.
• Try adjusting the image position using the
Position
menu setting.
• Press the
Aspect
button on the remote control to select a different image aspect ratio.
155
Summary of Contents for PowerLite 570
Page 1: ...PowerLite 570 575W 580 585W User s Guide ...
Page 2: ......
Page 21: ...Related references Projector Light Status Projector Parts Remote Control 21 ...
Page 45: ...1 Open the battery cover 2 Insert the batteries with the and ends facing as shown 45 ...
Page 131: ...2 Slide the air filter cover latch and open the air filter cover 131 ...
Page 133: ...5 Place the air filter back in the projector as shown 133 ...
Page 136: ...2 Slide the air filter cover latch and open the air filter cover 136 ...
Page 138: ...4 Place the new air filter in the projector as shown 138 ...


