EPSON Perfection 4490 Photo
Revision B
APPENDIX
ADF; Disassembly
94
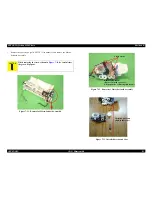
Figure 7-31. Hopper Release Lever Installing Orientation
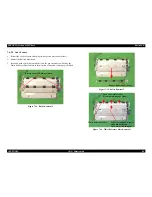
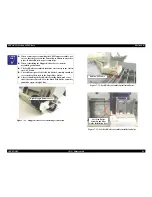
Figure 7-32. Feed Roller Assembly Installation Point
Figure 7-33. Left Feed Roller Assembly Installation Point
C H E C K
P O I N T
When removing or reinstalling the ASF Hopper Assembly, use
care so that the grease on the Cam will not adhere to any other
parts. If it has adhered, wipe it completely.
When reinstalling the Hopper Release Levers, note the
assembling orientation.
The Feed Roller Assemblies should be set securely to the rail in
the ASF Frame.
The left Frame part of the left Feed Roller Assembly should be
set securely to the notch of the Paper Edge Guide.
After reinstalling the Feed Roller Securing Bush, make sure
that it does not come off. Also, the black Feed Roller Assembly
should be set on the right side.
Right Hopper Release Lever
Rail in ASF Frame
Left Feed Roller
Assembly and Edge
Guide installation part
Summary of Contents for Perfection 4490 Photo
Page 8: ...C H A P T E R 1 PRODUCTDESCRIPTION ...
Page 18: ...C H A P T E R 2 OPERATINGPRINCIPLES ...
Page 25: ...C H A P T E R 3 TROUBLESHOOTING ...
Page 29: ...C H A P T E R 4 DISASSEMBLY ASSEMBLY ...
Page 57: ...C H A P T E R 5 ADJUSTMENT ...
Page 59: ...C H A P T E R 6 MAINTENANCE ...
Page 63: ...C H A P T E R 7 APPENDIX ...
Page 66: ...Model GT X750 Perfection 4490 Photo Board Main Board Rev A Sheet 1 1 ...
Page 68: ...Model GT X750 Perfection 4490 Photo Board DRV Board Assy Rev A Sheet 1 1 ...
Page 69: ...Model GT X750 Perfection 4490 Photo Board Image Sensor Board Rev B Sheet 1 1 ...
Page 70: ...Model GT X750 Perfection 4490 Photo Board SUB Board Rev A Sheet 1 1 ...
Page 71: ...Model GT X750 Perfection 4490 Photo Board SUB C Board Rev A Sheet 1 1 ...
Page 72: ...Model GT X750 Perfection 4490 Photo Board SUB D Board Rev A Sheet 1 1 ...
Page 74: ...GT X750 Perfection 4490 Photo NO 1 Rev 02 B176 ACCE 0012 10 20 30 40 400 401 ...
Page 76: ...R ev 01 B176 CAS E 002 GT X750 Perfection 4490 Photo NO 3 110 111 101 102 ...

