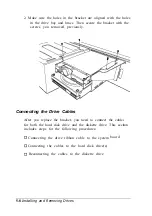
3. Slide the drive through the slot into the bay until it is flush
with the front of the computer.
4. Align the slots at the side of the drive bay with the mounting
holes in the drive or mounting frames. Then secure both
sides of the drive to the bay using the retaining screws.
5-18
Installing and Removing Drives
Summary of Contents for ActionPC 6000
Page 1: ......
Page 24: ...1 10 Setting Up Your System ...
Page 42: ...2 18 Running SETUP and Installing Drivers ...
Page 121: ...Hard Disk Drive Types Hard disk drive types Specifications A 9 ...
Page 125: ...Hardware Interrupts System I O Address Map Specifications A 13 ...
Page 126: ...System I O address map continued A 14 Specifications ...
Page 128: ...A 16 Specifications ...
Page 140: ...8 Index ...


