ENFORCER DP-266-1C3Q Manual Download Page 12

ENFORCER Wireless Video Door Phone 

12


SECO-LARM U.S.A., Inc. 

Operating the Wireless Video Door Phone:
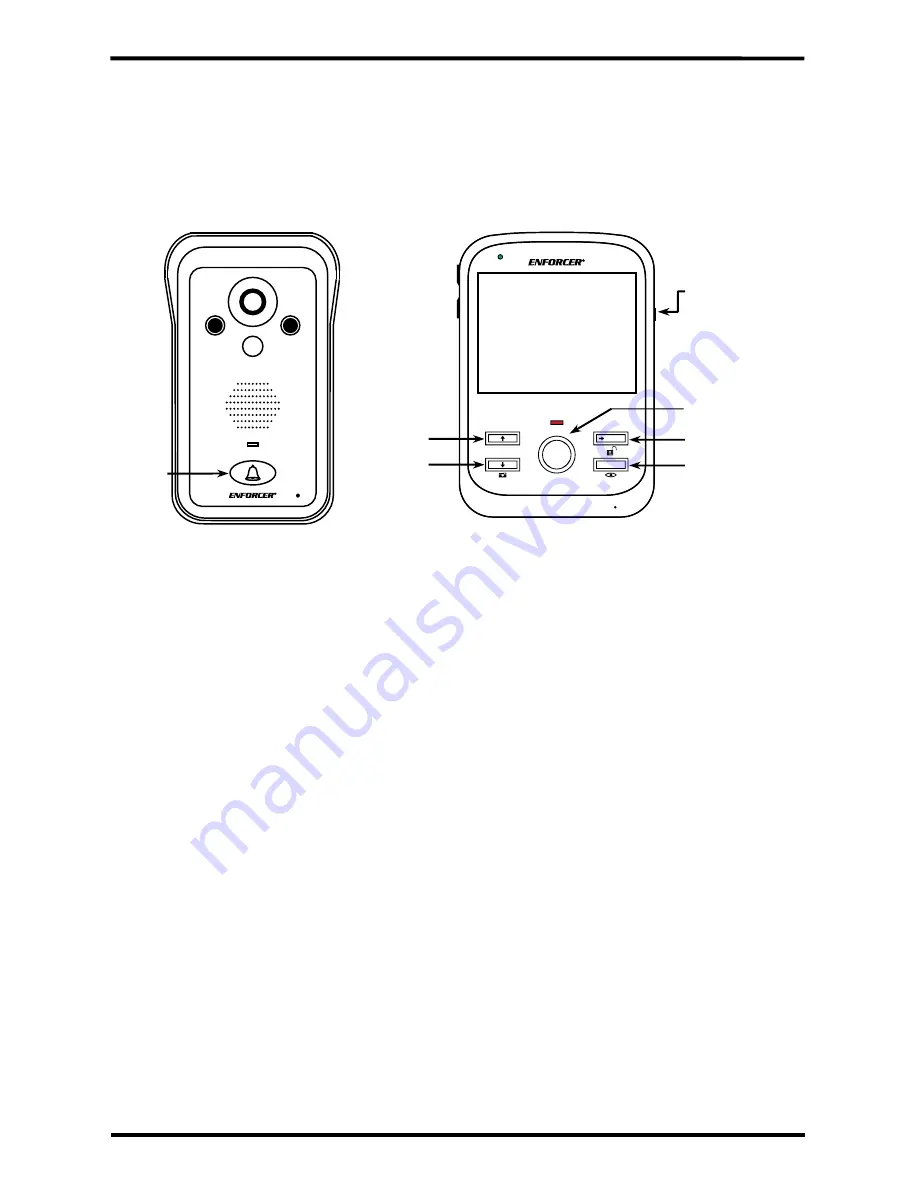
 

MENU 

EXIT 

OK 

OK/Talk 

 Menu/Unlock 
 Exit/View 

Doorbell 


Up 


Down/Photo 

ON/OFF: 


Turn monitor 

ON/OFF 


Standby 
mode 

Receive a visitor: 
1.


If a visitor presses the doorbell button on the camera, the monitor's display turns ON and the 
monitor sounds the chosen ring tone. 

2.


Press the "OK" button to accept the call. The bell icon will change to a microphone icon. 

3.


Press the "Menu/Unlock" button on the monitor to activate the camera's onboard relay. 

4.


Press the “Exit/View" button to mute the monitor (the camera station can still be heard on the 
indoor monitor). 

5.


Press the "Down/Photo" button on the monitor to take a manual photo. 

6.


Press the "Volume up/down" button to adjust the audio level. 

7.


Press the "OK" button when finished with the call. 

View and/or talk to a visitor who has not pressed the doorbell button on the camera: 
1.


Press the "OK" or "Power" button to turn the monitor’s display ON. 

2.


Press the "Exit/View" button to monitor the camera station. 

NOTE:   If multiple cameras are connected then use the "Up" or "Down" button to select the 

desired camera station to monitor. Press "OK" to connect to the selected camera. 

3.


The user can now view and hear the camera station. The microphone icon will have an "X" 
through it. 

4.


Press the "Exit/View" button to activate two-way communication. The microphone's "X" will 
be removed. 

5.


To unlock the optional electronic door lock, press the "Menu/Unlock" button to activate the relay. 

6.


Press the "Down/Photo" button to take a manual photo. 

7.


Press the "OK" button when finished with the call. 


Communicating with the camera 
Request entry: 
1.


Press the doorbell button on the camera. The indoor monitor will ring and display an image 
from the camera. The monitor will also display a bell icon. 

2.


Wait for the indoor user to accept the call and activate the onboard relay as necessary. 


Summary of Contents for DP-266-1C3Q

Page 1: ...red monitors Camera has built in IR LEDs for nighttime operation Camera includes a built in PIR sensor that activates the camera and takes photos of the visitor when they approach Monitor includes a k...

Page 2: ...3 Display Overview 4 Installation Notes 4 Camera Wiring Diagram 5 Sample Application 5 Installation Camera 6 Installation Monitor 6 7 On Screen Display Features 8 Programming and Using the On Screen D...

Page 3: ...e 9 16 VAC 5 16 VDC Relock delay 3 6 8 Seconds Relay output 3A 250VAC 30VDC Current draw Active 300mA 12VDC Standby 15mA 12VDC Battery life Active 7 Hours Standby 60 Days IR LED Range 5 1 5m IR LED Fr...

Page 4: ...ted 115 Up 20 170 Left 20 170 1 Unpack the video door phone and note the included parts 2 Read this manual thoroughly A clear understanding of the manual will make installation and operation much easi...

Page 5: ...wer supply is wired to the COM common output 1 Positive power input Connect to the red wire of the included AC adapter or to the positive wire of the doorbell s power supply 2 Negative power input Con...

Page 6: ...ole in the bracket to the optional door unlock device 5 Install the rechargeable lithium ion battery into the camera The battery will act as a backup power source in case of a power outage 6 Connect t...

Page 7: ...the ON OFF button for 3 seconds The monitor will turn ON with the ENFORCER screen Standby mode If the display is OFF press the ON OFF button momentarily to leave standby mode and turn the display ON...

Page 8: ...oved from the bracket and the tamper alarm activates 4 photos taken P Photos taken by the camera station automatically when the PIR function is activated 3 photos taken Messages View photos from misse...

Page 9: ...All to delete all photos after an additional prompt 5 Once viewing a photo press the Up or Down buttons to cycle through other photos 6 Press the OK button to either delete or exit the photo viewing...

Page 10: ...nlock button to open the on screen display 2 Highlight the Language icon and press the OK button to enter the Language screen 3 Use the Up and Down buttons to select a language English default German...

Page 11: ...8 seconds Pairing See the Resetting the Camera and Pairing a First Monitor and Programming Additional Monitors or Cameras sections on pgs 13 14 for information regarding the Pairing setting Alarm sett...

Page 12: ...to a visitor who has not pressed the doorbell button on the camera 1 Press the OK or Power button to turn the monitor s display ON 2 Press the Exit View button to monitor the camera station NOTE If mu...

Page 13: ...ton 5 Press the OK button when finished with the call Resetting the Camera and Pairing a First Monitor Communicating between monitors NOTE The Wireless Video Door Phone system can be set up with up to...

Page 14: ...can be learned to the system NOTE The intercom feature will not function until the connection is confirmed by the new monitor To pair an additional camera 1 Put the camera into pairing mode a Remove...

Page 15: ...the monitor Make sure the monitor s battery is charged Plug the charger directly into the monitor The monitor is not charging Remove the battery from the battery compartment and clean both the battery...

Page 16: ...nt or repair only at SECO LARM s option In no event shall SECO LARM be liable for any special collateral incidental or consequential personal or property damage of any kind to the purchaser or anyone...

Reviews: