


2
3
3. If the exterior temperature value vanishes from the display, push the RESET
button on the weather station for an update of the broadcast.
4. We recommend positioning the sensor on the northern side of the house.
In built-up areas the sensor range may drop rapidly.
5. The sensor is resistant to dripping water, but do not subject it to permanent
contact with weather and rain.
6. Do not put the sensor on metal surfaces, it would lower its broadcast range.
7. If a weak battery icon (B, H field) appears, replace the batteries in the sensor
or weather station.
Channel change and connection of more sensors
1. Use the CH button on the rear of the weather station to choose the desired
sensor channel - 1, 2 or 3. Then hold the CH button until the icon starts blinking.
2. On the rear side of the sensor, remove the battery compartment cover and
insert batteries (2xAA).
3. Set the required number of the sensor channel - 1, 2, 3 using the CH button
– it will be shown on the front display. Within 3 minutes the data from the
sensor will be read.
4. If the sensor signal is not found, remove the battery and insert back again.
Displaying the sensor data
Push the CH button on the weather station repeatedly to show data from
sensors 1, 2, 3.
The sensor number will be shown in field E.
To continuously show data from all sensors, push CH button several times until
the F icon appears.
To interrupt push CH button again.
Radio controlled clock (DCF77)
Radio signal is transmitted on radio waves (77.5 kHz) from a location near Frankfurt
am Mein in Germany within the radius of 1500 km.
This radio time signal automatically takes into account the summer time and
daylight saving time changes as well as leap years and date changes.
After registration with the wireless sensor, the weather station starts automatically
searching for the DCF77 signal for 10 minutes, while the L icon is blinking.
During the search no data on the display are updated and the buttons do not
work (except SNOOZE).
If the signal is found – the icon stops blinking and it shows the current time.
If the signal is not found – the icon disappears.
To start a new search for the DCF77 signal hold the button
.
To cancel the DCF77 signal search, push the button
again.
The DCF77 signal will be synchronised daily between 2:00 and 3:00 a.m.
Under normal conditions (in safe distance from any sources of interference
such as television sets, computer screens) the time signal is intercepted within
a few minutes.
If the clock fails to receive the signal, proceed as follows:
1. Move the weather station to a different location and attempt to search for
the DCF signal again.
2. Check the distance of the clock from any sources of interference (computer
screens, television sets). The distance should be at least 1,5 to 2 meters, when
you are searching for the signal.
3. When receiving the DCF signal, do not place the weather station near metal
doors, window frames or other metallic objects or constructions (washing
machines, spin dryers, refrigerators etc.)
4. In buildings with reinforced concrete constructions (cellars, high-rise
buildings) the DCF signal is weaker, depending from the local conditions.
In extreme situations you will need to locate the weather station next to a
window in the direction to the transmitter.
The DCF77 signal reception is affected by the following factors:
• Thick walls and insulations, cellars and basements.
• Unsuitable local geography (difficult to estimate in advance).
• Atmospheric disturbances, storms, not isolated electric appliances, televisions
and computers located near the DCF radio receiver.
Manual setting of time and date
1. Hold the MODE button.
2. Use the
↑/↓
buttons to set the 12/24h time format – hour – minute –year –
date – calendar language (E – English, G – German, F – French, S – Spanish, I
-Italian)
3. Use the MODE button to move form one value to another.
4. To move faster, hold
↑/↓
.
Internal and external temperature and humidity,
temperature units
Internal temperature and humidity are shown in field J.
External temperature and humidity are shown in field G.
Push the
↓
button to toggle the °C/°F units.
Pressure trend (weather)
The arrow in the A field shows the pressure trend (weather development)
Displayed indicator
Pressure trend (weather)
Rising
Constant
Falling
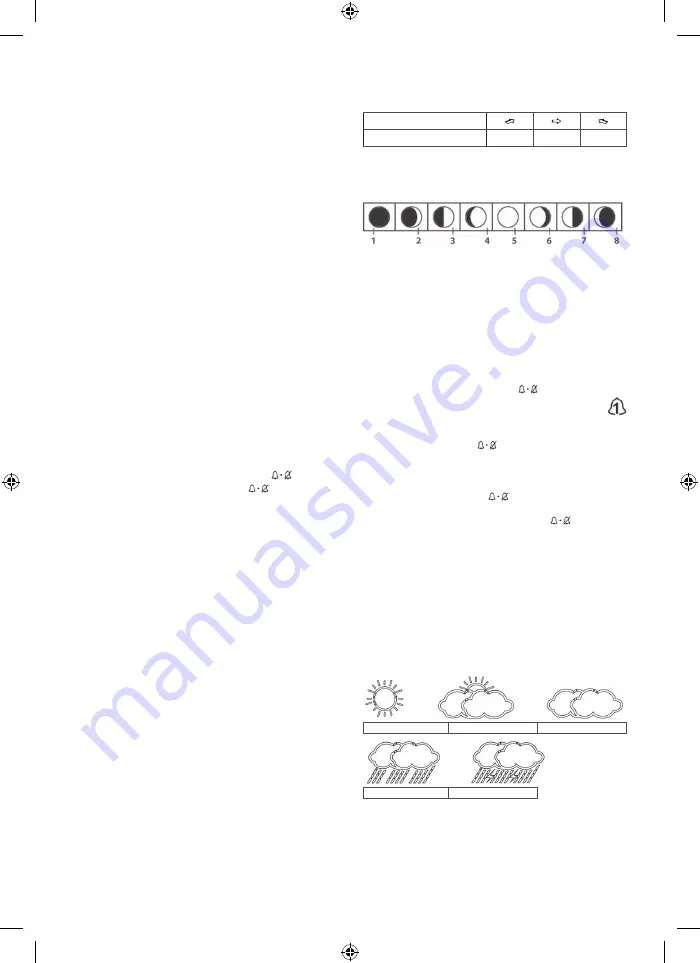
Lunar phases
Lunar phase is shown in field D.
The lunar phase icons are as follows:
1. New, 2. Waxing Crescent, 3. First Quarter, 4. Waxing Gibbous, 5. Full, 6. Waning
Gibbous, 7. Third Quarter, 8. Waning Crescent
Showing the maximum/minimum temperature
and humidity
Push the Max/Min button to show the maximum and minimum measured
humidity and temperature values one by one. Hold the Max/Min button to erase
the values from the memory.
Alarm clock setting
The weather station allows setting 2 alarm clocks.
Use the MODE button to choose alarm clock 1 or 2. The choice will be shown in the M field.
You can set the alarm time by pushing the MODE button and by arrows
↑/↓
.
To set the hours and minutes, push the button
The alarm clock number will be shown in the centre of the bell icon
– the alarm clock is active.
You can activate both alarm clocks at the same time, each with a different time setting.
To deactivate an alarm clock, push
again and the bell icon disappears.
Snooze function and backlight function
By the SNOOZE button you can postpone the alarm by 5 minutes.
The alarm clock icon will start blinking (the M field)
To cancel the SNOOZE function, push
The icon will stop blinking.
If you do not want to use the SNOOZE function, push
when the alarm
clock goes off.
By pushing the SNOOZE button, you activate the backlighting of the display
for 5 seconds.
Weather forecast
The weather station forecasts weather based on atmospheric pressure for the next
12 – 24 hours for the area 15-20 km around it.
The weather forecast accuracy is 70 – 75 %.
Because the weather forecasts may not be 100% successful, the producer or seller
cannot be responsible for any losses due to inaccurate weather forecast.
After the first setting or reset of the weather station it takes some 12 hours before
the weather station starts forecasting correctly.
The weather station shows 5 icons for weather forecasts.
The weather forecast icon is in field C
Sunny
Cloudy
Overcast
Rein
Storm
Troubleshooting
If the clock does not snow correct or complete data, take the batteries out and
insert back again.
Maintenance
The product is designed so that with proper use it can serve reliably for many years.
There are several guidelines for correct operation:
• Before you start using the product, read the user manual carefully.