26
Reference Manual
00809-0100-4570, Rev DA
Electrical Installation
November 2017
Electrical Installation
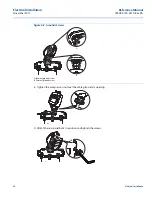
4. Remove approximately 4-in. (100 mm) of the cable mantle and strip approximately 0.4-in. (10 mm)
off the edge of each conductor.
5. Loosen the terminal block screws located inside the Rosemount 5708 head.
Note
The two terminal blocks can be pulled out by unfastening the two side screws to allow for easier wiring
into the terminals. When inserting the terminal blocks back into the head, it is advised to fasten the
screws back into the electronics card in order to avoid a loose connection and or operational problems.
6. Connect the cable wires according to the wiring diagram. See
“Different connection methods” on
for different connection methods.
Note
When connecting the last Rosemount 5708 in the chain, a 120 Ohm resistor must be connected as well.
See
.
In any installation of the 5708 whether it is a single unit on a silo or multiple units, it is mandatory to use
termination resistors at the ends of the daisy-chain connection.
One resistor must be on the last scanner on the chain (connected to the +/- terminals of the RS485 and
the other resistor on the other end of the line before converting the RS485 bus to a different
communication protocol such as USB, TCP/IP and others.
4-in. (100 mm)
0.4-in.
(10 mm)
Summary of Contents for Rosemount 5708
Page 1: ...Reference Manual 00809 0100 4570 Rev DA November 2017 Rosemount 5708 3D Solids Scanner ...
Page 2: ...ii Section Title November 2017 Reference Manual 00809 0100 4570 Rev DA ...
Page 8: ...vi Reference Manual 00809 0100 4570 Rev DA Contents November 2017 Contents ...
Page 12: ...2 Reference Manual 00809 0100 4570 Rev DA Introduction November 2017 Introduction ...
Page 202: ...ii Reference Manual 00809 0100 4570 Rev DA Index November 2017 Index ...
Page 203: ...iii Reference Manual 00809 0100 4570 Rev DA November 2017 ...


