


3
ENGLISH
WATER CHILLER REQUIREMENTS
WHAT YOU SHOULD KNOW BEFORE YOU BEGIN
WATER CHILLER USE
•
IMPORTANT: After unpacking the Water Chiller, place the unit upright for 24 hours before connecting to power.
• For best results, the water dispenser should be installed prior to installing the Water Chiller.
• Make sure that all electrical wiring and connections conform to local codes.
• A standard, earth (grounded) electrical GFCI outlet is required under the sink for the Water Chiller’s electrical power. The
wall outlet powering your Water Chiller must have power supplied continuously.
• This outlet must be fused and should not be controlled by the same wall switch that operates the disposer. Fuse/circuit
breaker required is 15 amp for 120 volt.
• It is recommended that a dedicated control valve be installed on the cold water line supplying water to this system.
• If you are using a filtration unit, the Water Chiller should be connected after the filter.
• To prevent damage or unit not working properly, the water pressure to the Water Chiller should be between
30psi (2 bar; 206 kPa) and a maximum of 100 psi (6.9 bar; 689 kPa).
• The temperature on the Water Chiller is controlled by the temperature control knob on the front of the unit.
• Ensure all tubing and fittings are secure and free of leaks.
• If you suspect elevated levels of chlorine in the water, it is recommended to use our water filtration system.
• The Water Chiller should only be installed in an upright position.
• The Water Chiller is intended only for chilling water.
• It is not recommended to pair the Water Chiller with dispenser model HC3300, as only one supply water line is available for
the connection of both hot and cold water.
• Regularly inspect the system. If there are signs of water leakage, turn off the water supply and contact InSinkErator.
• Please refer to the Installation, Care, and Use manual packaged with your water dispenser for additional safety information.
• Water Dispenser sold separately.
• This Water Chiller unit is not intended for commercial/industrial use.
Setting the Control: the Water Chiller has a dial for water temperature control.
• For colder water: Turn dial clockwise (to the right).
• For less cold water: Turn dial counterclockwise (to the left).
• To shut down the Water Chiller: Turn the dial to the OFF position at full counterclockwise (extreme left).
• Allow one hour to obtain chilled water.
DRAINING THE WATER CHILLER
1. Unplug the Water Chiller.
2. Shut off water supply to Water Chiller.
3. Open faucet to release pressure.
4. Disconnect the water lines attached to the Water Chiller by depressing collet on easy to connect fittings.
5. Tip Water Chiller to left side (opposite power cord side) and drain water into large container.
6. Set Water Chiller in its normal upright position for storage.
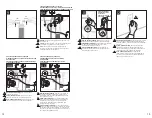
RECONNECTING THE WATER CHILLER
1. Shut off water supply to Water Chiller.
2. Put Water Chiller in position, allowing a 2” (5cm) space around the side and top.
3. Do not place any objects on top of chiller that could obstruct the fan.
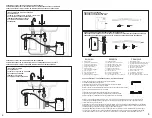
4. Connect water lines as described in the step-by-step instructions.
5. Slowly open main water supply valve and open faucet until water flows.
6. Plug in Water Chiller and set dial to desired water temperature.
2
• Cold or hot/cold water dispenser
• T-fitting
• Dedicated control valve
• Adjustable wrench
• Pencil
• Utility knife
• Tape measure / ruler
WHAT YOU NEED TO GET STARTED (SOLD SEPARATELY)
Save these instructions.
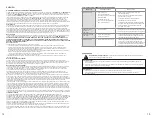
IMPORTANT SAFETY INFORMATION
INSTRUCTIONS PERTAINING TO RISK OF FIRE, ELECTRIC SHOCK, OR INJURY TO PERSONS
SAVE THESE INSTRUCTIONS
A potentially hazardous situation, which, if not avoided, could result in death or serious injury.
A potentially hazardous situation, which, if not avoided, could result in minor or moderate injury.
Notice is used to address practices not related to personal injury.
NOTICE
Save these instructions.
• To reduce risk of electric shock, the cord must be plugged into a mating, 3 prong, ground-type outlet.
- Do not remove ground prong.
- Do not use an adaptor.
- Do not use an extension cord.
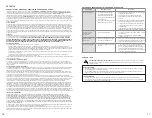
WARNING! Leak Hazard.
Regularly inspect Water Chiller, dispenser and plumbing fittings for leaks, which
can cause property damage and could result in personal injury.
WARNING! Fire Hazard.
Do not store flammable items such as rags, paper or aerosol cans near Water
Chiller. Do not store or use gasoline or other flammable vapors and liquids in vicinity of Water Chiller.
NOTICE: Property Damage.
To reduce the risk associated with property damage due to water leakage
or flooding, and to ensure optimal performance:
• Read and follow all instructions before installation and use of this system.
• Installation and use MUST comply with all state and local plumbing codes.
• Regularly inspect the unit for any signs of leakage. If there are signs of water damage, immediately
remove the unit from service.
• A drain pan, plumbed to an appropriate drain or outfitted with a leak detector, should be used in those
applications where any leakage could cause property damage.
NOTICE: Electrical Requirement.
This water cooler is intended to be connected to a ground fault
circuit interrupting (GFCI) device to meet UL requirements.
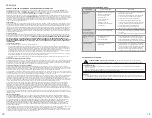
WARNING! Electric Shock Hazard.
• To reduce the risk of electric shock, do not immerse or expose the product, flexible cord or plug to rain,
moisture or any liquid or when standing in or on damp or wet surfaces. If any electrical product falls into water,
UNPLUG it immediately. DO NOT REACH INTO THE WATER. Important: Prior to reconnecting to the power
supply, the product should be inspected by a qualified technician.
WARNING! Choking Hazard.
To reduce the risk associated with choking: Do not allow children under 3 years
of age to have access to small parts during the installation of this product.
• Using an ungrounded (no earth ground) or improperly connected appliance can result in serious
injury or death.
- This appliance must be plugged into an earthed (grounded) GFCI outlet. This Water Chiller is
equipped with a power supply cord with a 3 prong ground plug. The plug must be connected to
an appropriate outlet that is properly installed and earthed (grounded) in accordance with all local
codes and ordinances. Do not modify the plug provided with the appliance - if it will not fit the
outlet, have a proper outlet installed by a qualified electrician. Check with a qualified electrician or
tradesperson if you are in doubt as to whether the Water Chiller is properly earthed (grounded).
!
!
!
!
!
*
!
*