background image

Elna Xchange

10

XCHANGE BOX

GENERAL OPERATION

1. Make sure your Xchange Box has power. To do this, simply verify that the green light

on the front of the Xchange Box is on.

2. When you double click the icon to start the Xchange program, it takes a few seconds

for the program to open. Make sure you have only opened the program one time.

You must only have the program opened one time in order to set up communication
between your computer and the Xchange Box.

To ensure the program hasn’t been opened twice, look at the bottom of your monitor
screen between the “Start” button on the left and the clock on the right. If you see a
square with “Converter Box” and a picture of the box more than once, you need to
exit one of the programs before you may continue.

3. Click

OK

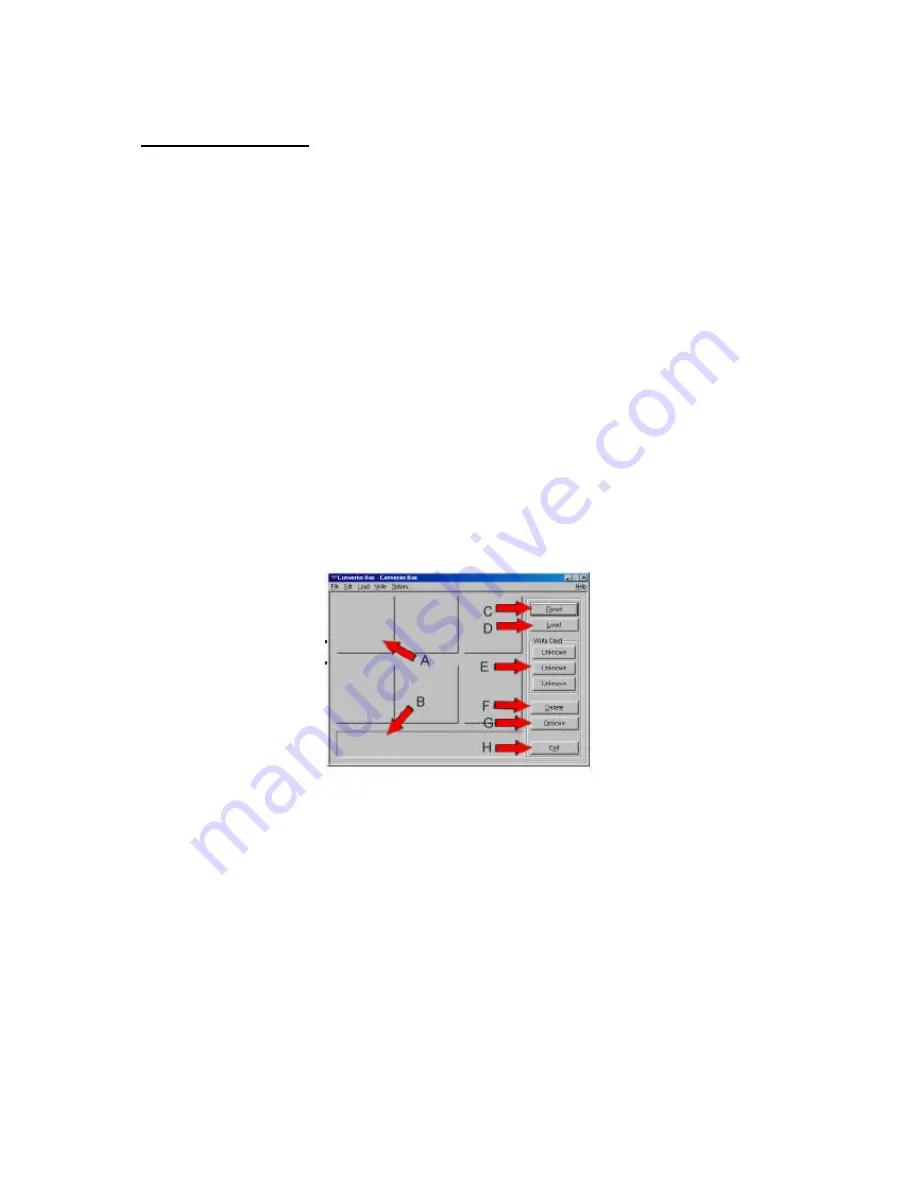
to enter the program. The Converter Box screen offers you

Read, Load

and

Write Card

buttons. The main screen also has

Delete, Options

and

Exit

buttons. The

Load, Write Card

and

Delete

buttons will be inactive until a design has

been read into the software or a card inserted into the slot.

A. Designs are displayed in these six boxes.
B. Dialog Box – as you move your mouse over any button, information will

appear

C. Read designs from your computer
D. Load designs from a memory card
E. Write designs to writable card
F. Delete individual designs
G. Options – programming Write buttons and File Open Preferences
H. Exit program

Summary of Contents for XCHANGE

Page 1: ...Elna Xchange 1 INSTRUCTION MANUAL...

Page 2: ...9 XCHANGE BOX General Operation 10 Xchange Box Slots 10 Read 11 12 Load 12 Delete 13 Options 13 Write 14 Exit 14 COLOR EDITOR Opening Color Editor 15 Navigation Bar 15 File Menu Open 15 16 Save 16 Sa...

Page 3: ...design in the Color Editor accessory software LIMITED WARRANTY 1 All parts other than connector pins are warranted to be free from defects for a period of one year and will be at the manufacturer s op...

Page 4: ...he manufacturer is not responsible for any representation expressed or implied other than those contained herein This warranty gives you specific legal rights and you may also have other rights which...

Page 5: ...ssly approved by the manufacturer or local sales distributor could void the user s authority to operate the equipment Canadian Department of Communication Compliance Statement for Canada only This dig...

Page 6: ...flat end of USB cable into USB port found in the front back or side of your computer 3 Plug square end of your USB cable into the back of your Xchange Box 4 Turn computer ON 5 The screen displays New...

Page 7: ...testing is put in place to ensure that users do not incur problems with equipment manufacturers products While the Xchange Box is in the process of gaining formal Microsoft approval it has been teste...

Page 8: ...NG NO COMPORT ERROR MESSAGE If you get a message on your screen saying Cannot open comport this usually means the USB driver is not installed correctly Follow the following steps to reinstall the driv...

Page 9: ...le format developed by Tajima It does not retain colorization EXP exp an expanded commercial file format It does not retain colorization HUS hus an expanded file format associated with Viking DOS Cust...

Page 10: ...the clock on the right If you see a square with Converter Box and a picture of the box more than once you need to exit one of the programs before you may continue 3 Click OK to enter the program The C...

Page 11: ...for sewing formats You cannot read bmp jpg or any kind of clip art into this program There is no digitizing software included Click the Read button or click File Open on the navigation bar and this w...

Page 12: ...design you want and click Load You can keep loading files one by one until all 6 squares on the Converter Box screen are full When you are finished selecting designs from the Card s Directory page cl...

Page 13: ...ogram up to three machines Click down arrow in the Write Button Preferences field and a database of available machines is displayed Scroll through the list until you find your machine and select it Cl...

Page 14: ...ange Box is Busy transferring the designs to the card Do not remove your card while the red light is on You will see a status bar with numbers counting up Writing block There is no specific number at...

Page 15: ...ur default folder or directory setting Click on the down arrow to the right of the Look in box to show the list of sub directories on your computer Select the folder that contains your designs When yo...

Page 16: ...nt from the Xchange Box it can only be saved back to the Xchange Box not to your computer or other writable media Save As Click File then Save As to name your design and save it to the desired folder...

Page 17: ...e Color Editor If you have not saved your work you will be prompted to do so VIEW MENU Realistic View Click View Realistic View Turn on Realistic View to view the final results of your embroidery A ch...

Page 18: ...be written to a card if the design size exceeds the maximum allowable hoop size for your machine Density Settings for GNC Designs Only Click Options then Density Settings or to bring up the dialog box...

Page 19: ...ge the display color represented by that box By clicking on the color you wish to change the name of the color will appear in the New Color Change To box Click OK to change the selected color to its n...

Reviews: