


Page 14 of 40 M8144
Issue 2.0
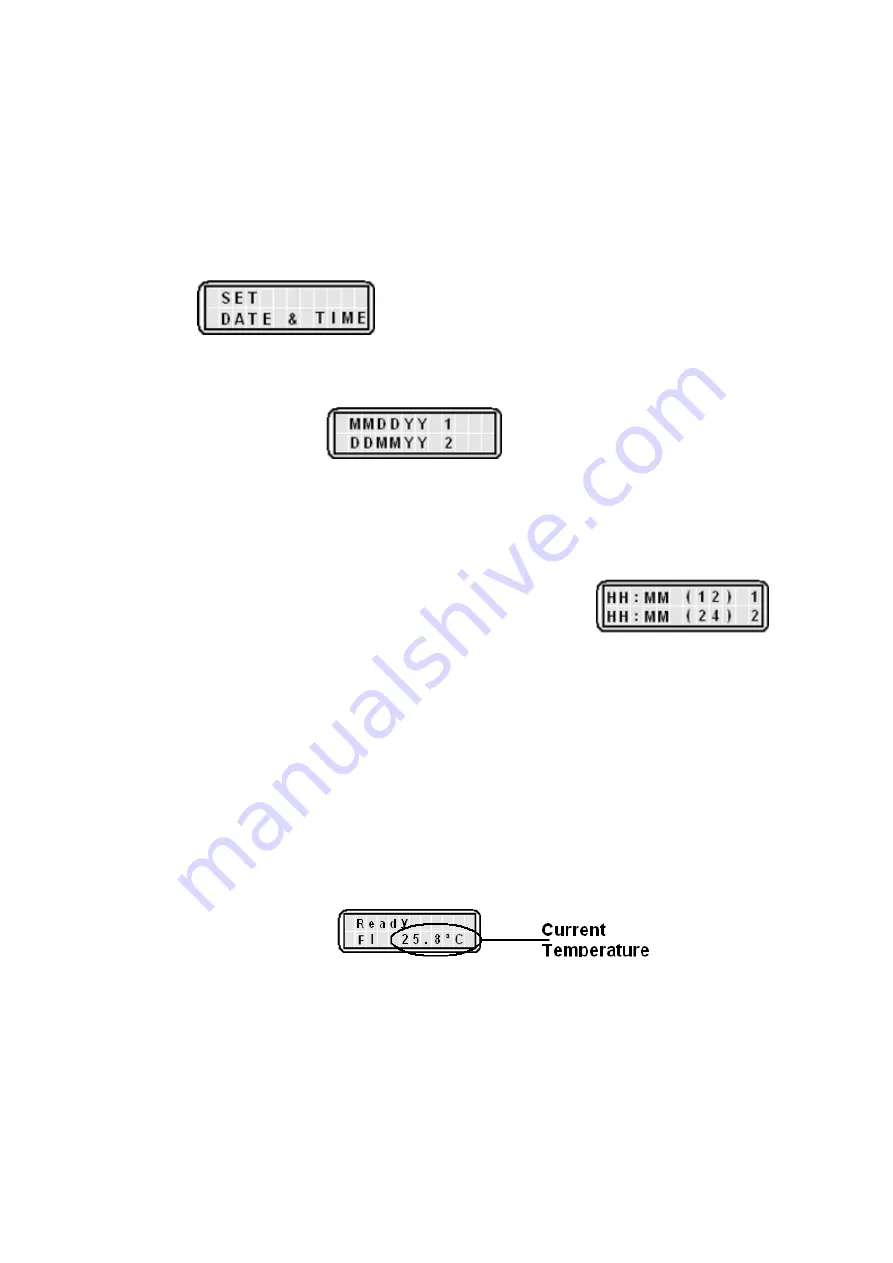
7.3. Setting the Time and Date (9200 & 9300 models only).
Date and time settings may also be accessed via the (F3) function facility.
Note:
The time clock has no daylight saving facility. You may wish to re-set the time when
daylight saving takes place.
7.3.1. When either the IA9200 / IA9300 is plugged in and powered up for the first time the time
and date may require setting. After the unit has displayed the firmware version and
model type you will be asked to set the date and the time.
press the return key to take you to the setting functions.
7.3.2. You are now asked to select the date format. Select the required format by pressing
either key 1 or key 2.
7.3.3. Enter the characters of the date for the format selected. For date selection 1 enter the
following as an example. To enter 14
th
July 2010 press 071410. For date selection 2
enter the following using the same example. 140710.
7.3.4. You will now be prompted to select the date format of either 12 or 24 hour format. Press
key 1 for 12 hour format or press key 2 for 24 hour format.
7.3.5. Enter the time characters for the time in your time zone as directed by the screen
followed by the return key.
7.3.6. If you have selected the 12 hour time format you will now be asked to select whether
your time is set in AM or PM mode. Select the prompt key 1 or 2 as applicable.
7.3.7. Your IA will return to the user screen.
7.4. IA9100 Operation.
7.4.1. Connect the IA to the power supply. It will perform a self check while displaying the
model and firmware version. The display will then turn to the Home screen which says
‘Ready’ and shows the IA ovens current temperature.
7.4.2. F1 is the Home
screen for setting temperatures and running the IA. Press ‘Fn’ key to
enter the F2 screen. The F2 screen will display the details of the last performed melt
sequence. To toggle between F1 home screen
and F2 Melt recall screen press the ‘Fn’
key.
7.4.3. To commence melt setup and perform a melt sequence, ensure the unit is in the F1
home screen.


