


according to the first part of this procedure. As with everything so far, the
unoccupied terminal of each switch will be connected to the boards later in this
document. As a reminder, don’t get the switches too hot! Like a soldering iron ninja,
get in there and get out.
o
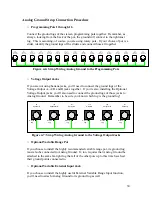
Manual Step and Manual Load Switches
Connect together either the upper or lower terminals on the rear of these two
momentary switches. If they’re not close to each other, just connect them to the
nearest Digital Ground point on the panel. Like the other SPST ON-OFF types, it
doesn’t matter which terminal you connect to. In fact, if they’re the pushbutton type,
you don’t even have to worry about orientation! You do have to worry about getting
them too hot here, but we’re not going to nag you about it, you already know.
o
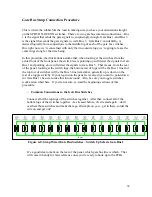
Gate Bus Merge 1, Merge 2 and Merge 3 Switches.
Connect together either the upper or lower terminals on the rear of the three merge
switches. If they’re not close to each other, just connect them to the nearest Digital
Ground point on the panel. Again, these are the SPST ON-OFF type, so either
terminal will do – just make sure you have them aligned right on the panel, as per the
beginning of this screed. Leave the other terminal of each switch open for wiring to
the PCBs. And, lest you forget – don’t get those switches too hot!
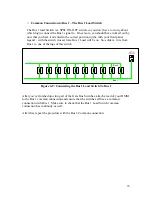
The Final Step For Digital Ground Strapping:
make sure all of the digital ground
points you’ve wired up on the panel are all connected together. For example, you may
have all the Pattern LEDs wired up to jab your eyes from the center of the panel, but the
Gate Bus LEDs may be wired together over in the corner, so far unconnected from any
other Digital Ground Point. Use insulated wire to solder all of the disparate wired
together components together so that anywhere you attach the Digital Ground wire from
the PCB, it will be connected to them all. After that, grab your DMM, connect it to one
Digital Ground point on the panel, and alternately connect the other lead to all of the
other Digital Ground points – make sure there is continuity to that one point from all
other Digital Ground points! Coming up - your checklist:
27