background image

Manual

7.

18

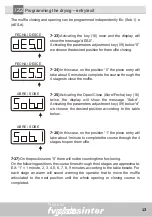
Vacuum time adjustment – VAC-2

7-19) 

Activate the vacuum time (14) key, and the display 

will show “00.00” minutes which is the standard recipe 
vacuum time that comes from the factory. 

TEMPO - VÁCUO - T2

7-20) 

Next,  activate  parameters  adjustment  keys  (09), 

one  for  each  digit  showing  on  the  display  the  desired 
value of “00.30” seconds.

PATAMAR - T2

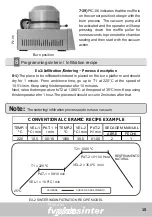
NOTES ABOUT THE VACUUM

A) 

The vacuum time can never be higher than the burn time, if the value for the vacuum 

time is higher than the value for the burn time, the furnace will determine for the vacuum 
time the same value as the burn time.

B)

 Vacuum time the same as “00.01” (1-segundo) indicates that the vacuum will be 

performed  on  the  heating  ramp  between  T1  and  T2.  When  the  T2  temperature  is 
reached the vacuum will be turned off.

C)

 ) Vacuum time the same as “00.00” (zero) indicates that the vacuum will not be 

performed at any time during the burn process.

D)

 Vacuum time higher than (1-second) Ex: ”00.30” indicates that the vacuum will be 

performed on the heating ramp using the baseline.

7.

21

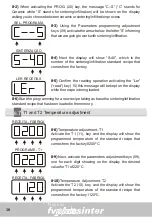
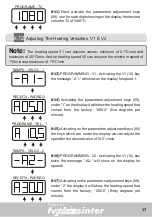
Manual vacuum adjustment sim/não (yes/no)

This  key  is  used  when  one  wants  to  change  the  vacuum  time 
during the burn. 
Activate the manual vacuum key (19) when you want to start or 
interrupt the vacuum at any stage of the process, the pump will 
perform  the  desired  function  over  any  previous  programming. 

When the LED above the key is on it means that the pump is activated. When the 
LED is off it means that the pump is deactivated. 

VÁCUO

MANUAL

12

Summary of Contents for Fv Plus Sinter

Page 1: ...Manual CAPA ...

Page 2: ...ions of the package if any damage is noticed contact the company immediately which will provide guidance on how to proceed We remind you that the equipment is shipped at the purchaser s account and risk and it is insured by the conveyor 1 1 The FV PLUS package should include A Afurnace settled in injected foam B Arigid mat I Pic 5 Item 24 C Asoft mat D Aset of isothermal pins Pic 5 item 25 E Instr...

Page 3: ...acuum is not used for the burn as it happens with the sintering infiltration For this procedure the S A L V Sistema de Aquecimento de Longa Vida long life heating system requires the vacuum pump to help with the air circulation inside the muffle therefore having its heating element durability increased resistance Note Not checking the procedures above will interfere on the equipment correct workin...

Page 4: ...life of the resistance at high temperatures This exclusive technological advance allowed EDG to extend the guarantee to 2 years for the furnaces equipped with this system To endure the high temperatures involved in the processes the sensor termopar should be made of platinum which on the other hand is not adequate for low temperatures and for the necessary speed for eliminating water during the si...

Page 5: ...ts Flashing and beeping signs of all process steps To avoid ambience heating and save energy an alarm will sound after 10 minutes if the equipment is not being operated and a Prot message will also be displayed warning that the muffle should be partially and manually closed Quick cooling Operation time totalizer Low cost muffle replacing system Electronic system forced ventilation keeps the compon...

Page 6: ...he furnace to the same network in which other furnaces compressors electrical taps or any other high electricity consumption devices are already connected 4 4 Check if the outlet in which the furnace will be plugged in is in perfect condition and of good quality to bear at least 20 amperes 4 5 Connect the grounding end round pin to a grounding rod and never to the electrical network neutral NOTE N...

Page 7: ...thin layer which makes the activation of its keys and functions easier 5 3 Identifying the keys and its functions 8 9 10 11 12 13 14 15 16 17 18 19 20 21 22 08 4 digits display 09 Parameters programming adjustment keys 10 Temperature keyT2 final burn 11 Temperature keyT1 piece entry 12 Heating speed key veloc 2 A2 13 Burn time key baseline Pat 2 14 Vacuum time key Vac 2 15 Database recipes key 16 ...

Page 8: ... SCREEN 2 On the second screen the current program version can be seen for product manufacturing 6 5 SCREEN 3 The message Ar can be seen on the third screen and the program waits for 30 seconds for the air to return to the muffle 6 6 SCREEN 4 On the fourth screen after the checking up is done the system loads the sintering standard no 40 recipe padrão de sinterização n 40 and will keep waiting for...

Page 9: ...we will follow practical examples for conventional ceramic sintering and infiltration recipes Starting from the ambient temperature raise it to T1 620 C that is the furnace entry temperature Keep this temperature until the operator s command to start the burn The muffle closing process preheating drying should take about 5 minutes The burn temperature is 900 C T2 Note Place the piece on the isothe...

Page 10: ...amic or sintering infiltration process The heating speed betweenT1 andT2 should be 55 C minute The burn time will be 1 minute The vacuum should turn the muffle closing on and turn it off 30 seconds after the burn time has started After the process is finished the piece should be removed in 1minute 7 3 Using the Parameters programming adjustment keys 9 activate the arrow below the letter C informin...

Page 11: ... 7 T1 And T2 Temperature adjustment 7 8 Temperature adjustment T1 Activate the T1 11 key and the display will show the programmed temperature of the standard recipe that comes from the factory 0600 PROG TEMP T1 7 9 Next activate the parameters adjustment keys 09 one for each digit showing on the display the desired value for T1 of 0620 C The furnace will heat until this temperature TEMPERATURA T1 ...

Page 12: ...showing on the display the desired value of A055 degrees minute 7 15 Burn time adjustment T2 BASELINE Note The burn time of the ceramic processes are shown in minutes and seconds For example 00 30 corresponds to thirty seconds 05 35 corresponds to 5 minutes and thirty five seconds PROG VÁCUO T2 7 16 Activate the burn time 13 key and the display will show 00 30 seconds which is the standard recipe ...

Page 13: ...that the vacuum will be performed on the heating ramp between T1 and T2 When the T2 temperature is reached the vacuum will be turned off C Vacuum time the same as 00 00 zero indicates that the vacuum will not be performed at any time during the burn process D Vacuum time higher than 1 second Ex 00 30 indicates that the vacuum will be performed on the heating ramp using the baseline 7 21 Manual vac...

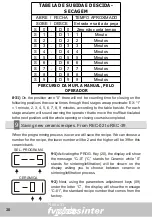
Page 14: ...Abre Fecha key 16 twice the display will show the message Sob d Activating the parameters adjustment key 09 below d we choose the desired position according to the table below 7 26 In this case on the position 1 the piece entry will take about 1 minute to complete the course through the 4 stages to open the muffle ABRE SOBE 7 27 On the position zero 0 there will not be counting time for closing On...

Page 15: ... S 9 D 9 9 Minutos TABLE FOR ASCENT AND DESCENT DRYING ABRE FECHA SOBE DESCE MUFFLE MANUAL COURSE BY OPERATOR Zero não conta tempo Entrada e saída da peça TEMPO APROXIMADO 7 28 Muffle course examples in the 4 closing stages 4º Entry or exit stage 04 Pic 10 3º Entry or exit stage 03 Pic 09 1º Entry or exit stage 01 Pic 07 2º Entry or exit stage 02 Pic 08 14 ...

Page 16: ...inute From ambience time go up to T1 at 220 C at the speed of 10 5 c min Keep using this temperature for 10 minutes Next raise the temperature to T2 at 1 080 C at the speed of 35 C min Keep using this temperature for 1 hour The piece exit should occur in 2 minutes after that Note The sintering infiltration processes do not use vacuum ABRE FECHA 220 10 5 00 10 1080 35 0 01 00 2 1 CONVENTIONAL CERAM...

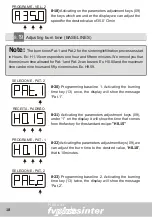
Page 17: ...the Ler read key 15 this message will be kept on the display while the recipe is being loaded LER RECEITAS 8 6 Start the programming for a new recipe taking as base the sintering infiltration standard recipe that has been loaded in the memory 8 7 T1 and T2 Temperature adjustment 8 8 Temperature adjustment T1 Activate the T1 11 key and the display will show the programmed temperature of the standar...

Page 18: ...r speed 1 PROGRAME T2 RECEITA PADRÃO 8 14 Activating the parameters adjustment keys 09 under 1 on the display it will show the heating speed that comes from the factory A05 0 five degrees per minute PROGRAME VEL 1 8 15 Activating on the parameters adjustment keys 09 the keys which are under the display we can adjust the speed for the desired value of 10 5 c min RAMPA VELOC 2 8 16 PROGRAMMING V2 Ac...

Page 19: ...0 00 and the maximum time can be nine hours and fifty nine minutes Ex H9 59 8 20 Programming baseline 1 Activating the burning time key 13 once the display will shoe the message Pat 1 SELECIONE PAT 2 PROGRAME PAT 1 RECEITA PADRÃO 8 21 Activating the parameters adjustment keys 09 under 1 on the display it will show the time that comes from the factory for the standard recipe H0 15 8 22 Activating t...

Page 20: ...7 Programming the muffle closing Activating the key 16 once the display will show the message dES 0 FECHA DESCE 8 28 Activating the parameters adjustment key 09 below 0 we choose the desired position according to the table below In this case on the position 2 the piece entry will take about 2 minutes to complete the piece entry ABRE SOBE 8 29 Activating the Open Close Abre Fecha key 16 twice the d...

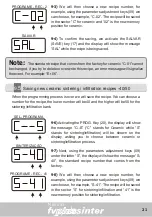
Page 21: ... sound warning the operator that to move the muffle articulated to the next position until the whole opening or closing course is completed 9 Saving new ceramic recipes From REC 02 to REC 39 When the programming process is over we will save the recipe We can choose a number for the recipe the lower number will be 2 and the higher will be 39 for this ceramic bank 9 1 Activating the PROG Key 20 the ...

Page 22: ...g process is over we will save the recipe We can choose a number for the recipe the lower number will be 40 and the higher will be 50 for the sintering infiltration bank SEL PROGRAMA 9 6 Activating the PROG Key 20 the display will show the message C S C stands for Ceramic while S stands for sintering infiltration will be shown on the display asking you to choose between ceramic or sintering infilt...

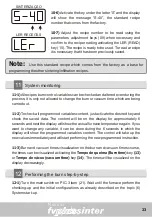
Page 23: ... th letter C and the d splay A e t e i will s ow the me sage C 1 the standard rec e h s 0 ip nu ber that co es fro the f ctory m m m a L R EITAS ER EC 10 dju ecip mb e rea ing th 3 A st the r e nu er to b d us e ara ters a stm t eys 0 en n ess nd p me dju en k 9 wh ec ary a c firm t re e din a atin th LE RE on to he cip rea g ctiv g e R AD key rec is re y to use To ad a cipe 15 The ipe ad be d re ...

Page 24: ...rried out 11 2 To check all programmed variables content just activate the desired key and check the saved data The content will be on the display for approximately 6 seconds and next the display will show the actual furnace temperature again If you want to change any variable it can be done during the 6 seconds in which the display will show the programmed variables content The control will take ...

Page 25: ...rocess by activating the Ler read key 15 to complete the operation Keys used sequence LER PROG 12 3 After reading the ceramic recipe the furnace will start the heating process to reach the temperature T1 620ºC in which it will stabilize waiting for a command by the operator T2 900ºC PAT 2 1 00 VAC 2 0 30 VEL 2 55ºC T1 620ºC RESFRIAMENTO NATURAL MUFLA ABERTA SECAGEM NO ESTÁGIO 4 CURVA DE AQUECIMENT...

Page 26: ...ssage dE 4 Stage 4 PIC 10 is the higher articulated position next we will have dE 3 Stage 3 PIC 9 put it down to a lower position and then dE 2 Stage 2 PIC 8 put it down once more dE 1 Stage 1 PIC 7 and finally FECH Burn start stage PIC 6 At this moment the operator should press down the muffle puller to promote the chamber sealing and then start with the vacuum suction 12 6 At this point the furn...

Page 27: ... be kept that way until the next burn process An alarm will sound warning the operator to close the muffle The display will show the Prot message This process helps saving energy and avoids the unnecessary ambient heating If you do not want to enable this function just keep the muffle closed for disabling it 13 3 Totalizador de horas de processo The furnace is equipped with a device that sums up t...

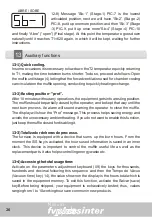
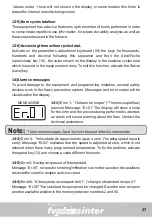
Page 28: ...sages and error codes will be visualized on the display 14 1 Error 1 Falha no termopar Thermocouple flaw sensor Message Er 01 The display will show a code for the error and the process being performed is aborted an alarm will sound warning about the flaw Contact the technical assistance MENSAGENS Note The errors messages 2 and 3 will not be used in this furnace model 14 2 Error 4 Velocidade de aqu...

Page 29: ...on Check the programming Specification Power supply 110 or 220 volts 50 60 Hz Under request Maximum consumption 1400 Watts Fuses 20 amperes to 110 volts 15 amperes to 220 volts Maximum operation temperature 1100 C with the vacuum Maximum safety limiter in 1200 C Equipment dimensions Width 290mm Height 320mm Depth 370mm Net weight 10 5Kg Package dimensions 450mm x 390mm x 340mm Gross weight 11Kg 28...

Page 30: ...Manual EDG Equipamentos e Controles Ltda R Eduardo Gobato 300 Centro Empresarial de Alta Tecnologia C E A T São Carlos S P 13573 440 Brasil 55 16 33779600 edg edg com br www edg com br ...

Reviews: