background image

P-164000476

9395P 500kVA / 600 kVA

127

Revision 002

User’s and Installation Guide

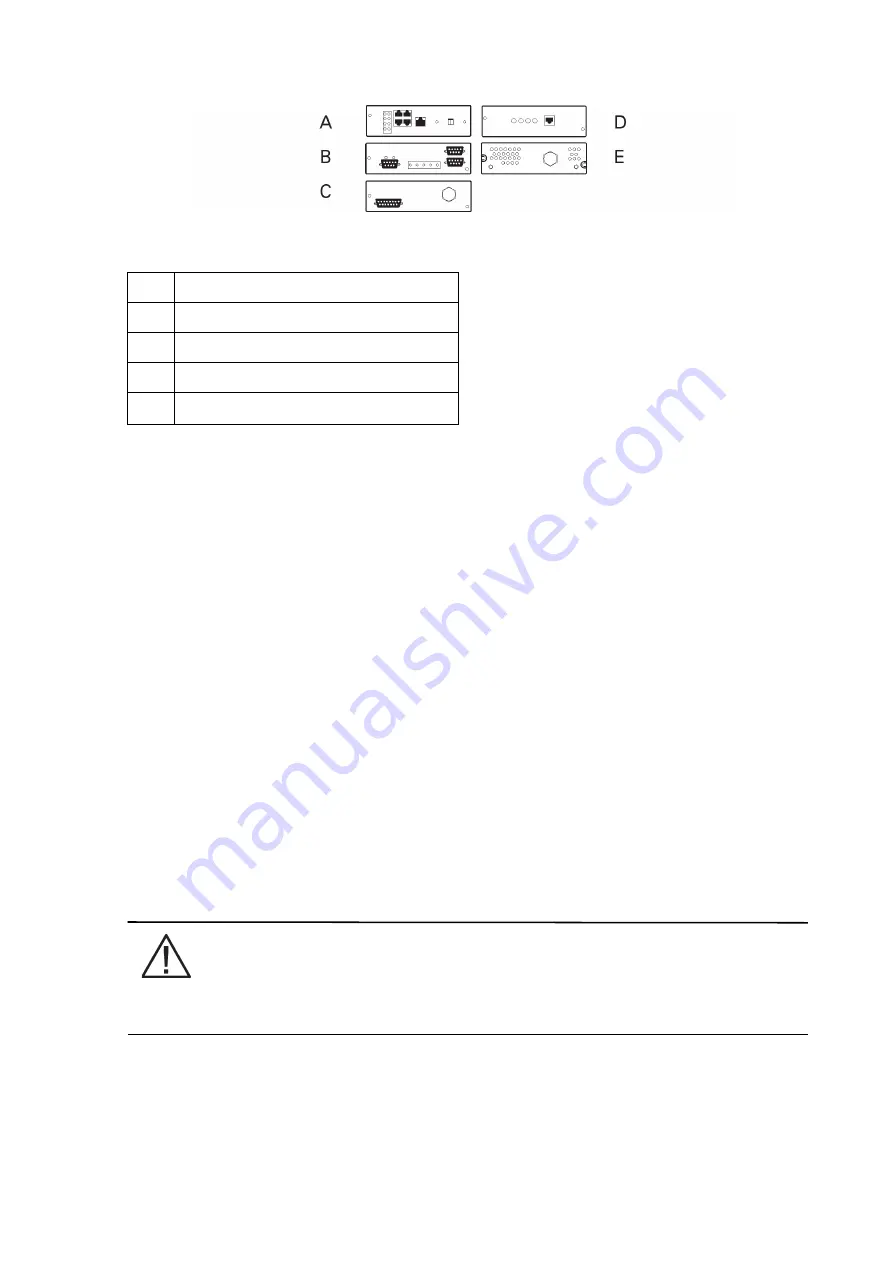
Figure 8-1. Optional X-Slot cards

8.2 LanSafe Power Management Software

Each Eaton 9395P UPS ships with LanSafe® Power Management Software. To begin installing LanSafe 
software, see the instructions accompanying the Software Suite CD.

LanSafe software uses an RS-232 serial link to communicate with the UPS. The software provides up-
to-date graphics of UPS power and system data and power flow, a complete record of critical power 
events, and notification of important UPS or power information. With custom views for monitoring 
status and metering information, various user groups can select the most useful view for their specific 
needs. LanSafe Power Management Software

8.3 Terminal mode

Terminal mode is supported by all RS-232 serial communication ports of the UPS. The following 
settings should be used:

Baud rate:19200

8 data bits

no parity

1 stop bit

NOTE

The brackets ([ ]) in the following bullets indicate standard keyboard characters. To use a key 
combination, hold down the Escape key and press the indicated letter key.

A

ConnectUPS-X Web/SNMP card

B

Modbus card

C

Relay interface card

D

Modem card

E

Industrial relay card

Summary of Contents for Power Xpert 9395P

Page 1: ...User s and Installation Guide Power Xpert 9395P UPS 500 kVA 600 kVA P 164000476 ...

Page 2: ...P 164000476 9395P 500kVA 600 kVA 2 Revision 002 User s and Installation Guide ...

Page 3: ...P 164000476 9395P 500kVA 600 kVA 3 Revision 002 User s and Installation Guide Power Xpert 9395P UPS 500 kVA 600 kVA User s and Installation Guide ...

Page 4: ...e This is a product for commercial and industrial application in the second environment Installation restrictions or additional measures may be needed to prevent disturbances February 9 2015 Eaton Corporation All Rights Reserved The contents of this manual are the copyright of the publisher and may not be reproduced even extracts unless permission granted Every care has been taken to ensure the ac...

Page 5: ...ass power wiring preparation 24 3 3 Inspecting and unpacking the UPS cabinet 25 4 UPS system installation 28 4 1 Preliminary installation information 28 4 2 Unloading the UPS cabinet from the pallet and mechanical installation 28 4 3 Field installed UPM FI UPM installation 32 4 4 Battery cabinet installation 32 4 5 Distributed bypass tie cabinet installation 32 4 6 Installing UPS external and batt...

Page 6: ...ode from the EEA controls menu 107 7 4 7 Start Variable Module Management System High Alert mode from the EEA controls menu 107 7 4 8 Transfer from Normal to Bypass mode 108 7 4 9 Transfer from Bypass to Normal mode 108 7 4 10 Enable Energy Saver System from EAA Controls menu 108 7 4 11 Disable Energy Saver System from EAA Controls menu 109 7 4 12 Transfer from Energy Saver System to Bypass mode 1...

Page 7: ...4 Building alarm monitoring 130 8 5 General purpose relay contact 130 9 UPS maintenance 131 9 1 Important safety instructions 131 9 2 Performing preventive maintenance 132 9 2 1 DAILY maintenance 132 9 2 2 MONTHLY maintenance 132 9 2 3 PERIODIC maintenance 132 9 2 4 ANNUAL maintenance 132 9 2 5 BATTERY maintenance 132 9 3 Installing batteries 133 9 4 Recycling the used UPS or batteries 133 9 5 Mai...

Page 8: ... kVA 600 kVA 20 Table 5 7 Recommended installation parts not supplied by Eaton Corporation 21 Table 5 8 Recommended input circuit breaker ratings 21 Table 5 9 Recommended bypass and output circuit breaker ratings 22 Table 5 10 Recommended DC input circuit breaker ratings 22 Table 4 1 TB1 TB2 and TB3 interface connections 47 Table 4 2 Remote EPO wire terminations 51 Table 5 1 HotSync CAN Bridge Car...

Page 9: ...rrent through the UPS in normal mode 63 Figure 6 3 Path of current through the UPS in bypass mode 64 Figure 6 4 Path of current through the UPS in Energy Saver System 66 Figure 6 5 Path of current through the UPS in battery mode 67 Figure 6 6 UPS system common rectifier feed common battery Dual Feed configuration 69 Figure 6 7 UPS system common rectifier feed separate battery Dual Feed configurati...

Page 10: ...creen 98 Figure 7 30 Bypass Mode Metering Method Option Screen 99 Figure 7 31 Settings Screen 99 Figure 7 32 Configuration Options Screen 100 Figure 7 33 Energy Advantage Architecture EAA Screen 100 Figure 7 34 Disable ESS Screen 101 Figure 7 35 High Alert Timer Screen 101 Figure 7 36 Statistics Basic Screen 102 Figure 7 37 Statistics Data Detail Screen 102 Figure 7 38 ESS Comparison Screen 102 Fi...

Page 11: ...s batteries provide emergency power to safeguard operation The UPS system is housed in a single free standing cabinet with safety shields behind the door for hazardous voltage protection The cabinet matches the battery and distribution cabinets in style and color and can be installed in line up and match or standalone configurations Figure 1 1 shows the Eaton 9395P UPS 500 kVA 600 kVA NOTE Startup...

Page 12: ...r the building alarms in addition to the UPS status See Chapter 8 Communication for additional information Alarm Contact One alarm contact is provided for connection to equipment at the facility such as a light an audible alarm or a computer terminal The equipment connected to this contact alerts you to a UPS alarm See Chapter 8 Communication for additional information X Slot Communication Bay A f...

Page 13: ... The FI UPM may be installed at any time in the future when power needs change The module cabinet is installed on the left side of the UPS and is wired directly to the UPS No input or output wiring changes are needed for redundancy Operation remains the same as for the original UPS 1 2 3 Sync Control An optional Eaton 9395P Sync Control maintains the critical load outputs of two separate single mo...

Page 14: ...eed protection contactor This configuration is primarily used in multiple UPS parallel systems that do not need a bypass for each UPS and use a separate System Bypass Module SBM to provide system bypass capabilities 1 2 8 Inherent redundancy To deliver greater reliability the Eaton 9395P UPS can be configured by an authorized Eaton Customer Service Engineer for inherent redundancy When configured ...

Page 15: ...ert mode all idle UPMs go online for one hour At the end of the hour the UPS defaults back to VMMS mode If the High Alert mode is reactivated during the one hour the one hour timer will be restarted 1 2 11 Optional X Slot cards The optional X Slot cards support several protocols such as SNMP HTTP AS 400 and Modbus See Chapter 8 Communication for additional information 1 3 Basic system configuratio...

Page 16: ... apply to the UPS system being installed or operated 1 5 Conventions used in this manual This manual uses these type conventions Bold type highlights important concepts in discussions key terms in procedures and menu options or represents a command or option that you type or enter at a prompt Italic type highlights notes and new terms where they are defined Screen type represents information that ...

Page 17: ...g Scheduling initial startup Regional locations and telephone numbers A question about any of the information in this manual A question this manual does not answer RISK OF ELECTRIC SHOCK Indicates that a risk of electric shock is present and the associated warning should be observed CAUTION REFER TO OPERATOR S MANUAL Refer to your operator s manual for additional information such as important oper...

Page 18: ...P 164000476 9395P 500kVA 600 kVA 8 Revision 002 User s and Installation Guide ...

Page 19: ...ve humidity 95 maximum The system is not intended for outdoor use Ensure all power is disconnected before performing installation or service Batteries can present a risk of electrical shock or burn from high short circuit current The following precautions should be observed 1 Remove watches rings or other metal objects 2 Use tools with insulated handles 3 Do not lay tools or metal parts on top of ...

Page 20: ...ON and WARNING notices affixed to the inside and outside of the equipment CAUTION To prevent damage to the wiring channel and wiring in the UPS cabinet base when lifting or moving the cabinet Lift and move the cabinet using only the front or rear forklift slots Verify that the forklift forks are in a horizontal position before inserting them into the forklift slots DO NOT angle fork tips upward In...

Page 21: ...rms specified on page 123 become void This service is offered as part of the sales contract for the UPS Contact service in advance usually a two week notice is required to reserve a preferred startup date 3 1 Creating an installation plan Before installing the UPS system read and understand how this manual applies to the system being installed Use the procedures and illustrations in Section 3 2 an...

Page 22: ... The UPS cabinets use forced air cooling to regulate internal component temperature Air inlets are in the front of the cabinet and outlets are in the top You must allow clearance in front of and above each cabinet for proper air circulation The clearances required around the UPS cabinet are shown in Table 3 2 Table 3 2 UPS cabinet clearances The basic environmental requirements for operation of th...

Page 23: ...tilation requirements during full load operation Ventilation required for cooling air exhaust approximately 920 liter sec 250 300kVA unit 280 liter sec ISBM Figure 3 1 UPS cabinet dimensions front view Rating kVA Heat rejection kW Heat rejection BTU h x 1000 500 kVA 19 8 67 6 600 kVA 25 5 87 0 1882 1874 1874 1878 ...

Page 24: ...P 164000476 9395P 500kVA 600 kVA 14 Revision 002 User s and Installation Guide Figure 3 2 UPS cabinet dimensions right side view Figure 3 3 UPS cabinet dimensions top view ...

Page 25: ...P 164000476 9395P 500kVA 600 kVA 15 Revision 002 User s and Installation Guide Figure 3 4 UPS cabinet dimensions bottom view ...

Page 26: ...P 164000476 9395P 500kVA 600 kVA 16 Revision 002 User s and Installation Guide Figure 3 5 UPS cabinet center of gravity 1882 1874 1874 1878 970 1057 ...

Page 27: ...P 164000476 9395P 500kVA 600 kVA 17 Revision 002 User s and Installation Guide Figure 3 6 Remote EPO switch dimensions 1 1 2 in knockout pattern typ 5 sides 1 ...

Page 28: ...ent are rated at 70 C If wire is run in an ambient temperature greater than 30 C higher temperature wire and or larger size wire may be necessary NOTE Callout letters A B C and D map to the figures in Section 6 3 on page 75 Bypass wiring data is not applicable to Input Output Module IOM configurations Table 3 4 Input output rating for 9395P 500 kVA 600 kVA Units Rating 50 60 Hz Rating kVA kW 500 2...

Page 29: ... neutral and there is no neutral conductor connected at the bypass input an optional neutral forming kit must be used This UPS system can be installed to the TN TT or IT power distribution systems NOTE Additional warning labels shown in Figure 5 7 shall be installed at the UPS input terminals and all primary power isolators used to isolate the UPS unit if the UPS system is installed to an IT power...

Page 30: ... IOM configurations Terminal function Terminal Function Bus landing Tightening torque Nm Bolt size AC input to UPS rectifier E1 Phase L1 4 2 bolt mounting 76 M12 E2 Phase L2 4 2 bolt mounting 76 M12 E3 Phase L3 4 2 bolt mounting 76 M12 AC input to bypass E6 Phase L1 4 2 bolt mounting 76 M12 E7 Phase L2 4 2 bolt mounting 76 M12 E8 Phase L3 4 2 bolt mounting 76 M12 AC output to critical load E9 Phas...

Page 31: ...pplying a 550 kVA three phase transformer to allow for inrush current Bypass input wiring and bypass input breaker rating should be treated as if supplying a 550 kVA load regardless of the rating of the UPS Bypass and output overcurrent protection and bypass and output disconnect switches are to be provided by the user Table 5 9 lists the recommended rating for bypass and output circuit breakers s...

Page 32: ...ser Table 5 10 lists the maximum rating for continuous duty rated circuit breakers satisfying the criteria for both Table 5 10 Recommended DC input circuit breaker ratings Rated battery current is computed at 1 7 volts per cell The battery wiring used between the battery and the UPS should not allow a voltage drop of more than 1 of nominal DC voltage at rated battery current If the conductors used...

Page 33: ...nnected between the alarm input and common terminal All control wiring and relay and switch contacts are customer supplied Use twisted pair wires for each alarm input and common The building alarms can be programmed to display the alarm functional name LAN and telephone drops for use with X Slot cards must be provided by facility planners or the customer The UPS Battery Aux and 48 Vdc Shunt Trip s...

Page 34: ...n page 19 The UPS can be installed in a high resistance ground application only by using a factory installed neutral forming kit MOBs with dual auxiliary contacts are to be provided by the customer Table 3 9 on page 22 lists the recommended rating for the MOBs The tie cabinet must contain Module Output Breakers MOBs with dual auxiliary contacts for control of the system Without dual auxiliary MOBs...

Page 35: ...e installation site or as close as possible before unpacking Insert the forklift or pallet jack forks from the right side of the cabinet between the supports on the bottom of the pallet see Figure 3 8 on page 26 for the location of the UPS center of gravity WARNING Do not tilt the UPS cabinet more than 10 from vertical or the cabinet may tip over 3 Set the pallet on a firm level surface allowing a...

Page 36: ...allation Guide NOTE While waiting for installation protect the unpacked cabinet from moisture dust and other harmful contaminants Failure to store and protect the UPS properly may void your warranty Figure 3 8 Eaton 9395P 500 kVA 600 kVA cabinet as shipped on pallet ...

Page 37: ...P 164000476 9395P 500kVA 600 kVA 27 Revision 002 User s and Installation Guide ...

Page 38: ...he UPS 4 2 Unloading the UPS cabinet from the pallet and mechanical installation The UPS cabinet is bolted to a wooden pallet supported by wood skids To remove the pallet and mechanically install the UPS perform the following procedure WARNING The UPS cabinet is heavy See Table 3 1 on page 12 for weight of cabinets If unloading instructions are not closely followed the cabinet may cause serious in...

Page 39: ...ng the cabinet retain the shipping bracket and securing hardware for later use 3 Remove the three bolts securing the right side shipping bracket to the cabinet and three bolts securing the bracket to the pallet see Figure Remove the right shipping bracket If permanently mounting the cabinet retain the shipping bracket and securing hardware for later use 4 Using the forklift raise the UPS cabinet s...

Page 40: ...0kVA 600 kVA 30 Revision 002 User s and Installation Guide Figure 4 1 Removing left side shipping bracket ISBM and FI UPM 1 Shipping bracket bolts 2 Removable right front panel 3 Pallet 4 Left side shipping bracket 1 2 3 4 ...

Page 41: ...002 User s and Installation Guide Figure 4 2 Removing right side shipping bracket ISBM and FI UPM 1 Top screw 2 Removable left front panel 3 Front door 4 Bottom screws 5 Pallet 6 Right side shipping bracket 7 Shipping bracket bolts 1 2 3 5 6 7 8 4 ...

Page 42: ... installed proceed to Section 4 5 if installing a distributed bypass tie cabinet otherwise proceed to Section 4 6 to complete the wiring of the UPS and battery cabinet 4 5 Distributed bypass tie cabinet installation NOTE The tie cabinet must contain Module Output Breakers MOBs with dual auxiliary contacts for control of the system Without dual auxiliary MOBs UPSs are not allowed to go to bypass in...

Page 43: ...mode For proper operation the following must be true 1A 2A 3A 4A 1B 2B 3B 4B In order to save cabling costs the following is also considered to be sufficient 1A 1B 2A 2B 3A 3B 4A 4B Any difference in wire length will result in decreased capacity of the UPS system while on bypass For example a 10 difference between the longest and shortest wire lengths will result in a decrease in bypass capacity o...

Page 44: ...d two bottom screws securing the UPS left front panel see Figure 4 4 on page 35 Lift the panel straight up to remove from the panel hanger bracket at the top of the cabinet 2 Route the input and output cables through either the top or bottom of the cabinet to the UPS terminals See Figure 4 4 through Figure 4 9 for wiring access information and common rectifier feed terminal locations or Figure 4 6...

Page 45: ...e operating system 2 Top entry conduit landing for AC input and output and DC input Remove panel to drill or punch cable entry holes 3 Interface entry for TB1 through TB3 wiring and X Slot connections Remove panels to drill or punch cable entry holes 4 Bottom entry conduit landing for AC input and output and DC input remove panel to drill or punch cable entry holes 1 2 3 4 ...

Page 46: ...P 164000476 9395P 500kVA 600 kVA 36 Revision 002 User s and Installation Guide Figure 4 5 UPS power terminal locations part a The terminals in the circle are not included in IOM units ...

Page 47: ...P 164000476 9395P 500kVA 600 kVA 37 Revision 002 User s and Installation Guide NOTE UPS power terminal locations part bA unit with separate rectifier feeds has two sets of rectifier AC input connections ...

Page 48: ...P 164000476 9395P 500kVA 600 kVA 38 Revision 002 User s and Installation Guide Figure 4 6 UPS power terminal locations separate rectifier feed B B B A A 15704 0209 15704 0209 ...

Page 49: ...164000476 9395P 500kVA 600 kVA 39 Revision 002 User s and Installation Guide Figure 4 7 Front view 1 Rectifier input 2 Load output 3 Not in use 4 By pass input 5 Battery 6 Neutral 7 Battery 1 2 3 4 5 6 7 ...

Page 50: ...DC power wiring from the battery cabinet to the UPS cabinet battery and ground terminals See Section 3 2 2 on page 19 for wiring and termination requirements 4 Proceed to Step 7 5 Route and connect the battery cables between the UPS and the battery system See Figure 4 4 through Figure 4 6 for wiring access information and terminal locations 6 Connect the positive negative and ground DC power wirin...

Page 51: ... Terminal block TB3 is accessible on the left side of the X Slot communication bay To gain access to terminal blocks TB1 and TB2 and the interface entry plates loosen the screws securing the protective cover panel and remove the panel This panel is to the right of the X Slot Communication Bay see Figure 4 9 on page 43 5 Remove the UPS cabinet top interface entry plates to drill or punch holes see ...

Page 52: ... current rating of 5A and a switched voltage rating of 30 Vac and 28 Vdc Alarm relay normally open and normally closed return terminals are separated on the terminal board but are connected together Do not directly connect relay contacts to the mains related circuits Reinforced insulation to the mains is required Alarm relay wiring should be a minimum of 75 mm2 ...

Page 53: ...kVA 600 kVA 43 Revision 002 User s and Installation Guide Figure 4 9 Interface terminal locations 1 X slot communication bays 2 TB1 and TB2 3 TB3 4 Protective cover panels 5 Control panel 6 AC input breaker CB1 1 2 3 4 5 6 ...

Page 54: ... 002 User s and Installation Guide For TB1 TB2 and TB3 connector assignments see Figure 4 10 and for detail AA see Figure The X Slot communication bays are illustrated in Figure 4 12 NOTE Interface terminal detail AA 1 X Slot communication bays 1 ...

Page 55: ...EPO return 17 Building alarm 1 5 Battery aux 18 Building alarm 1 return 6 Battery aux return 19 Building alarm 2 7 Battery shunt trip 20 Building alarm 2 return 8 Battery shunt trip 21 Building alarm 3 9 K3 AUX 22 Building alarm 3 return 10 K3 AUX return 23 Building alarm 4 11 Pull chain 24 Building alarm 4 return 12 Pull chain return 25 Building alarm 5 13 Alarm relay NC 26 Building alarm 5 retur...

Page 56: ...t is not used Terminal TB1 Name Description 1 Remote EPO NC Dry contact used to activate remote EPO of UPS 2 Remote EPO return 3 Remote EPO NO 4 Remote EPO return 5 Battery aux 6 Battery aux return 7 48 Vdc battery shunt trip 8 48 Vdc battery shunt trip 9 K3 AUX 10 K3 AUX return Terminal TB2 Name Description 1 Pull chain Backup control for parallel operation 2 Pull chain return 3 Alarm relay NC Ge...

Page 57: ...tached to the UPS cabinet proceed to Step 7 if battery cabinets are installed separated from the UPS cabinet or a rack mounted battery system is being used proceed to Step10 7 Route the Shunt trip and Aux wiring harness supplied with the battery cabinet from the battery cabinet to the UPS cabinet Refer to the Eaton 9395P Integrated Battery Cabinet Model IBC L installation manual for battery cabine...

Page 58: ...ready installed install the LAN and telephone drops 2 If not already accomplished remove one top screw and two bottom screws securing the UPS center front panel see Figure 4 2 on page 32 Lift the panel straight up to remove from the panel hanger bracket at the top of the cabinet 3 Remove the UPS cabinet interface entry plates to drill or punch holes see Figure 4 4 on page 36 4 Reinstall the interf...

Page 59: ...kVA 600 kVA 49 Revision 002 User s and Installation Guide Figure 4 12 X Slot communication bays 1 X Slot communications bay 1 2 X Slot communications bay 2 3 X Slot communications bay 3 5 X Slot communications bay 4 2 4 1 3 ...

Page 60: ...e Chapter 7 UPS operating instructions for shutdown instructions 3 Remove one top screw and two bottom screws securing the UPS center front panel see Figure 4 2 on page 31 Lift the panel straight up to remove from the panel hanger bracket at the top of the cabinet Figure 4 13 Remote EPO switch 4 To gain access to terminal blocks TB1 and TB2 and the interface entry plates loosen the screws securing...

Page 61: ...cuitry of the upstream protective devices A normally open NO contact is provided between terminals 6 and 7 of the remote EPO switch where applicable as shown in Figure 4 13 Remote EPO switch wiring must be in accordance with electrical code requirements 12 When all wiring is complete reinstall the protective cover panel and secure with the cabinet mounted screws 13 Reinstall the center front panel...

Page 62: ...inimum Remote EPO normally open and normally closed return terminals are separated on the terminal board but are connected together Figure 4 16 Normally closed and normally open remote EPO switch wiring NOTE Remote EPO switch rating is 24 Vdc 1 A minimum Remote EPO normally open and normally closed return terminals are separated on the terminal board but are connected together ...

Page 63: ...at the end of this manual This checklist ensures that you have completely installed all hardware cables and other equipment Complete all items listed on the checklist to ensure a smooth installation Make a copy of the installation checklist before filling it out and retain the original If installing a parallel system complete the parallel system installation checklist in addition to the installati...

Page 64: ... the card 1 Verify the UPS system is turned off and all power sources are disconnected See Chapter 17 UPS operating instructions for shutdown instructions 2 Unfasten the front door latch and swing the door open see Figure 4 2 on page 32 3 If installing interface wiring through the left interface entry conduit landing proceed to Step 4 otherwise proceed to Step 6 4 Remove one top screw and two bott...

Page 65: ...allel Systems Control 3 Connections for RPM II RIM II or SCM II 4 Connections for Bypass Status 5 Alarm J3 Terminal Name Description 1 Alarm Programmable UPS alarm Activate by a remote dry contact closure 2 Alarm Return 3 Alarm Relay NC Normally closed contact opens when UPS is on bypass 4 Alarm Relay Com Bypass contact return 5 Alarm Relay NO Normally open contact closes when UPS is on bypass 6 T...

Page 66: ...mination requirements see Section 3 2 3 on page 23 Table 4 1 on page 48 and Figure 4 9 on page 44 through Figure 4 11 7 Route and install CAN wiring between the UPS cabinets See Figure 5 2 and Table 5 1 on page 59 for the HotSync CAN Bridge Card terminal location and Figure 5 3 Figure 5 4 and Table 5 2 on page 58 for wiring information 8 If a tie cabinet with Module Output Breakers MOBs is being w...

Page 67: ...ing purposes and is not a floor layout plan UPSs can be placed in any physical order Figure 5 4 Distributed bypass system UPS CAN wiring without MOBs NOTE External CAN connections between UPSs require shielded twisted pair wire From UPS 1 CAN Bridge Card To UPS 2 CAN Bridge Card To UPS 3 CAN Bridge Card if installed To UPS 4 CAN Bridge Card if installed J3 8 L J3 8 L J3 8 L J3 8 L J3 9 H J3 9 H J3...

Page 68: ...g without MOBs NOTE Use twisted pair wiring between the UPS and MOB AUX contacts Table 5 3 Pull Chain wiring terminations J3 10 Shield J3 10 Shield J3 10 Shield J3 10 Shield From UPS 1 To UPS 2 To UPS 3 if installed To UPS 4 if installed TB2 1 Pull Chain TB2 1 Pull Chain TB2 1 Pull Chain TB2 1 Pull Chain TB2 2 Pull Chain TB2 2 Pull Chain TB2 2 Pull Chain TB2 2 Pull Chain ...

Page 69: ...signations on MOB AUX contacts are defined with breaker in OFF open position If MOB contacts have pigtail leads use the same wire gauge to connect to the UPS and use the correct crimp connections for the wire gauge External CAN connections between UPS cabinets require shielded twisted pair wire Use twisted pair wiring between the UPS and MOB AUX contacts ...

Page 70: ...2 CAN Bridge Card J3 2 Alarm Return MOB 2 Aux 1 Com UPS 2 TB2 1 Pull Chain MOB 2 Aux 2 NO Pull Chain UPS 2 TB2 2 Pull Chain Common UPS 3 TB2 2 Pull Chain Common Pull Chain Common UPS 3 CAN Bridge Card J3 1 Alarm MOB 3 Aux 1 NC MOB Open Alarm UPS 3 CAN Bridge Card J3 2 Alarm Return MOB 3 Aux 1 Com UPS 3 TB2 1 Pull Chain MOB 3 Aux 2 NO Pull Chain UPS 3 TB2 2 Pull Chain Common UPS 4 TB2 2 Pull Chain ...

Page 71: ... the parameters specified in Chapter 23 Product specifications the UPS uses a backup battery supply to maintain power to the critical load for a specified period of time or until the utility power returns For extended power outages the UPS allows you to either transfer to an alternative power system such as a generator or shut down your critical load in an orderly manner The emergency bypass consi...

Page 72: ...odes are In Normal mode the critical load is supplied by the inverter which derives its power from rectified utility AC power In this mode the battery charger also provides charging current for the battery if needed In Battery mode the battery provides DC power which maintains inverter operation The battery supports the critical load In Bypass mode the critical load is directly supported by utilit...

Page 73: ...onnected to the UPS and ready to support the inverter should the utility input become unavailable The inverter produces a three phase AC output to a customer s load without the use of a transformer The inverter derives regulated DC from the rectifier and uses IGBT devices and pulse width modulation PWM to produce a regulated and filtered AC output The AC output of the inverter is delivered to the ...

Page 74: ...ations or power outages from the source Some power line filtering and transient protection is provided to the load but no active power conditioning or battery support is available to the output of the system in the bypass mode of operation The internal bypass is comprised of a solid state silicon controlled rectifier SCR static switch SSW and a backfeed protection contactor K5 The static switch is...

Page 75: ... available from a UPM when in VMMS mode The default setting is 80 of the UPM full power rating If the limit is exceeded additional UPMs are activated to take on the increased load The VMMS redundancy setting sets the number of redundant UPMs that the customer requires Both the VMMS UPM load limit and UPM redundancy are user configurable In High Alert mode the UPS defaults to double conversion Onli...

Page 76: ...ransfer to Battery mode before returning to Normal mode Energy Saver mode is a normal operating mode and not an alarm condition While the UPS is in this mode the NORMAL light on the front display will illuminate 6 2 6 Battery mode The UPS automatically transfers to battery mode if a utility power outage occurs or if the utility power does not conform to specified parameters In battery mode the bat...

Page 77: ...f the input power fails to return or is not within the acceptance windows required for normal operation the battery continues discharging until a DC voltage level is reached where the inverter output can no longer support the connected loads When this event occurs the UPS issues another set of audible and visual alarms indicating SHUTDOWN IMMINENT Unless the rectifier has a valid AC input soon the...

Page 78: ...mon Battery Dual Feed Configuration Figure 6 7 on page 70 9395P 600 kVA 9395P 500 kVA 400 400 Single Reverse Transfer UPS Two UPM Common Rec tifier Feed Separate Battery Dual Feed Configuration Figure 6 8 on page 71 9395P 600 kVA 9395P 500 kVA 400 400 Single Reverse Transfer UPS Three UPM Common Rectifier Feed Common Battery Dual Feed Configuration Figure 6 9 on page 72 9395P 600 kVA 9395P 500 kVA...

Page 79: ...6 9395P 500kVA 600 kVA 69 Revision 002 User s and Installation Guide Figure 6 6 UPS system common rectifier feed common battery Dual Feed configuration Static Switch line not present in IOM configuration systems ...

Page 80: ... 9395P 500kVA 600 kVA 70 Revision 002 User s and Installation Guide Figure 6 7 UPS system common rectifier feed separate battery Dual Feed configuration Static Switch line not present in IOM configuration systems ...

Page 81: ...P 164000476 9395P 500kVA 600 kVA 71 Revision 002 User s and Installation Guide Figure 6 8 UPS system with a Field Upgrade UPM common rectifier feed common battery Dual Feed configuration ...

Page 82: ...P 164000476 9395P 500kVA 600 kVA 72 Revision 002 User s and Installation Guide Figure 6 9 UPS system with a Field Upgrade UPM common rectifier feed separate battery Dual Feed configuration ...

Page 83: ...with two upstream feeder breakers must be provided one for the UPS or rectifier input breaker RIB if installed and one for the maintenance bypass input DO NOT use a single feed or a single feeder breaker to supply both the UPS or RIB and the maintenance bypass If a bypass input breaker BIB is installed in the maintenance bypass and a single feed UPS is being installed a single feed to the maintena...

Page 84: ... is used for a secondary communication path This arrangement ensures bypass control even if the CAN bus is lost The system is paralleled for N 1 redundancy as long as there is always one or more UPMs online than required to support the load The system is paralleled for capacity if all UPMs in a system are required to support the load 6 4 1 Multiple UPS parallel system modes Similar to the single U...

Page 85: ...g each mode of operation 6 4 2 Normal mode distributed bypass In Normal mode utility AC power is supplied to the UPSs Each UPS then conditions the incoming AC power and provides clean regulated AC power to tie cabinet or distribution panel for parallel systems of up to four modules The applied load is shared equally among the available UPMs in the system Figure 6 11 shows the path of electrical po...

Page 86: ...e internal static switches If a module is taken offline the other modules remain online to support the load Load can be supported as long as there is a sufficient number of modules otherwise the load must be transferred to maintenance bypass or shut down The distributed bypass system can be transferred from Normal mode to Bypass mode manually However the distributed bypass system automatically swi...

Page 87: ...ctifier is again within the specified voltage or frequency acceptance windows Figure 6 13 Path of current through the UPSs in battery mode distributed bypass If the input power fails to return or is not within the acceptance windows required for normal operation the battery continues discharging until a DC voltage level is reached where the inverter output can no longer support the shared loads Wh...

Page 88: ...h UPS is shown in Figure 6 6 through Figure 6 9 starting on page 77 NOTE If the load requires a neutral a bypass source neutral must be provided If the load does not require a neutral and there is no neutral conductor connected at the bypass input a UPS neutral must be connected to source star point Oneline Drawing UPS Model Voltage System Type Input Output Figure 6 14 on page 79 9395P 1100 400 40...

Page 89: ...P 164000476 9395P 500kVA 600 kVA 79 Revision 002 User s and Installation Guide Figure 6 14 Typical distributed bypass system 1 1 and 2 0 configurations ...

Page 90: ...P 164000476 9395P 500kVA 600 kVA 80 Revision 002 User s and Installation Guide Figure 6 15 Typical distributed bypass system 2 1 and 3 0 configurations ...

Page 91: ...P 164000476 9395P 500kVA 600 kVA 81 Revision 002 User s and Installation Guide Figure 6 16 Typical distributed bypass system 3 1 and 4 0 configurations ...

Page 92: ...nstallation was successful and the system operates properly Read this section of the manual and have thorough understanding of UPS operation before attempting to operate any of the controls The UPS displays two minutes of battery runtime at the initial startup After a 24 hour charging period the UPS automatically runs a battery test and the correct battery runtime displays 7 1 UPS controls and ind...

Page 93: ...rol the UPS and to monitor UPS operation For a description of the UPS control panel functions see Section 7 1 2 Circuit breakers The optional circuit breaker CB1 is used to control the AC input to the UPS rectifier CB1 has three positions ON OFF and tripped Before it can be set to ON from the tripped position it needs to be set to OFF position ...

Page 94: ... the various screens are used to control and monitor UPS operation The following figure shows the location of the optional color touchscreen control panel 1 on the front door of the UPS For a description of the control panel see Section 7 3 Using the Color Touchscreen Control Panel Figure 7 2 Color Touchscreen Control Panel Location Typical ...

Page 95: ...A horizontal row of LED indicators 2 Before system power up the panel displays a system status screen similar to the one shown in the figure above When the unit powers up the screen displays as shown in the figure above When power is applied to the system the display advances to the Sign In screen shown in Figure Parts of the Touch Screen 7 3 1 Status Indicators The symbols on the bottom of the co...

Page 96: ...ng Probe is installed the temperature and humidity sensed by the probe will also be displayed Indicator Status Descriptions Green Lit Steady The UPS is in Online mode operating normally The power module is supplying power to the critical load Yellow Lit Steady The UPS is in Battery mode Because Battery mode is a normal condition of the UPS the Online indicator also remains illuminated Yellow Lit S...

Page 97: ... access pass code for ooperation See the following table D The padlock number indicates security level 0 4 E ENTER button Figure 7 5 Sign In or Password Request Screen Table 7 2 Security Levels and Functions 7 3 3 Using the Main Menu Buttons The UPS menu bar shown in the figure below allows you to display data in the information area to help you monitor and control UPS operation The following tabl...

Page 98: ...nline Mode The following figure shows the Main Menu and Power Maps screen The Power Maps screen displays immediately after entering the access code The Power Maps screen shows a real time graphical representation of the operating status See the following figure Number 1 refers to Figure Output kVA Screen from Home Screen Number 2 refers to Figure Average Efficiency Screen from Home Screen POWER MA...

Page 99: ...e Mode Touching the LOAD kVA button displays the Output kVA screen shown in the following figure Figure 7 8 Output kVA Screen from Home Screen Touching the AVERAGE EFFICIENCY button displays the system efficiency screen shown in the following figure Figure 7 9 Average Efficiency Screen from Home Screen Touching the CONSUMPTION button displays the screen shown in the following figure 1 2 3 ...

Page 100: ...atus Touching any of the buttons on the right side of the screen takes the user directly to that information screen Figure 7 11 Bypass screen Number 1 in the figure above refers to Figure Output kVA Screen from Home Screen Number 2 refers to Figure Average Efficiency Screen from Home Screen Number 3 refers to Figure Consumption Screen from Home Screen 7 3 6 Command Confirmation Pop Up The figure b...

Page 101: ...vidual conditions of the UPS at that time The two items at the far right of the OVERVIEW section are active buttons They can be selected to show a profile of efficiency or consumption over various time periods of 24 hours 7 days 30 days or 1 year This is true of all the meters screens listed in the top section Number 1 in the following figure refers to Figure Average Efficiency Screen from Home Sc...

Page 102: ...nput Meters Screen The Bypass Meters Screen shown in the following figure displays values pertaining to the Bypass conditions Figure 7 15 Bypass Meters Screen The Output Meters Screen shown in the following figure displays values pertaining to the system output Figure 7 16 Output Meters Screen ...

Page 103: ...nal detail The Bypass Output and Battery meters screens display similar values relevant to their monitoring of the system Figure 7 17 Input Meters Detail Screen The Select Source screen shown in the following figure allows the operator to choose the individual source for system readings Figure 7 18 Select Source Screen 7 3 10 Battery Meters Screens The next figures show the Battery Meters basic sc...

Page 104: ...Revision 002 User s and Installation Guide Figure 7 19 Battery Meters Screen Figure 7 20 Battery Log Screen The following figures show the Battery Log Detail screen and the Battery Log Summary screen Figure 7 21 Battery Log Detail Screen ...

Page 105: ...menu bar on the main menu screen to look at the active events screen This screen shows any currently active alarms notices or commands System Event Horns The system event horn beeps to alert an operator tha an event needing attention is taking place The horn cycles at a half second rate System Event Indicators The status indicators on the UPS control panel work with the event horn to let the opera...

Page 106: ...w the blue field 2 showing the number of events in the log See the following figure Figure 7 24 User Log Screen Selecting an event opens the Event Detail screen shown in the following figure This screen details the specifics of the event for the user to see Figure 7 25 User Log Detail Screen 7 3 13 System Status Screen and Controls Press the SYSTEM CONTROLS pushbutton on the main menu bar to displ...

Page 107: ...rol of the individual modules within the system It also gives their values and status Figure 7 27 Module Controls Screen The following figure shows the Module Control Detail screen By selecting any of the modules shown on the previous screen the user can observe full details of an individual module It also allows the user to move through various modules and modes while within this screen ...

Page 108: ...Control Detail Screen The Metering Method screen allows the operator to select line to line or line to neutral monitoring values See the following figures Figure 7 29 Online Mode Metering Method Option Screen Number 1 in the following figure points to an icon that indicates an Event System or Bypass ...

Page 109: ... operator access to basic system information such as serial number installed firmware version etc Touching the CLEAN SCREEN button disables the screen for 30 seconds to allow the user to safely clean the screen without affecting operation Figure 7 31 Settings Screen 7 3 15 Configuration Options Screen The screen shown in the following figure allows the operator to affect changes to various system ...

Page 110: ...y Advantage Architecture EAA Screen This screen shown in the following figure allows the operator to activate the various energy saving and power efficiency modes of the system The various Energy Advantage Architecture operations are described in Section 1 2 9 and in Section 1 2 10 Figure 7 33 Energy Advantage Architecture EAA Screen ...

Page 111: ...S mode running at that time Figure 7 35 High Alert Timer Screen The screen shown in the figure above asks the operator if they want to start the High Alert mode timer 7 3 17 Statistics Basic Screen The screen shown in the following figure allows the operator to query the system for various operational statistics such as shown in the second figure Statistics Data Detail Screen in this subchapter ...

Page 112: ...stallation Guide Figure 7 36 Statistics Basic Screen Figure 7 37 Statistics Data Detail Screen 7 3 18 ESS Comparison Screen The screen shown in the following figure allows the operator to visually obtain EAA mode efficiency values Figure 7 38 ESS Comparison Screen ...

Page 113: ...dule Map Screen The screen shown in the following figure allows the operator to control the individual UPMs Figure 7 39 UPS Module Map Screen 7 3 20 System Overview Screen The screen shown in the following figure displays values for all UPS and UPM parameters Figure 7 40 System Overview Screen ...

Page 114: ...ns input breaker CB1 close input breaker CB1 6 Close the door and secure the latch 7 Observe the UPS control panel display becoming active indicating logic power 8 Press the LOCK icon on the main screen the Sign In screen is displayed Use operator password to log in factory default password is 0101 9 On the System Status screen verify the UPS status is OK and the UPM status is OFFLINE 10 Close the...

Page 115: ...e UPS control panel display becoming active indicating logic power 8 Press the LOCK icon on the main screen The Sign In screen is displayed Use operator password to log in factory default password is 0101 9 Press CONTROLS on the main screen On the SYSTEM CONTROLS screen select GO TO BYPASS Command confirmation pop up screen shows up asking confirmation for the action Select YES After 5 seconds the...

Page 116: ...All the installed UPMs and their status can be seen here 12 On the MODULE CONTROLS screen select the desired UPM 13 Select GO TO NORMAL to transfer the UPM to normal mode Command confirmation pop up screen will show up asking confirmation for the action Select YES If Auto Bypass is enabled factory default the critical load is immediately supplied by the bypass source in Bypass mode until the inver...

Page 117: ...ory default password is 0101 2 Select CONTROLS on the main screen SYSTEM CONTROLS screen opens up 3 Select EAA CONTROLS This screen shows if VMMS is installed or not 4 Select DISABLE VMMS Command confirmation pop up screen will show up asking confirmation for the action Select YES 5 The UPS transfers to Battery mode and then to Normal mode in approximately ten seconds The Online status indicator i...

Page 118: ...available the power processor remains on and an alarm sounds 5 The UPS is now operating in Bypass mode and the BYPASS status indicator is illuminated The UPM status is IDLE on the MODULE CONTROLS screen The system is now on bypass and the UPS power processor remains on WARNING Power is present inside the UPS cabinets 7 4 9 Transfer from Bypass to Normal mode To transfer the critical load to Normal...

Page 119: ...icon on the main screen The Sign In screen is displayed Use operator password to log in factory default password is 0101 2 Select CONTROLS on the main screen SYSTEM CONTROLS screen opens up 3 Select EAA CONTROLS This screen shows if ESS is installed or not 4 Select DISABLE ESS Command confirmation pop up screen will show up asking confirmation for the action Select YES 5 If the unit is on ESS it w...

Page 120: ...e of the UPMs then select SHUT DOWN UPM Command confirmation pop up screen will show up asking confirmation for the action Select YES After this the UPM opens it output contactor and goes to IDLE The power module remains on The remaining UPMs supply the critical load 5 To turn off the previously chosen power module select SHUT DOWN UPM again Command confirmation pop up screen will show up asking c...

Page 121: ...ped or started by selecting START CHARGER STOP CHARGER To control the charger of a single UPM instead of EAA CONTROLS select MODULE CONTROLS and then the choose the desired UPM 7 4 18 Using the UPS LOAD OFF A UPS Load Off is initiated by the selecting LOAD OFF from the SYSTEM CONTROLS screen This de energizes the critical load and powers down the UPS The UPS including Bypass remains off until rest...

Page 122: ...o de energize the critical load NOTE The following instructions are for the Eaton Corporation supplied REPO switch If a customer supplied REPO switch is used it may not activate in the same manner refer to the operating instructions provided with the switch To use the REPO switch 1 Press the REPO pushbutton switch The input output and bypass backfeed contactors open the battery breaker or disconne...

Page 123: ...the UPS to mechanical bypass switch is described below 1 The normal start position should be following 2 Perform transfer from normal mode to bypass mode as described in Section 7 4 8 Remember to verify the transfer before proceeding the next step 3 Turn the switch S10 from UPS II position to Bypass I position 4 Perform the LOAD OFF procedure in Section 7 4 18 5 Turn OFF the rectifier switch to di...

Page 124: ...g 2 Turn ON rectifier switch to connect rectifier input to UPS 3 Turn ON Static bypass switch to connect bypass input to UPS 4 Perform the UPS start up procedure bypass mode in Section 5 Turn S10 switch from bypass position to UPS position to connect UPS output to load 6 Perform transfer from bypass to normal mode as described in Section 7 4 9 Remember to verify the transfer before proceeding to t...

Page 125: ...ct YES If Auto Bypass is enabled factory default the critical load is immediately supplied by the bypass source in Bypass mode from all UPSs until the inverter turns on and the UPSs transfer to Normal mode The status indicator on the UPS control panel indicates the UPS is in Bypass mode If Auto Bypass is not enabled the UPS outputs remain off until the UPSs transfer to Normal mode The rectifier an...

Page 126: ... Start Variable Module Management System High Alert mode from the EEA controls menu on page 107 7 5 6 Starting the UPS UPMs To start the power modules without transferring the critical load to Normal mode 1 Unfasten the front door latches and swing the doors open on all of the UPSs 2 If the UPSs contain input breakers CB1 verify that all input breakers are open 3 Close all UPS input feeder circuit...

Page 127: ...ion pop up screen will show up asking confirmation for the action Select YES If Auto Bypass is enabled factory default the critical load is immediately supplied by the bypass source in Bypass mode until the inverter turns on and the UPS transfers to Online mode The status indicator on the UPS control panel indicates the UPS is in Bypass mode If Auto Bypass is not enabled the UPS output remains off...

Page 128: ... Controls menu To transfer the critical load to Energy Saver System NOTE The Energy Saver System commands are displayed only if enabled at the factory or by an Eaton Customer Service Engineer 1 On any UPS press the LOCK icon on the main screen The Sign In screen is displayed Use the op erator password to log in factory default password is 0101 2 Select CONTROLS on the main screen SYSTEM CONTROLS s...

Page 129: ...ules remains on 7 5 13 Transfer from Normal to Bypass mode and shut down all UPMs To transfer the critical load to Bypass mode and shut down all UPMs 1 Transfer the critical load to bypass by performing the procedure in Section 7 4 11 2 Select CONTROLS on the main screen SYSTEM CONTROLS screen opens up 3 Select MODULE CONTROLS All the installed UPMs are showed here 4 Select UPM1 and then select SH...

Page 130: ...according to the procedure in Section 5 2 on page 61 To shut down a single UPS 1 Open the MOB for the UPS being shut down 2 On the UPS to shut down select the CONTROLS on the main screen The SYSTEM CONTROLS screen is displayed 3 Reinsure sure that the MOB is open and select GO TO BYPASS The UPS being shut down transfers to bypass other UPSes should stay in online and will continue to support the l...

Page 131: ...gn In screen is displayed Use operator password to log in factory default password is 0101 3 Select CONTROLS on the main screen SYSTEM CONTROLS screen opens up 4 Select GO TO BYPASS Command confirmation pop up screen will show up asking confirmation for the action Select YES The UPS being shut down transfers to bypass while other UPSs stay in normal mode supporting the load 5 Select MODULE CONTROL...

Page 132: ...e door and secure the latch 6 Close all the battery breakers 7 On the UPS being restarted observe the UPS control panel display becoming active indicating logic power 8 On the UPS being restarted press the LOCK icon on the main screen The Sign In screen is displayed Use operator password to log in factory default password is 0101 9 Verify no alarms are present on the ACTIVE EVENTS screen under the...

Page 133: ...splayed Use operator password to log in factory default password is 0101 2 Select CONTROLS on the main screen SYSTEM CONTROLS screen opens up 3 Select EAA CONTROLS 4 The UPS Charger can be stopped or started by selecting START CHARGER STOP CHARGER To control the charger of a single UPM instead of EAA CONTROLS select MODULE CONTROLS and then the choose the desired UPM 7 5 21 Using the UPS LOAD OFF ...

Page 134: ...procedure in Section 7 5 1 Section 7 5 2 or Section 7 5 15 WARNING Power is present inside the UPS cabinet until the upstream input feeder circuit breaker is opened and the MOB is opened 7 5 22 Using the Remote Emergency Power off Switch A UPS emergency power off is initiated by the REPO pushbutton switch In an emergency you can use this switch to control the UPS output The REPO switch de energize...

Page 135: ...ication on all UPSs CAUTION Do not attempt to restart the system after the REPO until the cause of the shutdown has been identified and cleared 2 To deactivate the REPO switch in preparation for restarting the UPS insert the supplied key and rotate clockwise until the red pushbutton releases To remove the key rotate the key back to the vertical position 3 Restart the UPSs by following the procedur...

Page 136: ...rk drops This card is provided as standard equipment with the UPS NOTE The Modem card cannot be installed in X Slot 2 Modem card provides out of band remote notification and monitoring using modem communication directly to cell phones and pagers Relay Interface card AS 400 has isolated dry contact Form C relay outputs for UPS status Utility failure Low battery UPS alarm OK or On bypass when interf...

Page 137: ...l power events and notification of important UPS or power information With custom views for monitoring status and metering information various user groups can select the most useful view for their specific needs LanSafe Power Management Software 8 3 Terminal mode Terminal mode is supported by all RS 232 serial communication ports of the UPS The following settings should be used Baud rate 19200 8 d...

Page 138: ...e escape key legend to control the function normally controlled by the control panel softkeys See Section on page 89 for instructions on navigating the control panel 8 3 2 Event History Log This key sequence prints the entire Event History Log of the UPS at the time the data is requested The printout begins with the oldest alarm entry in the queue and ends with the most recent Any alarms that occu...

Page 139: ...21 25 20 355 S138 CONTROL POWER ON PM1 03 16 2099 21 25 20 515 N011 OUTPUT UNDER OR OVER FREQ PM1 03 16 2099 21 25 20 675 S302 EEPS CONFIGURING PM1 03 16 2099 21 25 23 475 N267 POWER MODULE CABLE FAIL 15 PM1 03 16 2099 21 25 25 180 N271 DC HW AMPS LIMIT PM1 03 16 2099 21 25 25 215 N007 INPUT AC UNDER VOLTAGE PM1 03 16 2099 21 25 25 850 N011 OUTPUT UNDER OR OVER FREQ OK PM1 03 23 2099 18 59 20 450 ...

Page 140: ...o display the alarm functional name 8 5 General purpose relay contact One general purpose relay contact is provided as a standard feature on the UPS The alarm contact is located inside the UPS on the customer interface terminal board You can use a normally closed or normally open contact If the state of the contact changes from the state you specify as normal a signal is issued You can connect thi...

Page 141: ... open or protective panels removed Do not make any assumptions about the electrical state of any cabinet in the UPS system Since each battery string is an energy source in itself opening the battery circuit breaker does not de energize the voltage within the battery string DO NOT ATTEMPT TO ACCESS ANY INTERNAL AREA OF THE BATTERY STRING YOURSELF VOLTAGES ARE ALWAYS PRESENT IN THE BATTERY STRING If...

Page 142: ...d the front doors and wash or replace as necessary The left ISBM filter size is 12 20 1 and the right UPM filter sizes are 19 5 21 5 0 5 Contact your service representative for replacement filters To remove the filters a Open the front door latch and swing the doors open b Remove the filters from the cabinet mounted studs c Push the new filters onto the cabinet mounted studs until seated against t...

Page 143: ...ous waste center and follow the local legislation These symbols indicate on a product Use proper local collecting centers meeting local legislation when handling waste of electrical and electronic equipment WARNING HAZARDOUS MATERIALS Batteries may contain HIGH VOLTAGES and CAUSTIC TOXIC and FLAMMABLE substances Batteries can injure or kill people and damage equipment if used improperly DO NOT DIS...

Page 144: ...perating Input Voltage Nominal 15 400 Vac for operation from 340 Vac to 460 Vac Operating Input Frequency Range 5 Hz Operating Input Current See Table 3 4 on page 19 and Table 3 5 Reduced for Generator Adjustable Input Current Harmonic Content 3 THD at full load Power Factor Minimum 0 99 Line Surges 6 kV OC 3 kA SC per ANSI 62 41 and IEC 61000 4 5 Battery Voltage 480 Vdc UPS Output Capacity 100 ra...

Page 145: ... Capability 110 for 10 minutes 125 for 30 seconds 150 for 10 seconds Max battery charging current 240 A Operating Temperature 0 to 40 C without derating The recommended operating tempera ture is 25 C Operating Altitude Maximum 1000m at 40 C without derating Storage Temperature 25 to 60 C excluding batteries prolonged storage above 40 C causes rapid battery self discharge Relative Humidity operatin...

Page 146: ... if the installation commissioning repair alternation or ambient conditions of the equipment do not fulfil the requirements specified in the documentation delivered with the unit and other relevant documentation Equipment subjected to misuse negligence or accident Equipment comprised of materials provided or designs stipulated by the purchaser Under no circumstances shall the manufacturer its supp...

Page 147: ...rectly The area around the installed UPS system is clean and dust free It is recommended that the UPS be installed on a level floor suitable for computer or electronic equipment Adequate workspace exists around the UPS and other cabinets Adequate lighting is provided around all UPS equipment A 230 Vac service outlet is located within 7 5 meters of the UPS equipment The Remote Emergency Power off R...

Reviews: