background image

16

EATON  

LifeSense Wireless System Quick Setup Guide  E-HOOV-II002-E  July 2014

Configuring by WIFI 
Note:

 Be sure to have gathered the information listed in the 

Internet setup portion of the Wireless Setup Information 

Form. The NIST and DNS IP addresses as well as the network 

information needed for the internet connection is critical for 

the upcoming steps.

In this series of screens you will be entering the network 

address information for which the wireless gateway (HDU) 

will be configured to transmit data to the server on which the 

LifeSense customer web portal resides. 
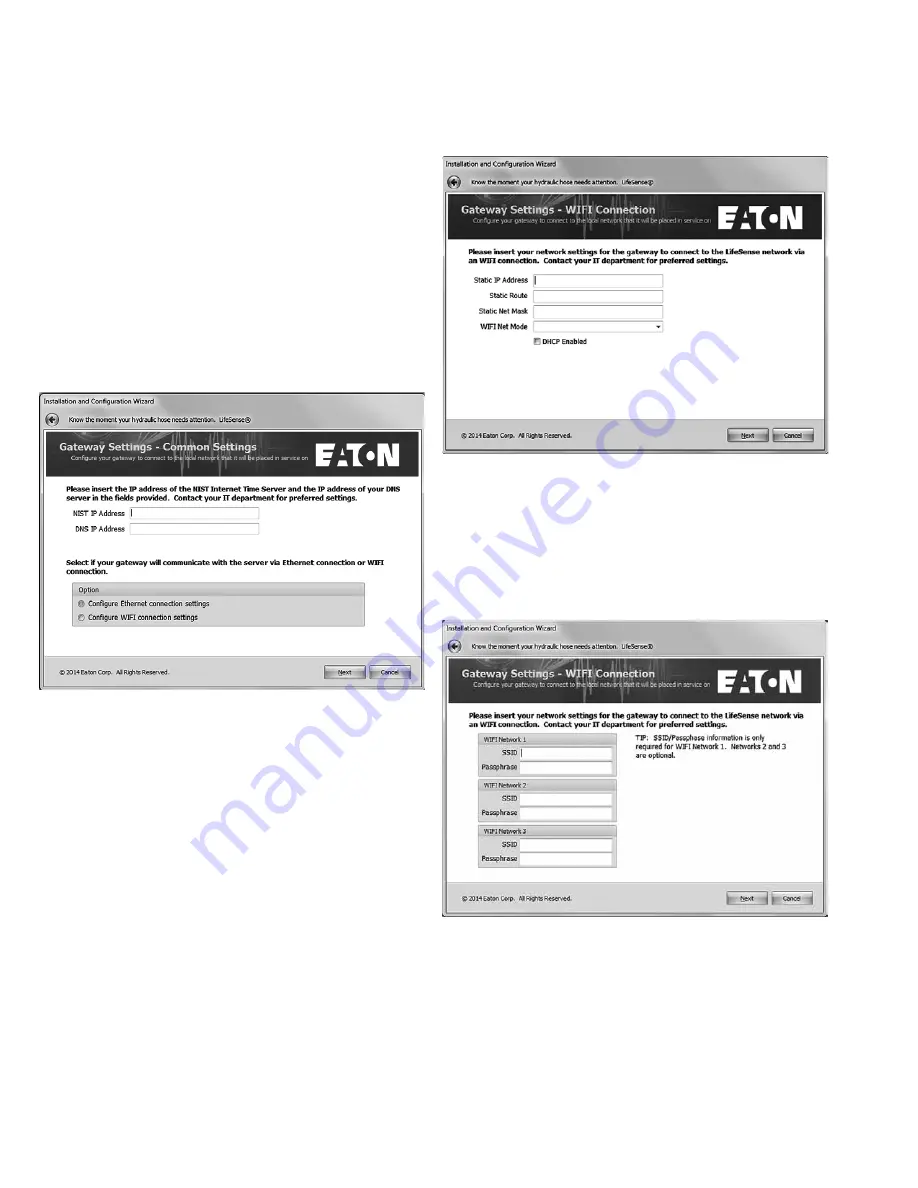
Input the NIST and DNS IP addresses that will be used on the 

network and then select if the wireless gateway (HDU) will be 

connecting to the Internet via Wi-Fi or Ethernet.   

Click Next.

Note:

 DHCP is usable; however, if a company wants to 

assign a static IP address to the wireless gateway (HDU) this 

information will need to be acquired from the company’s IT 

department. 

Configuring Wi-Fi Connection


Click Next.  
Enter the SSID and Passphrase for the Wi-Fi Networks. One is 

required but up to three may be entered.
Insert the WIFI network settings for the network on which the 

LifeSense gateway will be configured. To obtain the network’s 

SSID and passphrase information you will need to contact the 

customer’s/end user’s IT department. Once you have input 

the required information click Next.


Sensor Settings


Each wireless LifeSense sensor has a ten digit unique 

identification number located on the top of the sensor. This is 

so you will know exactly which sensor within the LifeSense 

system is issuing an alert. It’s in the Sensor Settings screen 

where you will input each sensor ID, either manually, or by 

loading them from a comma delimited file.

Manual Input


Type in the unique sensor ID in the given field and then tab 

over to the Sensor Location field and type in a description 

Wireless Gateway (HDU) 

Configuration  

(LifeSense Installation Wizard) 

Select DHCP or enter the static IP address, route, net mask 

and Wi-Fi net mode assigned.  

Summary of Contents for LifeSense

Page 1: ...Eaton LifeSense Wireless System Quick Setup Guide...

Page 2: ...s interf rences y compris celles pouvant causer un mauvais fonctionnement de l appareil LifeSense hose assembly 1 100 o Sensor assembly one per hose assembly FCC ID 2AABYS01 IC 12063A S01 o Protective...

Page 3: ...3 EATON LifeSense Wireless System Quick Setup Guide E HOOV II002 E July 2014 Part Listing 8 10 11 11 12 7 9 1 2 3 3 4 5 Sensor Type 2 16 Sensor Type 1 08 and 12 2 4 6...

Page 4: ...117C 48 Black Nylon 1 Shell Lower Half 12 Size FF92117C 57 Black Nylon 1 Shell Lower Half 16 Size FF92117C 63 01 Black Nylon Overmold Gasket 5 6 Panhead Machine Screw 08 12 Size FF91117C 68 Stainless...

Page 5: ...p profile or improper installation of the terminal end to the application will not be alerted by LifeSense WARNING Verify that the specified equipment is depressurized before installing a hose assembl...

Page 6: ...type and size Step 6 ConfigureWireless Gateway Hose Diagnostic Unit HDU Proceed to page six 6 of this guide for instructions on how to configure the wireless gateway HDU to the network on which it wi...

Page 7: ...makes the most sense for you After you have successfully downloaded the wizard double click the application icon to launch the program Step by step screens will guide you through the configuration pro...

Page 8: ...quired IP connect both antennas to the gateway Click the Discover Gateway button A pop up message similar to the one shown below will appear if the installation wizard has successfully discovered the...

Page 9: ...n Values portion of the wizard you will input various values needed to set up the wireless gateway HDU on the network on which it will operate Click Continue with a New Configuration Read through the...

Page 10: ...lds to input the equipment number e g vehicle identification number or model number its serial number if applicable and a description of the equipment After adding the requested information click Next...

Page 11: ...will input the name and contact information text message and email addresses as well as selecting the types of alerts the contact will receive When inputting a text message address this will not be th...

Page 12: ...has been added Click OK If you need to add more contacts input each additional contact s information clicking Save Contact and OK after each subsequent entry Upon clicking the Close button on the Cont...

Page 13: ...uired from the company s IT department Configuring Ethernet Connection Select DHCP or enter the static IP address route net mask and Wi Fi net mode assigned Click Next Sensor Settings Each wireless Li...

Page 14: ...izard is now able to configure the wireless gateway HDU and customer account If you would like to review the information you ve input before configuring the wireless gateway HDU click on the Review Se...

Page 15: ...ion wizard application To verify the gateway you have just configured is successfully communicating to the Eaton server open your Internet browser and navigate to the LifeSense web portal by typing th...

Page 16: ...uired from the company s IT department ConfiguringWi Fi Connection Click Next Enter the SSID and Passphrase for the Wi Fi Networks One is required but up to three may be entered Insert the WIFI networ...

Page 17: ...external storage device connected to your computer e g USB thumb drive or memory stick for upload When the sensor data is successfully loaded click Next Configuring with No Sensors You may also elect...

Page 18: ...ing up a Windows Explorer screen where you can chose to save the ini file on your computer or external storage device To verify the gateway you have just configured is successfully communicating to th...

Page 19: ...de hold the key fob over the sensor for 17 18 seconds The LED light will flash three 3 times Sensor Status andTest To check the status of a hose or clear an alert on the sensor hold the key fob over t...

Page 20: ...uminates If not replace the sensor The wireless gateway HDU does not report to the back end server Verify the wireless gateway HDU has power the antennas are properly installed and the wireless gatewa...

Page 21: ...ame Contact Phone Contact E Mail Internet Setup The following information will be needed to setup your gateway and its connection to the backend server If you do not know what the internet settings ar...

Page 22: ...Identifier Location Sensor Identifier Location 1 51 2 52 3 53 4 54 5 55 6 56 7 57 8 58 9 59 10 60 11 61 12 62 13 63 14 64 15 65 16 66 17 67 18 68 19 69 20 70 21 71 22 72 23 73 24 74 25 75 26 76 27 77...

Page 23: ...pe Route de la Longeraie 7 1110 Morges Switzerland Tel 41 0 21 811 4600 Fax 41 0 21 811 4601 Eaton Hydraulics Group Asia Pacific Eaton Building No 7 Lane 280 Linhong Road Changning District Shanghai 2...

Reviews: