background image

3

Solo Advantage                     

Self-Adjusting Clutches

Install

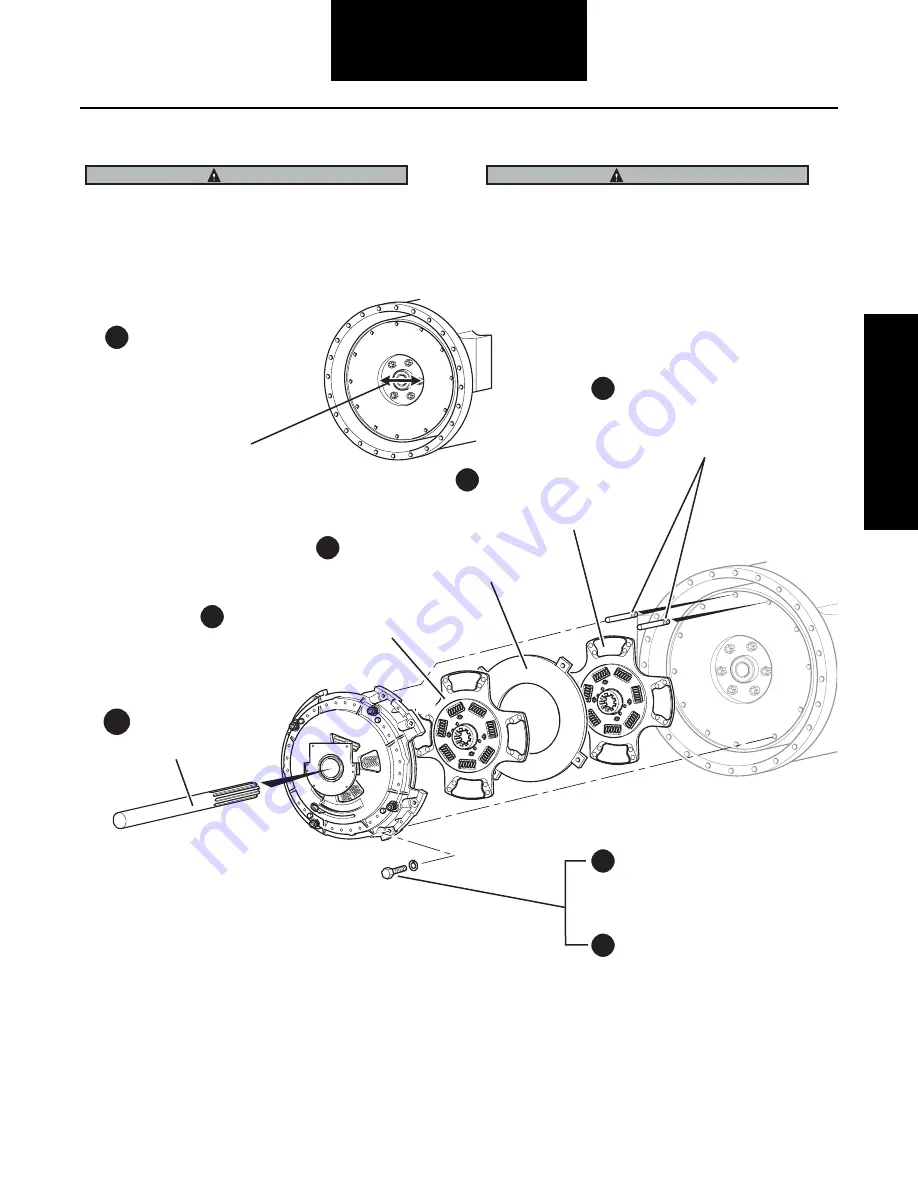
Install Clutch to Flywheel


U

s

e the Eato

n

 Cl

u

tch 

S

electo

r

 G

u

ide (CL

S

L1511)

to make 

sur

e yo

u

 have the 

r

ight cl

u

tch. 


A

n

 a

ss

embled cl

u

tch weigh

s

 abo

u

t 150 lb

s

 (68 kg). 

Avoid the 

r

i

s

k of i

n

j

ur

y. U

s

e p

r

ope

r

 eq

u

ipme

n

t

whe

n

 lifti

n

g a cl

u

tch. 

P

r

og

r

e

ss

ively tighte

n

 mo

un

ti

n

g bolt

s


i

n

 a c

r

i

ss

c

r

o

ss

 patte

rn


s

ta

r

ti

n

g with the

lowe

r

 left bolt  (1, 2, 3, 4, 5, 6, 7, 8). 

To

r

q

u

e to 40-50 lb-ft (54-68 N•m). 

Fail

ur

e to do thi

s

 co

u

ld 

r

e

su

lt i

n


imp

r

ope

r

 piloti

n

g of the cl

u

tch 

a

n

d ca

us

e cl

u

tch damage.

I

ns

tall lock wa

s

he

rs

 a

n

d mo

un

ti

n

g  

bolt

s

 (7/16" x 14 UNC x 2-1/4" 

g

r

ade 5) fi

n

ge

r

 tight. Replace 

s

t

u

d

s

 with lock wa

s

he

rs

 a

n

d bolt

s

.

I

ns

tall 

s

eco

n

d di

s

c o

n

to alig

n

i

n

g  

tool. Follow the o

r

ie

n

tatio

n


i

ns

t

ru

ctio

ns

 o

n

 the di

s

c.

I

ns

tall i

n

te

r

mediate plate i

n

to 

s

lot

s


o

n

 the cl

u

tch cove

r

. Flywheel 

s

ide 

m

us

t face the flywheel.

I

ns

tall di

s

c o

n

to alig

n

i

n

g tool. 

Follow the o

r

ie

n

tatio

n


i

ns

t

ru

ctio

ns

 o

n

 the di

s

c.

I

ns

e

r

t alig

n

i

n

g tool  

th

r

o

u

gh bea

r

i

n

g.

Note: Whe

n

 i

ns

talli

n

g cl

u

tch to flywheel, po

s

itio

n


          the wea

r

 i

n

dicato

r

 at the bottom of flywheel 

          to ea

s

e f

u

t

ur

e cl

u

tch 

s

e

r

vici

n

g.

I

ns

tall two 7/16" x 14  

UNC x 5" 

s

t

u

d

s

 i

n

to 

u

ppe

r


mo

un

ti

n

g hole

s

. I

ns

tall 

a

ss

embled cl

u

tch.


IMPORTANT

WARNING

Mea

sur

e the flywheel bo

r

e.  

U

s

e the Eato

n

 Cl

u

tch  

S

electo

r

 G

u

ide to ve

r

ify that  

the dampe

r

 will fit i

n

to the 

flywheel bo

r

e.

 7.0" 

(8-

s

p

r

i

n

g)

 8.5" 

(10-

s

p

r

i

n

g)

 10.0" (7-

s

p

r

i

n

g a

n

d Mack 9-

s

p

r

i

n

g)

Note: Mack 9-

s

p

r

i

n

g fo

r

 Mack a

n

d Volvo 

e

n

gi

n

e

s

 2007 a

n

n

ewe

r

 o

n

ly.

Summary of Contents for CLSM0200

Page 1: ...Service Manual Eaton Heavy DutyClutches CLSM0200 May 2012 Solo Advantage Easy Pedal Advantage Value Clutch UltraShift DM UltraShift PLUS ECA Clutch ...

Page 2: ......

Page 3: ...he Failure Analysis Guide When disassembling various assemblies lay all parts on a clean bench in the same sequence as removed to simplify and reduce the possibility of losing parts Since the cost of a new part is generally a small fraction of the cost of downtime and labor avoid reusing a questionable part that could lead to additional repairs and expense Use of other than recommended tools parts...

Page 4: ...ii Warnings ...

Page 5: ...move Clutch 32 Opening the ECA Clutch 32 15 5 Heavy Duty ECA Clutch Installation 35 Install Clutch to Flywheel 36 Install Transmission 37 Lubricate 39 ECA Clutch Adjustment 40 Grease Interval Count Reset 42 ServiceRanger Procedure 42 Operator Triggered Procedure 44 ECA Clutch In Vehicle Resetting Procedure 45 Opening the ECA Clutch 45 Low Capacity Inertia Brake Wear Life Measurement 48 Transmissio...

Page 6: ...iv Table of Contents ...

Page 7: ...s 7 16 x 14 x 1 3 4 UNC hex head Install them in the 4 cover holes hand tight then turn one full turn 2 Support the Clutch during the removal of the 8 mounting bolts 3 Remove the clutch from the flywheel Note Mark the proper position of the discs and interme diate plate for reinstallation This step will hold the pressure plate separator pins in proper position so the clutch can be reused and will ...

Page 8: ... Housing Face Runout Secure dial indicator base to flywheel housing face Rotate flywheel one revolution Maximum runout is 0 008 0 20 mm 1 Position gauge finger so that it contacts pilot bearing bore 2 Rotate flywheel one revolution Maximum runout is 0 005 0 13 mm 3 Secure dial indicator base to flywheel near the outer edge 1 Put gauge finger in contact with face of flywheel housing 2 3 Flywheel Fa...

Page 9: ...shers and bolts 7 Install second disc onto aligning tool Follow the orientation instructions on the disc 5 Install intermediate plate into slots on the clutch cover Flywheel side must face the flywheel 4 Install disc onto aligning tool Follow the orientation instructions on the disc 3 Insert aligning tool through bearing 2 Note When installing clutch to flywheel position the wear indicator at the ...

Page 10: ...e bearing housing using Weatherhead socket Tighten hand tight and continue to turn until the opening of the fitting is facing toward the 6 o clock position 13 Install lube hose into brass fitting and tighten until hand tight then turn an additional 2 turns Lubricate release bearing until grease purges from release bearing housing Use NLGI grade 2 or 3 Lithium complex grease Reference Eaton lubrica...

Page 11: ...ing retainer cap may cause the clutch brake to wear prematurely Release Yoke Worn fingers can cause bushing wear and yoke interference when the pedal is down Input Shaft Wear roughness can reduce sleeve bushing life and cause it to come out Input Shaft Spigot Wear will not provide proper interface with the inner race of the pilot bearing This can result in damage to the clutch or the pilot bearing...

Page 12: ...ease arm to install transmission This will cause the clutch to over adjust Do not force transmission against clutch with yoke fingers in the UP position This will break the cast webbing of the clutch causing damage that is not warrantable Do not use excessive force If it does not enter freely investigate the cause of problem and make any necessary changes CAUTION IMPORTANT Do not add lube never se...

Page 13: ...se bearing slightly closer to the transmission Gains free play in cab With the pedal up measure the distance between the release bearing and the clutch brake The correct distance should be 0 490 0 560 12 70 14 22 mm If the distance is more the 0 560 14 22 mm return to Step 1 and readjust the clutch linkage If the distance is less the 0 490 12 70 mm see Solo Advantage Heavy Duty 15 5 Clutch Trouble...

Page 14: ...e release bearing and the clutch brake Press the pedal down to the floor to reclamp the gauge If the gauge does not clamp readjust the truck linkage and move yoke fingers closer to the bearing Use a gauge long enough to keep hands away from moving parts 4 WARNING Release Bearing Yoke Finger Clutch Brake DO NOT RESET THE CLUTCH Do not change free play by readjusting the clutch linkage Verify there ...

Page 15: ...se to input shaft and yoke fingers 2 8 Failure to properly lubricate the bearing bushing will result in bearing and sleeve failures CAUTION IMPORTANT 7 Apply ample grease that is visibly exiting the opening and contacts the transmission shaft This will lube the clutch brake and bushing when the pedal is pressed Apply grease to the cross shaft bushings and linkage pivot points 9 Do not add lube nev...

Page 16: ...before engaging the clutch Pedal travels too far before engaging the clutch Clutch does not disengage Not enough brake squeeze Not enough travel Too much brake squeeze Too much travel Not Enough Free Pedal If clutch is out of vehicle go to Out of Vehicle Resetting Procedure on Based on your symptom the chart will direct you to the correct solution Go to page 11 Go to page 12 Go to page 11 Go to pa...

Page 17: ...ng Clutch Brake If clutch was factory installed and was never removed or if clutch was removed from engine and reinstalled If new reman clutch was installed and it never operated properly check wear tab position If tab at GOOD position Disc is installed incorrectly Damper is too large for the flywheel opening If tab not at GOOD position the bearing may have been pulled during installation causing ...

Page 18: ...utch is set up correctly Problem exists with truck linkage Repair according to OEM specifications Hydraulic Linkage Clutch is not set up correctly If clutch was factory installed and was never removed Mechanical Linkage Hydraulic Linkage If clutch was removed from engine and reinstalled Setup If new reman clutch was installed and it never operated properly Setup Note Before measuring the distance ...

Page 19: ...n place follow Steps 1 3 in this procedure Remove spacers and torque transmission mounting bolts Continue process starting at Step 4 GOOD Hold 1 2 Let up on pedal DO NOT push pedal down again or wear tab will return to the wrong position 3 Install and tighten 4 shipping bolts 7 16 x 14 x 1 3 4 UNC until they quit turning Note This will remove the gap between the sleeve and the pin 4 Remove shippin...

Page 20: ...Rotate the engine so that the cam tab can be reached through the transmission inspection opening 4 Push the clutch pedal to the floor While the clutch pedal is pushed to the floor have someone push the cam tab to the new position using finger pressure or the Solo tool Once the cam tab is pushed to the new position you can release the clutch pedal Note If the cam tab does not move there is not enou...

Page 21: ...l greater than 0 590 between the clutch brake and the release bearing repeat Steps 7 and 8 7 With the free pedal removed push the clutch pedal down at least 5 times Make sure the clutch release bearing contacts the clutch brake While you engage and release the clutch the cab free pedal will increase This indicates the Solo is adjusting to the environment Shipping Bolts Shipping Bolt Tamper Proof B...

Page 22: ...elow the mounting surface 5 Remove the 4 shipping bolts if they have been installed 1 Center the ram and press downward on the retainer until it comes to a stop Lock the ram in position 3 Reinstall the clutch using the original installation instructions 6 Support the clutch in an arbor press with the bearing facing down Shipping Bolts Note Make sure there is at least 1 of space to allow the bearin...

Page 23: ...ywheel Housing Face Runout Secure dial indicator base to flywheel housing face Rotate flywheel one revolution Maximum runout is 0 008 0 20 mm 1 Position gauge finger so that it contacts pilot bearing bore 2 Rotate flywheel one revolution Maximum runout is 0 005 0 13 mm 3 Secure dial indicator base to flywheel near the outer edge 1 Put gauge finger in contact with face of flywheel housing 2 3 Flywh...

Page 24: ... clutch and cause clutch damage 8 Install lock washers and mounting bolts 7 16 x 14 UNC x 2 1 4 grade 5 finger tight Replace studs with lock washers and bolts 7 Install second disc onto aligning tool Follow the orientation instructions on the disc 5 Install intermediate plate into slots on the clutch cover Flywheel Side must face the flywheel 4 Install disc onto aligning tool Follow the orientatio...

Page 25: ...de cover over aligning tool 10 Install disc into flywheel Follow the orientation instructions on the disc 6 Install intermediate plate onto drive pins 7 Install second disc onto flywheel Follow the orientation instructions on the disc 8 Progressively tighten mounting bolts in a crisscross pattern starting with the lower left bolt 1 2 3 4 5 6 7 8 Torque to 25 35 lb ft 34 47 N m Failure to do this c...

Page 26: ... 219 89 mm Transmission Bearing Retainer Cap A worn rough bearing retainer cap may cause the clutch brake to wear prematurely Release Yoke Worn fingers can cause bushing wear and yoke interference when the pedal is down Input Shaft Wear roughness can reduce sleeve bushing life and cause it to come out CAUTION Do not excessively force the transmission into the clutch assembly or engine housing This...

Page 27: ... to OEM specs Note If you have a hydraulic linkage 2 Make sure that the yoke fingers remain in the up position until they are over the release bearing housing CAUTION IMPORTANT Do not add lube to the input shaft splines Never seize or grease The discs must be free to slide Do not force transmission against clutch with yoke fingers in the up position This will break the cast webbing of the clutch c...

Page 28: ...on Note Before measuring the distance between the release bearing and clutch brake depress clutch pedal to remove free pedal in the cab T O T U R N D E P R E S S B O L T Adjusting Nut Part Number 125489 While pedal is held down remove lockstrap and move adjusting lug If measurement was more than 0 560 14 22 mm move adjusting lug to the left shown If measurement was less than 0 500 12 77 mm move ad...

Page 29: ...move the yoke fingers further from the release bearing Repeat Step 4 Less than 1 25 4 mm Have an assistant insert 0 010 0 25 mm feeler gauge between the release bearing and the clutch brake Press the pedal down to the floor to clamp the gauge If the gauge does not clamp readjust the truck linkage and move the yoke finger closer to the bearing Use a gauge long enough to keep hands away from moving ...

Page 30: ...m The truck linkage should allow for a minimum of 0 685 of yoke finger movement 0 125 for free play 0 500 for the bearing and 0 060 for clutch brake squeeze If it is necessary to increase the free play adjust upper pedal stop to raise or lower the pedal in the cab If this is not possible check the OEM parts manual to verify the correct clutch arm was installed at the factory 7 Do not change bearin...

Page 31: ...ssion shaft This will lube the clutch brake and bushing when the pedal is pressed For additional lubrication information see TCMT0021 Yoke Finger Failure to properly lubricate the bearing bushing will result in bearing and sleeve failures Input Shaft Apply grease to input shaft and yoke fingers 8 Apply grease to the cross shaft bushings and linkage pivot points 2 9 CAUTION IMPORTANT Do not add lub...

Page 32: ...ing more than 9 lb ft can cause permanent clutch damage CAUTION Remove the jack screw 6 Remove the transmission supporting its weight to prevent damage to the clutch discs 4 Install the jack screw into one of the four holes located adjacent to the clutch mounting bolts This forces the pressure plate forward clamping the discs and holding them in place 3 Insert alignment shaft and clutch jack 5 Rem...

Page 33: ...dial indicator base to flywheel housing face Rotate flywheel one revolution Maximum runout is 0 008 0 20 mm 1 Position gauge finger so that it contacts pilot bearing bore 2 Rotate flywheel one revolution Maximum runout is 0 005 0 13 mm 3 Secure dial indicator base to flywheel near the outer edge 1 Put gauge finger in contact with face of flywheel housing 2 3 Flywheel Face Runout Flywheel Housing I...

Page 34: ...proper piloting of the clutch and cause clutch damage 7 Install lock washers and mounting bolts 7 16 x 14 UNC x 2 1 4 grade 5 finger tight Replace studs with lock washers and bolts 6 Install second disc onto aligning tool Follow the orientation instructions on the disc 4 Insert aligning tool through DM Clutch and rear disc 3 Install two 7 16 x 14 UNC x 5 studs into upper mounting holes Using clutc...

Page 35: ...h the inner race of the pilot bearing This can result in damage to the clutch or the pilot bearing 2 Do not use excessive force If it does not enter freely investigate the cause of problem and make any necessary changes Do not let the transmission drop or hang unsupported in the driven discs This can cause the discs to become distorted and the clutch to not release CAUTION WARNING 5 Reconnect Ultr...

Page 36: ...n the vehicle sta tionary and the engine not running 6 Key on and allow the system to completely power up but do not start the engine 7 Select LOW mode on the shift controller UltraShift system will begin to emit an audible tone 8 Select an upshift once UltraShift gear display will display a 0 with down arrows and discontinue the tone indicating Special Functions mode is acti vated 9 Once in Speci...

Page 37: ...o manually recalibrate Gen 3 1 Using ServiceRanger select Advanced Product Function button 2 Select UltraShift transmission model Gen 3 from menu tree in the upper left 3 Select the VPA SnapShot Utility and launch the func tion 4 Read the APF description and select Next 5 Enter the vehicle info and select Next 6 Select VPA from the dropdown Data Source field 7 Enter an output file name and locatio...

Page 38: ...till in vehicle complete steps 1 7 of the ECA Clutch In Vehicle Resetting Procedure on page 45 to ensure proper function after reinstallation Move ECA Clutch to Service Position CAUTION 2 Turn ignition switch to on A F F O N O T R A T S B Plug 9 pin connector into dash port 3 Click on ServiceRanger icon to launch program C CAUTION Ensure that hands are not inside the clutch housing while opening o...

Page 39: ...ick on ECA Clutch Service E Click on transmission Note Advanced Product Functions appear CAUTION Ensure that hands are not inside the clutch housing while opening or closing the clutch Choose Clutch Position tab G Click Move to Service Position button H I Confirm Positive results ...

Page 40: ...ead Install them in the 4 cover holes hand tight then turn one full turn This step will hold the pressure plate separator pins in proper position so the clutch can be reused and will release after reinstalling 4 Support the clutch during the removal of the 8 mounting bolts 5 Remove the clutch from the flywheel IMPORTANT Shipping Bolts 4 7 16 x 14 x 1 3 4 UNC ...

Page 41: ... Runout Secure dial indicator base to flywheel housing face Rotate flywheel one revolution Maximum runout is 0 008 0 20 mm 1 Position gauge finger so that it contacts pilot bearing bore 2 Rotate flywheel one revolution Maximum runout is 0 005 0 13 mm 3 Secure dial indicator base to flywheel near the outer edge 1 Put gauge finger in contact with face of flywheel housing 2 3 Flywheel Face Runout Fly...

Page 42: ...o the orientation of the lube fitting is in the 4 o clock position Remove aligning tool 7 Remove four yellow shipping bolts in an even 1 4 turn crisscross pattern 6 Generic graphic Note The clutch release yoke fingers must be positioned so they clear the release bearing housing when removing and installing the transmission Preferred method Move the release yoke to the service position via ServiceR...

Page 43: ... yoke interference when the Electronic Clutch Actuator is at the released position Input Shaft Spigot Wear will not provide proper interface with the inner race of the pilot bearing This can result in damage to the clutch or the pilot bearing 1 Put transmission in neutral Be sure new LCIB has been installed 3 Position transmission so it is square to and aligned with engine 4 Mesh splines by moving...

Page 44: ...e 8 and 3 way connector terminals and reconnect the connectors to the ECA 6 Reconnect the negative 12 volt battery cable Note Ensure you rotate the release yoke close to the cast dowel in the clutch housing prior to mating with the cross shaft This allows the release yoke to clear the release bearing during installation 3 Install the 4 cap screws from the ECA mounting flange and tighten to 35 45 l...

Page 45: ...be tube so that a visual purge can be observed at the cross shaft bushing weep hole 4 Reset the grease interval count if the optional auto mated lube schedule has been activated Note See the Grease Interval Count Reset section IMPORTANT Do not add lube never seize or grease to the input shaft splines The disc must be free to slide CAUTION Failure to properly lubricate the bearing bushing will resu...

Page 46: ...justment Refer to Troubleshooting Guide TRTS0930 for more fault code detail A clutch adjustment should always be performed after a clutch replacement Open and expand the Advanced Product Functions tree 4 5 6 Click on ECA Clutch Service Click on transmission Note Advanced Product Functions appear 2 Turn ignition switch to on 1 F F O N O T R A T S 2 Plug 9 pin connector into dash port 3 Click on Ser...

Page 47: ...41 ECA Clutch Set up Click on Request Clutch Adjustment Note ECA will actuate the clutch five times to perform adjustment Choose Clutch Position Tab 7 8 9 Confirm Positive results ...

Page 48: ... Note GI stands for grease interval and may be misread as G1 on gear display The operator can choose to follow this Automated Lube Schedule or the published lube guidelines in the Lubrication Manual TCMT0021 When enabled it is highly important to reset the Grease Interval Count every time the release bearing is greased The Grease Interval Count can be reset via ServiceRanger or Operator Triggered ...

Page 49: ...lick on Clear Grease Interval Counter 8 9 Confirm Positive results 10 Turn ignition switch to off to save reset Open and expand the Advanced Product Functions tree 4 6 Click on ECA Clutch Service 5 Click on transmission Note Advanced Product Functions appear ...

Page 50: ...ode on the shift device Press the manual up shift button until the gear display shows 3 Press Accelerator to the floor Gear display will show a down arrow Release the accelerator Gear display will show a 0 Select neutral and turn ignition to off in order to save the reset R N D W O L L A U N A M T F I H S F F O N O T R A T S F F O N O T R A T S 3 Hold 0 Release ...

Page 51: ...the release bearing and LCIB If the measurement is not between 0 490 and 0 560 reset clutch Go to Step 2 2 Eaton Service Ranger Diagnostic Software is needed to command the ECA to open the clutch Note Keep the ECA Clutch Service Utility open It will be used again during this process LCIB Correct Distance 0 490 0 560 Release Beaing Opening the ECA Clutch 2 Turn ignition switch to on A F F O N O T R...

Page 52: ...rm Positive results Note Keep the ECA Clutch Service utility open It will be used again during this process Open and expand the Advanced Product Functions tree D F Click on ECA Clutch Service E Click on transmission Note Advanced Product Functions appear CAUTION Ensure that hands are not inside the clutch housing while opening or closing the clutch ...

Page 53: ...housing and engine housing to increase stroke With spacers in place follow Steps 2 through 6 in this procedure Remove spacers and torque transmission mounting bolts Continue process starting at Step 7 5 NEW e r o f e B g n i p p i h S t l o B p a G o N p a G e v e e l S n i P r e t f A Install and tighten 4 shipping bolts 7 16 x 14 x 1 3 4 UNC to remove gap between sleeve and pin 7 In the ECA Clut...

Page 54: ...uld be replaced soon Transmission in Chassis 1 Open inspection cover 2 Through the inspection cover opening lightly com press down the Low Capacity Inertia Brake LCIB using an appropriate tool to avoid damaging the LCIB 3 With your other hand use a shim or a feeler gauge to measure the gap between the mounting stud nut washer and the front of the LCIB caused when the LCIB is compressed 4 Using cal...

Page 55: ...ring the clutch will not adjust and the bearing will move away from the transmission and lose clutch brake squeeze If the system is operational clutch replacement may be nec essary If replacing the clutch you must adhere to OEM war ranty guidelines prior to claim disposition Master Cylinder Installation Master Cylinder Master cylinder may be mounted at any angle ranging from vertical to horizontal...

Page 56: ...rod Clutch Brake Squeeze For non synchronized applications only Transmission Installation Non Synchronized Slave Cylinder 1 Freeplay 3 8 mm 1 Clutch brake squeeze 13 50 mm 1 1 1 Clutch servo 2 To master cylinder 3 Connect air supply 30 psi source Bolts 4 M16 x 1 5 mm torque 20 25 N m 4 Bolts 2 M8 x 1 25 mm torque 20 25 N m 5 Pushrod 1 Slave cylinder 2 5 3 4 1 1 ...

Page 57: ...que all connectors to 20 25 N m Note Make sure there is a constant rise to the master cylinder Snap to Connect Threaded Connect Fill Procedure Recommended methods are vacuum fill or pressure fill Refer to OEM procedure Do not press or disengage clutch pedal when removing slave cylinder or clutch servo 1 Pushrod 2 Slave cylinder 3 To master cylinder 4 Bolts 4 M8 x 1 25 mm torque 20 25 N m 1 Clutch ...

Page 58: ...grease purges from release bearing housing Use NLGI 2 or 3 Lithium complex grease Reference Eaton lubrication manual TCMT0021 for specific instructions 4 Install hand hole cover A 8173 with grommet biased towards transmission in the clutch housing Secure the hand hold cover with two 5 16 x 18 x 1 2 inch long bolts 5 Insert plug into hole in upper left side of the clutch housing where the horizonta...

Page 59: ...fer to diagram 2 Transmission installation remove the nuts from the brass fitting with the grease zerk Install the trans mission and insert the brass fitting through the hole in the left side of the clutch housing Reinstall the brass nuts and tighten 3 Lubricate release bearing until grease purges from release bearing housing Use NLGI 2 or 3 Lithium complex grease Reference Eaton lubrication manua...

Page 60: ... least expensive drivetrain component is considered the fuse of the system Failure of a clutch damper section is usually an indication of a serious torsional vibration systems problem or shock loading due to driver abuse Clutches are assemblies made up of many different compo nents utilizing many different types of materials This section describes the major components which make up a complete Eato...

Page 61: ...b rotation There are three basic categories of torsional rates for clutch dampers rigid standard soft Rigid and Clutch Discs Rigid discs and clutch discs with no spring package whatsoever act as a nearly direct link from the engine flywheel to the transmission and offer no protection against torsional vibration Their use should be limited to older mechanically fueled engines where clutch replaceme...

Page 62: ... due to lack of adjustment loading the clutch beyond its design torque rat ing or the clutch has reached the end of its design life With the ability to re rate an electronic controlled diesel engine it is quite easy to delivery torque to the clutch beyond its design capacity Before an engine re rating is performed confirm that the clutch and other drivetrain components are capable of car rying the...

Page 63: ...driven by the clutch cover or by the flywheel on the 14 Easy Pedal Plus design Positive Separator Pin Eaton s Positive Pin Separator improves clutch life and perfor mance by providing cooler operation smoother engagement and equal plate separation The pin restricts intermediate plate movement when the clutch is released giving constant gap on both sides of the plate therefore allowing the driven d...

Page 64: ...be attributed to this type of operation 5 Do Not Slip the Clutch to Hold the Vehicle on an Incline This procedure uses the clutch to do the job normally expected of the wheel brakes A slipping clutch accumulates heat faster than it can be dissi pated resulting in early failures 6 Do Not Coast with the Clutch Released and Trans mission in Gear This procedure can cause high driven disc RPM through m...

Page 65: ...ific appli cation If the correct clutch is chosen the truck will have good engagement protection for the driveline long clutch life and minimal loss of torque 1 Check the Flywheel Bore 15 5 Clutch The fly wheel environment must be checked to make sure a clutch can be used with it The bore is important when deciding what type of driven disc to use The bore must be large enough to allow for a proper...

Page 66: ... cross shaft bushings per OEM recommen dations 5 Clutch Control Linkage Lubricate the clutch linkage bell cranks and pivot pins per OEM recommenda tions 6 Pilot Bearing The pilot bearing inside the flywheel is a sealed for life bearing and requires no lubrica tion Use a premium pilot bearing to prevent clutch drag and early bearing failures C 3 C 4 C 5 Suffix Lube Tube Assembly The Eaton Lube Tube...

Page 67: ......

Page 68: ...atures and specifications listed in this document are subject to change without notice and represent the maximum capabilities of the software and products with all options installed Although every attempt has been made to ensure the accuracy of information contained within Eaton makes no representation about the completeness correctness or accuracy and assumes no responsibility for any errors or o...

Reviews: