easytech Isokinetic Genu Iso User Manual Download Page 1


Easytech s.r.l. 

– Genu Iso/Plus User’s Manual

 

rev. C                                             

Pag. 

1

 di 

97


Isokinetic Line 

Genu Iso 

 Genu Plus 

User’s Manual


Rev. C of the 16/07/2020 

(Based on Italian Version F) 


Easytech S.r.l. 


EASYTECH s.r.l. 

Via della Fangosa, 32- 50032 Borgo San Lorenzo (FI) Italy 

tel. +39 055 8455216 - fax +39 055 8454349 

e-mail: 

[email protected]


Direct Technical Service number: +39 348 2316323 
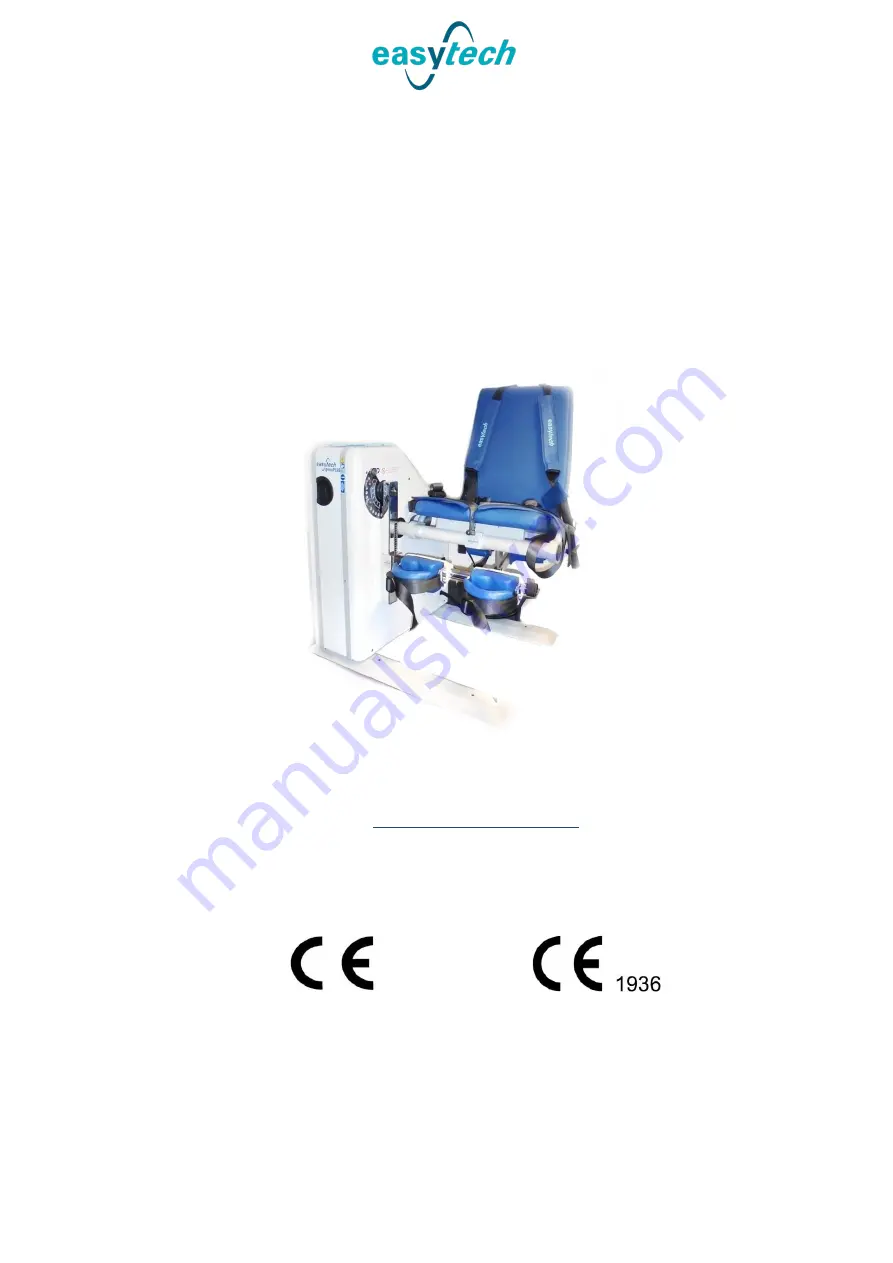


GENU ISO 

GENU PLUS 


This  apparatus  is  compliant  to  93/42/CEE  directive  for  medical  equipments.  Conformity  has  been 
tested according to CEI EN 60601-1 directive. 


Summary of Contents for Isokinetic Genu Iso

Page 1: ... F Easytech S r l EASYTECH s r l Via della Fangosa 32 50032 Borgo San Lorenzo FI Italy tel 39 055 8455216 fax 39 055 8454349 e mail info easytechitalia com Direct Technical Service number 39 348 2316323 GENU ISO GENU PLUS This apparatus is compliant to 93 42 CEE directive for medical equipments Conformity has been tested according to CEI EN 60601 1 directive ...

Page 2: ...anslated in any language nor recorded through any type of equipment without authorization in written by EASYTECH S r l EASYTECH S r l reserves the right to embody changes or improvements in this manual and the product without prior notice Version 16 07 2020 Title Genu ISO e Genu PLUS User s Manual Internal Revision MusGENU_GB_C ...

Page 3: ...NS FOR THE PATIENT 12 2 6 1 Contraindications 12 2 6 2 Special cautions 12 2 7 SAFETY DEVICES 12 3 DESCRIPTION OF GENU 13 3 1 STRUCTURE OF THE DEVICE AND TECHNICAL DESCRIPTION 13 3 1 1 Frame and patient accommodation 14 3 1 2 Oleodynamic section Isometry selector 14 3 1 3 Personal Computer and Software 15 3 1 4 Main technical features 15 3 2 DESCRIPTION OF THE DEVICE FUNCTIONS 17 4 CONNECTION TO G...

Page 4: ... 4 ECCENTRIC EXERCISE 45 5 4 1 Single exercise parameter settings 45 5 4 2 Gravity compensation 46 5 4 3 Setting the limits 47 5 4 4 Exercise in progress 48 5 4 5 End of exercise and review of the graphics 50 5 4 6 Series of exercises and Test 52 5 5 PASSIVE MOVEMENT EXERCISE PM 54 5 5 1 Gravity compensation 54 5 5 2 Setting the limits 54 5 5 3 Exercise in progress 56 5 5 4 Series of exercises and...

Page 5: ... ENVIRONMENTAL AND CONDITION FOR TRANSPORTATION AND STORAGE 82 9 DISPOSAL OF THE UNIT AT THE END OF ITS LIFECYCLE 82 10 LABEL 83 11 APPENDIX 1 SOFTWARE INSTALLATION 85 11 1 PROGRAM INSTALLATION 85 11 2 START PROGRAM 90 11 3 START PROGRAM WITH ERROR MESSAGE 91 12 APPENDIX 2 EXTERNAL TOOLS 94 12 1 IsoDateExSync 94 12 2 IsoExportDB 94 12 3 Report Customization 94 ...

Page 6: ...the basis of the definitions of the All IX Rule 9 of the Directive it is GENU Iso Medical treatment of class I GENU Plus Any active medical device therapeutic class IIb Therefore it is a device to be used under direct medical supervision The devices are manufactured in compliance with Directive 93 42 EEC and subsequent amendments and additions 1 2ESSENTIAL PERFORMANCE The device has no life suppor...

Page 7: ...t by personnel authorized by Easytech The device has been installed in a room with an electrical system that is not compliant with the requirements of current standards The device is not used for the intended use or in accordance with the instructions provided in this manual The device has been tampered with by unauthorized personnel ...

Page 8: ...d supplied with the device or in all cases the spare power cords supplied by Easytech Although it is possible to purchase similar cable that offer good performances their characteristics are not suitable to guarantee the compliance with standards according to which the device has been manufactured In particular The lead section of the cable network must be at least 1mmq The length of mains cable m...

Page 9: ... many cases to prevent sudden malfunctions If the device has fallen to the ground or the external casing is damaged or you reasonably suspect that the performance of the device has degraded disconnect it from the power supply and contact the technical support of Easytech If the connection cable is damaged or liquid has penetrated inside the device disconnect it and contact the technical support of...

Page 10: ... s declaration Electromagnetic Immunity The device is intended for use in the electromagnetic environment specified below The customer or the user of the device should assure that it is used in such an environment Immunity Test Test Level Conformity Electromagnetic Environment Guidance Electrostatic discharge IEC 61000 4 2 2 4 8 kV contact 2 4 8 15 kV air Compliant Floors should be wood concrete o...

Page 11: ...any part of the device including cables than the racommended separation distance calculated from the equation applicable to the frequency of the transmitter RF Conducted IEC 61000 4 6 from 150 KHz to 80 MHz 6 765 6 795 MHz 13 553 13 567 MHz 26 957 27 283 MHz 40 66 40 70 MHz 3 Veff Standard A 6 Veff d 6 E P d 6 E P RF radiated IEC 61000 4 3 See note 80MHz 800 MHz 800MHz 2 7GHz 3 V m Standard A 3 V ...

Page 12: ...ated in the device 2 6 SPECIAL PRESCRIPTIONS FOR THE PATIENT 2 6 1 Contraindications At present Genu Prima can be used by anyone provided that the physician therapist defines the type intensity and limits of the exercises in function of the ability and conditions of each patient The apparatus of the Isokinetic Line must not be used on pediatric patients 2 6 2 Special cautions The are no particular...

Page 13: ...measurements relating to the exercise from the device and allow the storage and consultation of the data relating to the exercises performed The program for managing tests exercises archives and utilities is developed in a Microsoft environment and can run on a PC with Microsoft operating system The active part of Genu is composed of on hydraulic gearmotor consisting of a hydraulic pump a distribu...

Page 14: ...tion leather Straps from high strength nylon woven fabric Seat frame is designed to support patient up to 120 kg Continuous adjustment of seat length backrest tilt lever length with adjustment ruler Discrete adjustment of Range Of Motion 0 105 pitch 15 Angles for isometric exercise 0 90 in step of 15 3 1 2 Oleodynamic section Isometry selector Isokinetic brake with cam actuator velocity adjustment...

Page 15: ... operating space required m 2 00 x 2 70 CONCENTRIC controlled speed 40 s 400 s ECCENTRIC controlled speed 20 s 200 s GenuPLUS model PASSIVE MOVEMENT controlled speed 5 s 20 s GenuPLUS model independent separate adjustment for flexion extension minimum increase interval 1 s travel with mechanical stop 0 105º minimum electronic adjustment interval 1 torque resolution 1 5 Nm Max Torque 600Nm 5 goniom...

Page 16: ...le trolley computer monitor printer Operating system Windows 7 8 8 1 10 Processor minimum requirements Intel I3 RAM minimum requirements 4GB Video Board minimum requirements 1024x768pixel 24bit Monitor Compatible with video board Printer Color graphic compatible with personal computer operating system USB port ...

Page 17: ...he limb under examination NOT impede the movements of the lever 12 Emergency Stop button A provision of the patient for any eventuality Causes the immediate stop of the machine and stopping the movement of the lever Only in the model GenuPLUS 6 Goniometer Mechanical stops Shown with guards removed for demonstration purposes only NEVER WORK WITH THE GUARDS REMOVED 7 Lever with standard ankle pad ri...

Page 18: ...aised position by turning it as shown by the arrows Turn on the device by using the green switch it will light up CHECKS TO BE PERFORMED IF THE DEVICE WILL NOT POWER ON CHECK SOLUTION Is the grid power present in the device s installation site Contact your own electrician Is the power cord correctly connected to device Is it intact Connect the power cord whit care to device Check the power cord an...

Page 19: ...art Unit B already on therefore please carefully follow the order in which the two units are turned on first turn on unit B mechanical part and then turn on unit A personal computer The personal computer is turned on by acting on the switch located on the front panel Monitor and printer will turn on simultaneously as they are connected to the same circuit verify that this occurs At the end of the ...

Page 20: ...ioning and leverages The chair consists of two sections The seat is adjustable in length by sliding the backrest forward or aft after suitably operating the locking mechanism on the left side of the seat Backrest tilt can be adjusted by using the adjustment lever located on the rear side of the backrest It is essential that seat and backrest are adjusted as required to have the knee rotation fulcr...

Page 21: ...he unused ankle pad must be kept in the locked position pad pointing in the direction opposite to the patient If you intend to use the lever with the Anti Shear device first remove the lever with the ankle pad installed on the graduated shaft to do this remove the setscrew near the lower end on the graduated shaft then loosen the black blocking knob placed at the end of the cross lever and pull ou...

Page 22: ...ever which constitutes the fulcrum of the Anti Shear ankle pad must be positioned in an intermediate point between the two cushions normally approximately in the middle the most suitable position is determined by the therapist based on his experience and on the patient s particular problem Lever with Anti Shear device A clamping device is installed under the seat It is used to hold the unused limb...

Page 23: ... possible to perform the following independent adjustments Angular velocity of extensors between 40 s and 400 s in 1 s steps Angular velocity of flexors between 40 s and 400 s in 1 s steps Angular velocity of eccentric extension between 20 sec and 200 sec at 1 sec steps GenuPLUS model Eccentric bending angular velocity between 20 sec and 200 sec at 1 sec steps GenuPLUS model Angular velocity of Pa...

Page 24: ... Plus User s Manual rev C Pag 24 di 97 Per accedere ai pomelli è necessario rimuovere la protezione leva utilizzando l apposito attrezzo Pulsante di emergenza Protezione trasparente contro urti o schiacciamenti NON RIMUOVERE ...

Page 25: ...rm the isometric exercise Move the selector to position OFF to release the lever and perform dynamic exercises isokinetic hydrodynamic and isotonic 4 4 POSSIBLE FAULTS 4 4 1 Communication error The communication between the two units is controlled upon start up and when a new exercise test is started In case of communication error between Pc and Genu unit the following error will be displayed and ...

Page 26: ...elease the emergency button and press Retry If the program does not detect the device set the parameters as indicated in Appendix 1 to the paragraph relating to the start of the program with an error message In some cases of communication error the following error message may appear In these cases write down the message on a note pad and continue operating by pressing the Continue button Contact c...

Page 27: ...malous movements of the lever during concentric exercise access the setup from the main screen Enter the password 2016 and press ok This will open the following window Click on 0 Air and follow the instructions on the screen NB Make sure that the device is connected and switched on before starting the procedure Setup ...

Page 28: ...reen 4 4 4 Notice recovery of configuration files There is a possibility that a configuration file error might occur when the program starts up An automatic file retrieval mechanism has been implemented the program retrieves a copy of the saved configuration file at the end of the previous working session and restores it successfully Through the following message the program notifies the operator ...

Page 29: ...EN When the device is started the following screen will display This is the main screen of the program home page that can be used to access all the functions of the system 1 HomePage 2 Settings 3 Patient page 4 Session log page 5 Concentric exercise 6 Eccentric exercise 7 Passive movements 8 Series preparation 9 Patient s name 10 Type of motion and operational mode 11 Number of repetitions 12 Devi...

Page 30: ...device was shutdown The selected patient is the one to which the subsequent exercise will be linked in the database and whose data will be available for review Press OK to confirm To enter a new patient press 1 NEW insert the desired data press SAVE to save and OK to confirm To change the data press button 2 CHANGE to delete them press button 3 DELETE To search and recall a patient in the archive ...

Page 31: ...Easytech s r l Genu Iso Plus User s Manual rev C Pag 31 di 97 If the search finds more than one match select the desired patient among the listed ones ...

Page 32: ...onic hydrodynamic isometric Type of exercise single exercise series test Segment to treat GENU knee 5 3 1 Concentric isokinetic exercise 5 3 1 1 Single exercise parameter settings When a limb is selected it is also necessary to change all the information displayed on the screen and printouts that contain the names of the movements and muscles involved in the exercise SEGMENT MUSCLES INVOLVED MOVEM...

Page 33: ... using the system provided Fully extend the leg and press the 0 button to save the position Eventually it is possible to do the same thing for 90 bent leg It is advisable to set the parameters when the leg is extended 0 unless the therapist judges that it is impossible Number of repetitions Move the cursor until the desired number displays and move the mouse to the right or left in increments of u...

Page 34: ... button Auto next to the option for setting the extension limit angle 3 ENABLE DISABLE ACTIVE ROM Range of movement Use this option to limit the range used to process the exercise data 4 ENABLE DISABLE TORQUE TARGET Use this option to display on the chart during the exercise a limit that the patient can refer to as the target to be reached By default this corresponds to the maximum value of the pr...

Page 35: ...rapist should compare the resulting value with the historical values to verify that the calibration is correct A confirmation screen will be displayed at the end of the operation 5 3 1 4 Exercise in progress Once all the settings have been completed press the arrow at the bottom right to access the page relating to the exercise Press START wait for the device to issue an acoustic visual signal the...

Page 36: ...ue range and the maximum torque value that corresponds to the relative angle By pressing the blue and or red chart it is possible to hide or display the trend of the torque and or angle If one or both charts are pressed once more the program returns to the previous screen with 2 charts while when the ellipsis button is pressed the program displays the exercise with the angle and torque displayed o...

Page 37: ...ton in the main window See figure below it is possible to recall a series of pre established exercised that is a working protocol compiled by the therapist for more details see paragraph 5 7 By pressing the TEST button in the main window it is possible to load a series of pre set exercises for the purpose of patient s health assessment The operating procedures are identical at the beginning of any...

Page 38: ...d TEST selection is identical a navigator windows will open and the appropriate file can be selected Confirm with OK The start of exercise is identical to the case of single exercise At the end of each SERIES or TEST exercise a waiting rest time window will appear SERIES TEST ...

Page 39: ...ctly as instructions in section 4 3 1 attaching the lever to the ankle using the system provided Fully extend the leg and press the 0 button to save the position Eventually it is possible to do the same thing for 90 bent leg It is advisable to set the parameters when the leg is extended 0 unless the therapist judges that it is impossible Number of repetitions Move the cursor until the desired numb...

Page 40: ...ight or left in increments of units for a fine adjustment SYNCRO The extension flexion values will be the same The settings relating to the LIMITS and the COMPENSATION as well as the analysis of graphics the exercise SERIES and the TEST mode are like the case of isokinetic exercise see paragraph 5 3 1 and related sub paragraphs 5 3 4 Concentric isometric exercise 5 3 4 1 Single exercise parameter ...

Page 41: ... while the COMPENSATION is not present 5 3 4 2 Setting the limits 1 ENABLE DISABLE TORQUE TARGET If activated a limit will be indicated on the graph during the exercise This limit can be used by the patient as a target to be achieved its default is the maximum value of the previous exercise 5 3 4 3 Exercise in progress and review of graphics Once all the settings have been completed press the arro...

Page 42: ...imum value red reference is reached The therapist may decide to move the maximum limit reached if the review of the outline indicates that the automatically detected point is not representative 5 3 4 4 Series of exercises and Isometric Test By pressing the SERIES button in the main window See figure below it is possible to recall a series of pre established exercised that is a working protocol com...

Page 43: ...d TEST selection is identical a navigator windows will open and the appropriate file can be selected Confirm with OK The start of exercise is identical to the case of single exercise At the end of each SERIES or TEST exercise a waiting rest time window will appear SERIES TEST ...

Page 44: ... Plus User s Manual rev C Pag 44 di 97 By pressing button 1 it is possible to immediately move to the following exercise ignoring the rest period At the end of the series or TEST the obtained results are automatically saved 1 ...

Page 45: ...n eccentric mode respectively in flexion and extension movements Exercise only extensor muscles asymmetric in which the patient works with the extensor muscles during the extension movement concentric and continues to work with the extensor muscles during the flexion eccentric Exercise only flexor muscles asymmetric in which the patient works with the flexor muscles during the extension movement e...

Page 46: ...dvisable to set the parameters when the leg is extended 0 unless the therapist judges that it is impossible Number of repetitions Move the cursor until the desired number displays and move the mouse to the right or left in increments of units for a fine adjustment Extension flexion speed Set the desired value by moving the cursor Move the cursor to the right or left in increments of units for a fi...

Page 47: ...ration at the beginning of each exercise because the parameters are stored in the memory of the device The therapist should compare the resulting value with the historical values to verify that the calibration is correct A confirmation screen will be displayed at the end of the operation 5 4 3 Setting the limits Clicking on the right arrow you proceed with the execution of the exercise passing thr...

Page 48: ...n ROM by clicking on the ball to the left of the command 3 ENABLE DISABLE ACTIVE ROM range of movement If enabled it limits the range within which the exercises data will be processed The default setting is 10 less than the arc of movement set with the key 2 to eliminate any artifacts generated by the inversion of motion inversion of the direction of rotation of the motor 4 ENABLE DISABLE TORQUE L...

Page 49: ...Cartesian diagram The torque of flexor muscles is considered Negative and represented below the axis of zero in the Cartesian diagram The movement of extension is represented with the color Dark The movement of flexion is represented with the color Light In the case EXC extensors flexors we have the following type of diagram In the case Extensors EXC CONC we have the following type of diagram ...

Page 50: ...exercise appear the chart below with the angle value in red and the value of the torque in blue with the histogram displays the active field of the torque limits preset and the maximum value of the torque with the relative angle Red Chart Angle Blue Chart Torque Patient s name and limb click here for contro lateral limb Show Hide Histogram Show Hide Torque Show Hide Angle Show Hide Performance ...

Page 51: ... by pressing it again it will return to the previous situation All the commands and controls that can operate on the charts are similar to those described for the case of Concentric exercise Section 5 3 The above example is related to the case EXC extensors flexors the CONC EXC extensors and EXC CONC flexors are similar and shown below ...

Page 52: ...in window it is possible to load a series of pre set exercises for the purpose of patient s health assessment The operating procedures are identical at the beginning of any exercise the limb the type of motion and any limits must be identified and the exercise must be started by pressing the TEST or SERIES button After selecting the SERIES or TEST as described above the program opens a navigation ...

Page 53: ...exercise of the SERIES or TEST the program displays a screen with the rest time By pressing button 1 it is possible to immediately move to the following exercise ignoring the rest period At the end of the series or TEST the obtained results can be saved with the appropriate button 1 ...

Page 54: ...e adjustable range of angular speed will change in this case 5 s at 20 s 5 5 1 Gravity compensation The compensation of gravity is identical to the other cases during the Passive movement it serves only to set the torque limit function properly without taking account of the weight of the limb 5 5 2 Setting the limits Clicking on the right arrow you proceed with the execution of the exercise passin...

Page 55: ...ion angle limit and press the Auto button next to the command setting the limiting flexion Bring the leg angle limit extension and press the Auto button next to the command setting the limiting extension You can also set the angles through the sliders in the same manner just described for the setting of all the other parameters To continue with the exercise you need to enable the range of motion R...

Page 56: ...he repetitions are over the time taken will remain on the screen Is now possible to save the exercise 5 5 4 Series of exercises and Test By pressing the SERIES button in the main window See figure below it is possible to recall a series of pre established exercised that is a working protocol compiled by the therapist for more details see paragraph 5 7 After selecting the SERIES as described above ...

Page 57: ...ents Select the patient and then return to the main screen and select section Databases 5 6 2 Sessions table The menu item Archive in the main screen gives access to all the database review functions The first access page is shown in the following figure It displays the tables of all the exercises performed by the selected patient and with a specific limb Each column represents an exercise while t...

Page 58: ...tions are the same if 2 exercises are selected The difference in this case is that it is possible to compare two exercises performed at different times to determine the evolution of the trauma or related to two limbs the limb being examined and the contralateral limb The display scale is obviously smaller but the options are the same From this window the operator can also print the report of the e...

Page 59: ... Manual rev C Pag 59 di 97 Display of two overlapped exercises Image obtained by pressing button 1 on the double chart 1 Display of two overlapped exercises with Y axis changed Display of the two overlapped exercises with X axis changed ...

Page 60: ...les on the X axis and torque on the Y axis Angle and torque of all the repetitions of the 2 different exercises displayed with a different scale Angle and torque of all the repetitions of 2 different exercises Angle and torque of all the repetitions of the 2 overlapped exercises ...

Page 61: ...Plus User s Manual rev C Pag 61 di 97 By clicking the torque scale it is possible to change the scale and select a value with sign instead of an absolute value by clicking box 1 above the slider for the torque scale adjustment ...

Page 62: ... the isometric mode the shape of the chart is slightly different 5 6 4 Tables printouts In each archive window there is the print button in the bottom right of the screen Clicking on this icon will open the report of the exercise or exercises In this report there is a comparative table which contains the data of the two selected exercises and in which are highlighted the different between them The...

Page 63: ... the report The isokinetic test screen is that same that will be displayed when two random exercises are loaded and when the time and amplitude scale adjustment controls are used The exercise displayed on the left refers to the limb being examined The exercise displayed on the right refers to the reference contralateral limb The icons in the lower left enables to change the type of display as foll...

Page 64: ...ical data along with the currently displayed charts The columns of the following example of report represent 1 Exercise performed with the sick limb being examined 2 Exercise performed with the reference contralateral limb 3 Percentage differences between the sick and contralateral limbs 4 Ratio between the values of the sick and contralateral limbs ...

Page 65: ...Easytech s r l Genu Iso Plus User s Manual rev C Pag 65 di 97 ...

Page 66: ...ith eccentric activation of extensors muscles MFE Eccentric flexors Muscles Identifies the extension phase with Eccentric activation of flexors muscle The operating conditions include the following cases Pure Concentric Exercise CNC in Extension EXT work the extensors muscles MEC and flexion FLX work the flexors muscles MFC Pure eccentric exercise EXC in Extension EXT work the flexors muscles MFE ...

Page 67: ... MEC 1 EXT 1 MFE 1 CNC 2 EXT 2 MEC 2 EXT 2 MEC 2 EXT 2 MEC 2 EXT 2 MEC 2 FLX 1 MFC 1 FLX 1 MEE 1 FLX 1 MEE 1 FLX 1 MFC 1 FLX 2 MFC 2 FLX 2 MFC 2 FLX 2 MFC 2 FLX 2 MFC 2 EXT 1 MEC 1 EXT 1 MFE 1 EXT 1 MEC 1 EXT 1 MFE 1 EXC 2 EXT 2 MFE 2 EXT 2 MFE 2 EXT 2 MFE 2 EXT 2 MFE 2 FLX 1 MFC 1 FLX 1 MEE 1 FLX 1 MEE 1 FLX 1 MFC 1 FLX 2 MEE 2 FLX 2 MEE 2 FLX 2 MEE 2 FLX 2 MEE 2 EXT 1 MEC 1 EXT 1 MFE 1 EXT 1 MEC...

Page 68: ...rcises Isokinetic Concentric In this case relating to two CONCENTRIC exercises the words EXT and FLX which identify the phases of extension and flexion refer to the Extensor and Flexor muscles This is the case shown in the box at the top left side in the Legend see page 65 in the intersection between CNC 2 and CNC 1 ...

Page 69: ...at is expressed in the box next to the first one the one between the intersection with EXC 2 and EXC 1 and we will see the following As seen in the Legend page 65 the boxes of the diagonal compare exercises homogeneous with each other two concentric and two eccentric two extensors or tw flexors We now see the case of other two diagonal boxes ...

Page 70: ...Easytech s r l Genu Iso Plus User s Manual rev C Pag 70 di 97 The following example is related to a test that compares two exercises both on EXTENSORS Concentric Eccentric ...

Page 71: ...e above report highlights the differences between two muscles equal that refer to the selected exercises always taking as reference the first exercise carried out in order of time the one which appears in the right column in the report IN CONCLUSION THE PROGRAM ALLOWS YOU TO EASILY EVALUATE ALL PARAMETERS PERFORMANCE REPORTS AND THE DIFFERENCES BETWEEN THE VARIOUS PARAMETERS MEASURED ON THE JOINTS...

Page 72: ...s explained above After this operation it is necessary to select the desired type of test As shown in the following figure there are 4 types of tests 4Fasi_DxExt First exercise Extension of the right limb 4Fasi_DxFlx First exercise Flexion of the right limb 4Fasi_SxExt First exercise Extension of the left limb 4Fasi_SxFlx First exercise Flexion of the left limb The 4 selected exercises will be per...

Page 73: ...or touching any point in the column it is possible to select a specific exercise it is possible to select 1 or 2 exercises see figure By clicking or touching the header of a column and in particular the description TEST it is possible to select all 4 test exercises see figure Button in the lower left side enables to display the charts ...

Page 74: ...one The extension phase positive convection is displayed in the upper section of the chart the zero line is displayed in the center while the flexion negative torque is displayed in the lower section To accurately compare the extensor and flexor muscles of each limb it is necessary to enable the display of absolute values on the left of the chart and click or touch the small rectangles above the s...

Page 75: ...wo overlapped charts and compare the torque values of one limb with those of the other one Continuous curves refer to the limb being examined while the dotted ones refer to the contralateral limb The printer icon in the lower right enables to print the two page report the first shows the data along with the charts selected on the screen The second shows all the differences ratios and percentages b...

Page 76: ...Easytech s r l Genu Iso Plus User s Manual rev C Pag 76 di 97 Click the printer icon in the upper right to print the report Click the small cross on the far right to close the page ...

Page 77: ...Easytech s r l Genu Iso Plus User s Manual rev C Pag 77 di 97 Click the printer icon in the upper right to print the report Click the small cross on the far right to close the page ...

Page 78: ... of series Concentric Eccentric PM the following screen will appear for create a new series To create a new series press NEW select the limb the type of motion and its values Confirm by pressing ADD 1 and repeat the operation until the desired series is created To delete an exercise from the series select the exercise to be deleted press DELETE 2 and confirm as shown in the following image 1 2 3 4...

Page 79: ...llowing window will appear where the created series will be named max 10 alpha numeric characters The UPDATE button 5 allows the operator to update the data of a selected exercise To recall a previously saved series press OPEN 4 A window will appear from which it is possible to recall the series of interest ...

Page 80: ...sent in the hydraulic circuit Follow the air elimination described in the cap 4 4 2 IT S NO POSSIBLE TO EXECUTE A PM OR EXCENTRIC EXERCICE THE DEVICE DON T START Low battery Leave the device connected to grid with the main switch in ON position some hours without use it Exhausted Batteries Change the batteries THERE IS AN OFFSET ON COUPLE VALUE It s necessary to reset the torque offset Follow the ...

Page 81: ...ave a specific protection Do not use solvents or the other abrasive solutions Do not use heat pressure sterilization systems 7 2 PERIODICAL INSPECTION AND LIFE OF THE DEVICE As suggested in the safety requirements it is very important to perform a few visual tactile checks every time the device is used in order to make sure its operative conditions are safe and that there are no visible damages Ch...

Page 82: ... The other parts of the machine can be packaged in a similar manner or placed in boxes 8 2ENVIRONMENTAL AND CONDITION FOR TRANSPORTATION AND STORAGE Environment Temperature 10 50 C Relative Humidity 30 75 Atmospheric Pressure 700 1060 mbar 9 DISPOSAL OF THE UNIT AT THE END OF ITS LIFECYCLE The disposal of the unit generally consists in simply replacing it and in returning the old one to the manufa...

Page 83: ...al The device that is no longer usable must be disposed of in accordance with current regulation for electrical and electronic equipment WEEE Directive 2012 19 UE Production year Manufacturer Type B Applied Part Classification According CEI EN 60601 1 Code This number is just an example Read User Manual The device that is no longer usable must be disposed of in accordance with current regulation f...

Page 84: ...Easytech s r l Genu Iso Plus User s Manual rev C Pag 84 di 97 ...

Page 85: ...he USB cable to the computer Insert the installation CD or the USB pen into the device Note If you are using the USB drive you should create a new folder on hard disk of your computer You should copy the USB drive s file into the new folder Open the unit DVD RW or the folder just created on your computer with the software inside Open file on folder the last numbers may change depending on the soft...

Page 86: ...ndow like this will appear Select your favorite installation language and then click OK A window like this will appear Choose the destination folder and then click Next Note it is suggested not to change the default destination folder in order to guarantee the proper working On the next window check the checkbox and then click Next ...

Page 87: ...l rev C Pag 87 di 97 On the following window click Install and wait for the installation process to complete When the process is completed click on Finish to start the installation of the exercise extraction tool from a common Isocine3 archive ...

Page 88: ...v C Pag 88 di 97 Select installation language and click on OK If the installer requests to choose the installation folder leave the default one then click on Next In the next step leave the checkmark on Create a desktop shortcut then click on Next ...

Page 89: ...Easytech s r l Genu Iso Plus User s Manual rev C Pag 89 di 97 In the next step click on Install As the tool installation is completed click on Finish The Isocine3 software installation is now completed ...

Page 90: ... l Genu Iso Plus User s Manual rev C Pag 90 di 97 11 2 START PROGRAM Start Isocine3 program Open the program by double clicking on desktop icon Now open the program configuration panel to complete the installation ...

Page 91: ... left button or tap the screen by selecting the question mark in the upper right corner 11 3 START PROGRAM WITH ERROR MESSAGE If running the program Isocine3 for the first time you receive the following error message it means that device is not connected In the picture below there is a red font on the right top below the easytech logo Device not connected Select Language Select Equipment Type OK N...

Page 92: ...e device is not turned on 3 The emergency button is pressed Check the USB connection turn on the device or release the emergency button and press Retry Close the program then open the software again See picture below status icon in order to verify the device connection Now open the program configuration panel to complete the installation ...

Page 93: ... is correctly configured Now is possible to use the equipment PLEASE READ THE USER MANUAL CAREFULLY TO OPEN THE ONLINE USER MANUAL CLICK WITH LE LEFT BUTTON OR TOUCH THE SCREEN BY SELECTING THE QUESTION MARK IN THE UPPEN RIGHT CORNER Select Language Select Equipment Type OK Next ...

Page 94: ...older of the Isocine3 software installation directory By default the path is as follows C Easytech_Isocine3 Utilities IsoExportDB This tool is intended to be used to extract in offline mode from an exercise archive of the Isocine3 software a detailed list of all the exercises performed by a specific patient with the relative performances for each exercise Please refer to the user s manual in the f...

Page 95: ......

Page 96: ......

Page 97: ... r l Via della Fangosa 32 50032 Borgo S Lorenzo Firenze Italy Tel 39 055 8455216 Fax 39 055 8454349 E Mail info easytechitalia com www easytechitalia com Direct number of Easytech Technical Support 39 348 2316323 ...

Reviews: