background image

57 

SDI DVR User’s Manual 


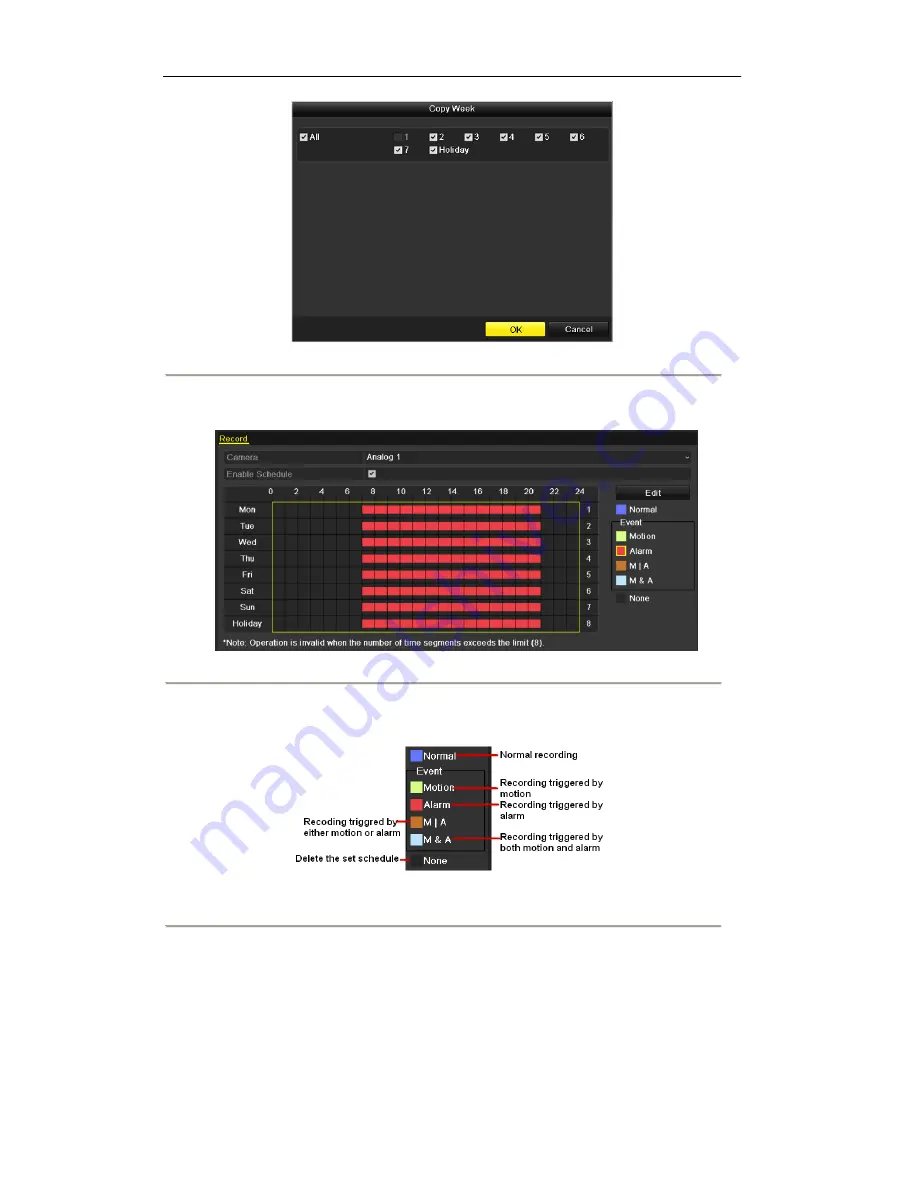
Figure 5. 27 Copy Schedule to Other Days 


Draw the schedule


1)  Click on the color icon of Motion in the event list on the right-side of the interface. 


Figure 5. 28 Draw the Schedule- Alarm 


Descriptions of the color icons are shown in the figure below. 


Figure 5. 29 Descriptions of the color icons 


2)  Click and drag the mouse on the schedule. 


3)  Click on the outside of the schedule to finish and exit the drawing. 


You can repeat step 3 to set schedule for other channels. If the settings can also be used to other channels, click 


Copy

, and then choose the channel to which you want to copy. 

Summary of Contents for DVR-SDI Series

Page 1: ...SDI Digital Video Recorder User s Manual...

Page 2: ...received including interference that may cause undesired operation EU Conformity Statement This product and if applicable the supplied accessories too are marked with CE and comply therefore with the...

Page 3: ...y secured to a rack or shelf Major shocks or jolts to the unit as a result of dropping it may cause damage to the sensitive electronics within the unit Use the DVR in conjunction with an UPS if possib...

Page 4: ...urchasing our product If there are any questions or requests please do not hesitate to contact your dealer This manual is applicable to the models listed in the following table Series Model Type DVR S...

Page 5: ...automatic cycling can be adjusted Quick setting menu is provided for live view The selected live view channel can be shielded Motion detection tamper proofing video exception alarm and video loss ala...

Page 6: ...otifying surveillance center and sending email Automatic restore when system is abnormal Other Local Functions Users can operate by mouse and remote control Three level user management admin user can...

Page 7: ...restart Support upgrading via remote FTP server RS 485 transparent channel transmission Alarm and exception information can be sent to the remote host Remotely start stop recording Remote PTZ control...

Page 8: ...33 4 1 Configuring PTZ Settings 34 4 2 Setting PTZ Presets Patrols Patterns 35 4 2 1 Customizing Presets 35 4 2 2 Calling Presets 36 4 2 3 Customizing Patrols 37 4 2 4 Calling Patrols 38 4 2 5 Custom...

Page 9: ...oss 110 8 4 Detecting Video Tampering 112 8 5 Handling Exceptions 114 8 6 Setting Alarm Response Actions 115 8 7 Triggering or Clearing Alarm Output Manually 117 Chapter 9 Network Settings 118 9 1 Con...

Page 10: ...12 1 2 Viewing Camera Information 152 12 1 3 Viewing Record Information 152 12 1 4 Viewing Alarm Information Optional 153 12 1 5 Viewing Network Information 153 12 1 6 Viewing HDD Information 154 12...

Page 11: ...SDI DVR User s Manual 11 Chapter 1 Introduction...

Page 12: ...evices such as USB mouse and USB Hard Disk Drive HDD 4 Composite Keys SHIFT Switch between the numeric or letter input and functions of the composite keys Input letter or numbers when the light is out...

Page 13: ...ed to navigate between different fields and items in menus In the Playback mode the Up and Down button is used to speed up and slow down recorded video The Left and Right button will select the next a...

Page 14: ...he device 2 DEV Enables Disables Remote Control 3 Alphanumeric Buttons Same as Alphanumeric buttons on front panel 4 EDIT Button Same as EDIT IRIS button on front panel 5 A Button Same as A FOCUS butt...

Page 15: ...ocedure below to troubleshoot Steps 1 Go into Menu Settings General More Settings by operating the front control panel or the mouse 2 Check and remember DVR ID The default ID is 255 This ID is valid f...

Page 16: ...er The operation of the mouse Table 1 3 Description of the Mouse Control Name Action Description Left Click Single Click Live view Select channel and show the quick set menu Menu Select and enter Doub...

Page 17: ...tion Figure 1 3 Soft Keyboard Description of the buttons on the soft keyboard Table 1 4 Description of the Soft Keyboard Icons Icons Description Icons Description English Capital English Numbers Symbo...

Page 18: ...tor for audio output 4 VGA DB9 connector for VGA output Display local video output and menu 5 HDMI HDMI video output connector 6 USB Port Universal Serial Bus USB port for additional devices 7 Network...

Page 19: ...ED on the front panel should be red indicating the device gets the power supply 2 Turn on the power switch on the rear panel and the Power indicator LED should turn yellow indicating that the unit beg...

Page 20: ...d the POWER indicator turns red you can turn on the device by clicking the POWER button on the remote control Rebooting the DVR While in the Shutdown menu Figure 1 6 you can also reboot the DVR Steps...

Page 21: ...SDI DVR User s Manual 21 Chapter 2 Getting Started...

Page 22: ...d can walk you through some important settings of the DVR If you don t want to use the Setup Wizard at this time click the Cancel button You can also choose to use the Setup Wizard next time by leavin...

Page 23: ...e 2 4 Date and Time Settings 7 After the time settings click Next button which will take you back to the Network Setup Wizard window as shown in Figure 2 5 Figure 2 5 Network Configuration 8 Click Nex...

Page 24: ...al 24 10 Click Next button to enter the Record Settings window as shown in Figure 2 7 Figure 2 7 Record Settings 11 Click Copy to copy the settings to other channels 12 Click OK to save the settings a...

Page 25: ...SDI DVR User s Manual 25 Chapter 3 Live View...

Page 26: ...bring you to the Live View mode Live View Icons In the live view mode there are icons at the right top of the screen for each channel showing the status of the record and alarm in the channel so that...

Page 27: ...screens Next screen right direction button Previous screen left direction button Auto switch Press Enter button All day playback Press Play button 3 2 2 Using the Mouse in Live View Table 3 3 Mouse Op...

Page 28: ...use to the bottom of the screen Figure 3 2 Quick Setting Toolbar Table 3 4 Description of Quick Setting Toolbar Icons Icons Description Icons Description Icons Description Enable Disable Manual Record...

Page 29: ...SDI DVR User s Manual 29 Figure 3 3 Digital Zoom...

Page 30: ...de Video Output Interface Designates the output to configure the settings for Outputs include HDMI depends on the model and VGA Live View Mode Designates the display mode to be used for Live View Dwel...

Page 31: ...er s Manual 31 2 Click a window to select it and then double click a camera name in the camera list you would like to display Setting an X means the window will not display any channel 3 Click the App...

Page 32: ...f you want to do some operation you need to enter user name and password to log in again Steps 1 Enter the Shutdown menu Menu Shutdown Figure 3 6 Shutdown 2 Click Logout Note After you have logged out...

Page 33: ...SDI DVR User s Manual 33 Chapter 4 PTZ Controls...

Page 34: ...nd the DVR are connected properly through RS 485 interface Steps 1 Enter the PTZ Settings interface Menu Camera PTZ Figure 4 1 PTZ General 2 Choose the camera for PTZ setting next to Camera label 3 En...

Page 35: ...nt to when an event takes place Steps 1 Enter the PTZ Control interface Menu Camera PTZ More Settings Figure 4 2 PTZ More Settings 2 Use the directional button to wheel the camera to the location wher...

Page 36: ...etting interface Steps 1 Enter the PTZ Control interface Menu Camera PTZ More Settings 2 Check the round icon before Call Preset Figure 4 4 PTZ Call Preset 3 Choose the preset number Call preset in li...

Page 37: ...tomizing Presets Steps 1 Enter the PTZ Control interface Menu Camera PTZ More Settings 2 Select patrol number 3 Select the under Patrol option box to add key points for the patrol Figure 4 6 PTZ Add K...

Page 38: ...rresponding key point and click to delete all the key points Figure 4 8 KeyPoints Deletion 4 2 4 Calling Patrols Purpose Calling a patrol makes the PTZ to move according the predefined patrol path Cal...

Page 39: ...trol on the control bar 3 Double click the patrol you want to call or click to select the patrol and click to call the patrol Figure 4 10 PTZ Panel Patrol 4 2 5 Customizing Patterns Purpose Patterns c...

Page 40: ...a according to the predefined patterns Calling pattern in the PTZ setting interface Steps 1 Enter the PTZ Control interface 2 Select the pattern number 3 Click then the PTZ moves according to the patt...

Page 41: ...SDI DVR User s Manual 41 Figure 4 13 PTZ Panel Pattern...

Page 42: ...gure 4 14 PTZ Panel Table 4 1 Description of the PTZ panel icons Icon Description Icon Description Icon Description Direction button and the auto cycle button Zoom Focus Iris Zoom Focus Iris The speed...

Page 43: ...SDI DVR User s Manual 43 Chapter 5 Recording Settings...

Page 44: ...ecord capacity and maximum picture capacity For detailed information see Chapter 10 4 Configuring Quota Mode 2 If the HDD mode is Group you should set the HDD group For detailed information see Chapte...

Page 45: ...triggered the recording ends at 11 00 if you set the post record time as 5 seconds it records till 11 00 05 Expired Time The expired time is the longest time for a record file to be kept in the HDD if...

Page 46: ...5 Sub stream Encoding 2 Select a camera in the camera dropdown list 3 Configure the parameters 4 Click Apply to save the settings 5 If the parameters can also be used to other channels click Copy to c...

Page 47: ...ord Schedule Figure 5 6 Record Schedule Without the Alarm Module Figure 5 7 Record Schedule With the Alarm Module 2 Choose the camera you want to configure in the Camera dropdown list 3 Check the chec...

Page 48: ...d Note Up to 8 periods can be configured for each day And the time periods can t be overlapped each other Repeat the above steps 1 3 to schedule recording for other days in the week If the schedule ca...

Page 49: ...11 Draw the Schedule 2 Click and drag the mouse on the schedule 3 Click on the other area except for the schedule table to finish and exit the drawing You can repeat step 5 to set schedule for other...

Page 50: ...arning notifying the surveillance center sending email and so on Steps 1 Enter the Motion Detection interface Menu Camera Motion Figure 5 13 Motion Detection 2 Configure Motion Detection 1 Choose came...

Page 51: ...ngs 7 Click OK to back to the upper level menu 8 Exit the Motion Detection menu 3 Configure the schedule Please refer to the Chapter 5 2 Configuring Record Schedule while you may choose Motion as the...

Page 52: ...schedule leave the All Day checkbox blank and set the Start End time Note Up to 8 periods can be configured for each day And the time periods can t be overlapped each other Repeat the above steps to...

Page 53: ...the schedule 3 Click on the outside of the schedule to finish and exit the drawing You can repeat step 3 to set schedule for other channels If the settings can also be used to other channels click Co...

Page 54: ...ing Steps 1 Enter the Alarm setting interface Menu Configuration Alarm Figure 5 21 Alarm Settings 2 Click the Alarm Input tab Figure 5 22 Alarm Settings Alarm Input 1 Select Alarm Input number and con...

Page 55: ...er level menu Repeat the above steps to configure other alarm input parameters If the setting can also be applied to other alarm inputs click Copy and choose the alarm input number Figure 5 24 Copy Al...

Page 56: ...ule 4 Set the Type as Alarm 5 To schedule an all day recording check the checkbox after the All Day item 6 To arrange other schedule leave the All Day checkbox blank and set the Start End time Note Up...

Page 57: ...e Alarm Descriptions of the color icons are shown in the figure below Figure 5 29 Descriptions of the color icons 2 Click and drag the mouse on the schedule 3 Click on the outside of the schedule to f...

Page 58: ...58 SDI DVR User s Manual Figure 5 30 Copy Schedule to Other Channels...

Page 59: ...s interface Menu Manual Figure 5 31 Manual Record 2 Enable manual record Click the status icon before camera number to change it to Or click the status icon of Analog to enable manual record of all ch...

Page 60: ...1 Enter the Record setting interface Menu Record 2 Choose Holiday on the left bar Figure 5 32 Holiday Settings 3 Enable Edit Holiday schedule 1 Click to enter the Edit interface Figure 5 33 Edit Holi...

Page 61: ...the timeline of Holiday See the two figures below Figure 5 34 Edit Schedule Holiday Figure 5 35 Draw Schedule Holiday Note Up to 8 periods can be configured for each day And the time periods can t be...

Page 62: ...is chapter the configuration for Motion Alarm motion or alarm and Motion Alarm triggered recording will be described only Steps 1 Enter the Record setting interface Menu Record Schedule Figure 5 36 Re...

Page 63: ...n also be set to other days click Copy Figure 5 38 Copy Schedule to Other Days Draw the schedule 1 Click on the color icon of Motion in the event list on the right side of the interface Figure 5 39 Dr...

Page 64: ...et the HDD property to Redundant For detailed information please refer to Chapter 10 4 Managing HDD Group There should be at least another HDD which is in Read Write status Steps 1 Enter HDD Informati...

Page 65: ...Record 2 Select Camera you want to configure 3 Check the checkbox of Redundant Record 4 Click Apply to save settings If the encoding parameters can also be used to other channels click Copy and choos...

Page 66: ...nter editing interface 4 Configuring HDD group 1 Choose a group number for the HDD group 2 Click Apply to save your settings 3 Click OK to back to the upper level menu Repeat the above steps to config...

Page 67: ...he channels you want to investigate by checking the checkbox to 3 Configure the record type file type start time and end time 4 Click Search to show the results Figure 5 46 Playback Search Result 5 Pr...

Page 68: ...nt to protect Figure 5 49 HDD General Editing 3 Set the HDD to Read only 4 Click OK to save settings and back to the upper level menu Notes 1 You can t save any files in a Read only HDD If you want to...

Page 69: ...69 SDI DVR User s Manual Chapter 6 Playback...

Page 70: ...n live view mode using the mouse and click the button in the quick setting toolbar Note Only record files recorded during the last five minutes on this channel will be played back Figure 6 1 Instant P...

Page 71: ...can be used to control playing progress as shown in Figure 6 3 Figure 6 3 All day Playback Interface The channel and time selection menu displays by moving the mouse to the right of the playback inte...

Page 72: ...r Note 1 Playback progress bar use the mouse to drag the progress bar to locate special frames 2 About video type bar represents normal recording manual or schedule represents event recording motion r...

Page 73: ...ule or there will be only two types of recording supported Normal and Motion 4 Set search conditions and click the Playback button to enter Playback interface Figure 6 7 Video Search by Time In the Pl...

Page 74: ...progress bar to locate special frames 2 About video type bar represents normal recording manual or schedule represents event recording motion represents smart search recording 6 1 3 Playing Back by No...

Page 75: ...you to step 3 and step 4 Figure 6 11 Result of Normal Video Search 3 Choose channels for simultaneous playback Note The optional channels for simultaneous playback are the same channels for chosen to...

Page 76: ...Start Stop clipping 30s forward 30s reverse Add default tag Add customized tag Tag management Slow forward Pause reverse play Reverse play Single frame reverse play Pause play Play Single frame play S...

Page 77: ...upported after the alarm module is plugged in 3 Check the checkbox of camera number on demand 4 Click Search button to enter the Search Result interface Figure 6 16 Video Search by Motion Figure 6 17...

Page 78: ...esult of Video Search by Motion Figure 6 19 Result of Video Search by Alarm Input 7 Playback interface The toolbar in the bottom part of Playback interface can be used to control playing process Figur...

Page 79: ...Start Stop clipping 30s forward 30s reverse Add default tag Add customized tag Tag management Slow forward Pause reverse play Reverse play Single frame reverse play Pause play Play Single frame play...

Page 80: ...record files and position time point Before playing back by tag 1 Enter Playback interface Figure 6 23 Interface of Playback by Time Press button to add default tag Press button to add customized tag...

Page 81: ...playback conditions and tag management Choose the tag name of the recorded file you want to play back it can be edited or deleted Pre play and post play time can be set according to actual needs Note...

Page 82: ...e Start Stop clipping 30s forward 30s reverse Add default tag Add customized tag Tag management Slow forward Pause reverse play Reverse play Single frame reverse play Pause play Play Single frame play...

Page 83: ...og Search interface Menu Maintenance Log Search Set search time and type and click Search button Figure 6 30 System Log Search Interface 2 Choose a log with record file and click button to enter Playb...

Page 84: ...84 SDI DVR User s Manual 3 Playback interface The toolbar in the bottom part of Playback interface can be used to control playing process Figure 6 32 Interface of Playback by Log...

Page 85: ...lbar Using the front panel Press the button to set the speed to Single frame One click on the playback screen or press button on the front panel represents playback or adverse playback of one frame 6...

Page 86: ...a After drawing area s press button to execute smart search in this area Note Multi area and full screen searching modes are supported Figure 6 35 Draw Area of Smart Search Results of intelligent anal...

Page 87: ...ed tag Tag management Slow forward Pause reverse play Reverse play Single frame reverse play Pause play Play Single frame play Stop Fast forward Previous smart search result Next smart search result V...

Page 88: ...le and the image within it will be enlarged up to 16 times Figure 6 38 Draw Area for Digital Zoom Figure 6 39 Right click Menu under Playback The right click menu Table 6 7 Detailed Explanation of Rig...

Page 89: ...89 SDI DVR User s Manual Chapter 7 Backup...

Page 90: ...te The time duration of record files on a specified channel cannot exceed one day Otherwise the message box Max 24 hours are allowed for quick export pops up Figure 7 1 Quick Export Interface 3 Export...

Page 91: ...re 7 4 Checkup of Quick Export Result Using USB1 1 7 1 2 Backing up by Normal Video Search Purpose The record files can be backed up to various USB devices such as USB flash drives USB HDDs and USB wr...

Page 92: ...selected files is displayed in the lower left corner of the window Figure 7 6 Result of Normal Video Search for Backup 4 Export Click Export button and start backup Note If the inserted USB device is...

Page 93: ...cord files are exported with pop up message box Export finished Figure 7 9 Export Finished 5 Check backup result Choose the record file in Export interface and click button to check it Note The Player...

Page 94: ...ackup and Normal Backup are supported Note Alarm Input type is supported after the alarm module is plugged in Steps 1 Enter Export interface Menu Export Event 2 Search for events 1 Select the type of...

Page 95: ...annels triggered by the event 3 Clicking Quick Export button will export record files of all channels triggered by the selected alarm input Figure 7 14 Result of Event Search by Motion Figure 7 15 Res...

Page 96: ...7 Event Details Interface Alarm Input 4 Export Click the Export button and start backing up Note If the inserted USB device is not recognized Click the Refresh button Reconnect device Check for compat...

Page 97: ...age Export finished Figure 7 19 Export Finished 5 Check backup result Note The Player player exe will be exported automatically during record file export Figure 7 20 Checkup of Event Export Result Usi...

Page 98: ...o save the clips Note A maximum of 30 clips can be selected for each channel Figure 7 21 Interface of Playback by Time 4 Click Yes to save video clips and enter Export interface or click No to quit an...

Page 99: ...orting interface until all record files are exported with pop up message Export finished Figure 7 24 Export Finished 6 Check backup result Note The Player player exe will be exported automatically dur...

Page 100: ...t button to enter Export interface Note At least one record file shall be selected Figure 7 27 Result of Normal Video Search for Backup 3 Backup device management Click New Folder button if you want t...

Page 101: ...l Set search condition and click Search button to enter Search Result interface Note At least one channel shall be selected Figure 7 29 Normal Video Search for Backup 2 Select record files you want to...

Page 102: ...ant to erase the files from a re writable CD DVD Note There must be a re writable CD DVD when you make this operation Note If the inserted USB writer is not recognized Click the Refresh button Reconne...

Page 103: ...SDI DVR User s Manual 103 Chapter 8 Alarm Settings...

Page 104: ...on Setup Interface 2 Set detection area and sensitivity Check checkbox to enable motion detection use the mouse to draw detection area s and drag the sensitivity bar to set sensitivity Click to set al...

Page 105: ...riods shall not be repeated or overlapped Figure 8 4 Set Arming Schedule of Motion Detection 5 Click Handling tab to set up alarm response actions of motion alarm please refer to Chapter 8 6 Setting A...

Page 106: ...SDI DVR User s Manual 106 Figure 8 5 Copy Settings of Motion Detection...

Page 107: ...ons Figure 8 7 Alarm Input Settings Interface 3 Select Trigger Channel tab and select one or more channels which will start to record or become full screen monitoring when an external alarm is input 4...

Page 108: ...o complete the settings of the alarm input Note Please check whether the PTZ or speed dome supports PTZ linkage One alarm input can trigger presets patrol or pattern of more than one channel But prese...

Page 109: ...SDI DVR User s Manual 109 Figure 8 10 Copy Settings of Alarm Input...

Page 110: ...Enable Video Loss Alarm Click button to set up handling method of video loss 3 Set arming schedule of the channel Select Arming Schedule tab to set the channel s arming schedule Choose one day of a we...

Page 111: ...et up alarm response action of video loss please refer to Chapter 8 6 Setting Alarm Response Actions 5 Click the OK button to complete the video loss settings of the channel Repeat the above steps to...

Page 112: ...ox of Enable Video Tampering 3 Use the mouse to draw an area you want to detect video tampering 4 Drag the sensitivity bar and choose a proper sensitivity level Figure 8 14 Set Detection Area and Sens...

Page 113: ...ter 8 6 Setting Alarm Response Actions Repeat the above steps to set arming schedule of other days of a week You can also use Copy button to copy an arming schedule to other days 4 Click the OK button...

Page 114: ...ion Mismatch The input resolution is smaller than the recording resolution Record Exception No space for saving recorded files Steps Enter Exception interface of System Configuration and handle variou...

Page 115: ...Channel settings the channel s you want to make full screen monitoring Audible Warning Trigger an audible beep when an alarm is detected Notify Surveillance Center Sends an exception or alarm signal...

Page 116: ...n each day Note Time periods shall not be repeated or overlapped Figure 8 19 Set Arming Schedule of Alarm Output 3 Repeat the above steps to set arming schedule of other days of a week You can also us...

Page 117: ...an be cleared only by clicking Clear button in the following interface Steps Select the alarm output you want to trigger or clear and make related operations Menu Manual Alarm Click Trigger Clear butt...

Page 118: ...SDI DVR User s Manual 118 Chapter 9 Network Settings...

Page 119: ...erface 2 Select the General tab 3 In the General Settings interface you can configure the following settings NIC Type IPv4 Address IPv4 Gateway MTU and DNS Server If the DHCP server is available you c...

Page 120: ...n to save the settings 6 After successful settings the system asks you to reboot the device to enable the new settings and the PPPoE dial up is automatically connected after reboot You can go to Menu...

Page 121: ...r Address for DynDNS i e members dyndns org 2 In the NVR Domain Name text field enter the domain obtained from the DynDNS website 3 Enter the User Name and Password registered in the DynDNS website Fi...

Page 122: ...NVR it will replace the old one registered on the server You can register the alias of the device domain name in the hkDDNS server first and then enter the alias to the Device Domain Name in the NVR...

Page 123: ...set in a more customized network NTP software can be used to establish a NTP server used for time synchronization 9 2 4 Configuring SNMP Purpose You can use SNMP protocol to get device status and par...

Page 124: ...vice is connected When the network working mode of the device is set as multi address the Default Route of the device should be in the same network segment as that of the LAN IP address of the router...

Page 125: ...1 and 65535 and the value must be different from each other If multiple devices are configured for the UPnP settings under the same router the value of the port No for each device should be unique Fig...

Page 126: ...2 7 Configuring Multicast Purpose The multicast can be configured to realize live view for more than 128 cameras through network A multicast address spans the Class D IP range of 224 0 0 0 to 239 255...

Page 127: ...xit the menu 9 2 9 Configuring Server and HTTP Ports Purpose You can change the server and HTTP ports in the Network Settings menu The default server port is 8000 and the default HTTP port is 80 Steps...

Page 128: ...rk Settings menu Please refer to Chapter 9 1 Configuring General Settings for detailed information Steps 1 Enter the Network Settings interface Menu Configuration Network 2 Select the Email tab to ent...

Page 129: ...time between two captures of the alarm images You can also set SMTP port and enable SSL here Interval The interval refers to the time between two actions of sending attached pictures E mail Test Sends...

Page 130: ...time information of DVR such as linking status MTU sending receiving rate etc Steps 1 Enter the Network Traffic interface Menu Maintenance Net Detect Figure 9 23 Network Traffic Interface 2 You can vi...

Page 131: ...lay and packet loss 4 Enter the destination address in the text field of Destination Address 5 Click the Test button to start testing network delay and packet loss The testing result pops up on the wi...

Page 132: ...n it fails to detect the backup device please check whether it is compatible with the DVR You can format the backup device if the format is incorrect Figure 9 26 Export Network Packet 4 Click the Expo...

Page 133: ...us If the network is normal the following message box pops out Figure 9 29 Network Status Checking Result If the message box pops out with other information instead of this one you can click Network b...

Page 134: ...enance Net Detect 2 Click the Network Stat tab to enter the Network Statistics menu Figure 9 31 Network Stat Interface 3 View the bandwidth of Remote Live View bandwidth of Remote Playback and bandwid...

Page 135: ...SDI DVR User s Manual 135 Chapter 10 HDD Management...

Page 136: ...neral Figure 10 1 HDD Information Interface 2 Select HDD to be initialized 3 Click the Init button Figure 10 2 Confirm Initialization 4 Select the OK button to start initialization Figure 10 3 Start I...

Page 137: ...n Interface 2 Click the Add button to enter the Add NetHDD interface as shown in Figure 10 6 Figure 10 6 HDD Information Interface 3 Add the allocated NetHDD 4 Select the type to NAS or IP SAN 5 Confi...

Page 138: ...wn below 4 Click the OK button to add the selected IP SAN disk Note Up to 1 IP SAN disk can be added Figure 10 8 Add IP SAN Disk 6 After having successfully added the NAS or IP SAN disk return to the...

Page 139: ...u HDD Advanced 2 Set the Mode to Group as shown in Figure 10 10 Figure 10 10 Storage Mode Interface 3 Click the Apply button and the following Attention box will pop up Figure 10 11 Attention for Rebo...

Page 140: ...ore setting the HDD property please set the storage mode to Group refer to step1 4 of Chapter 10 3 1 Setting HDD Groups A HDD can be set to read only to prevent important recorded files from being ove...

Page 141: ...ly or Redundancy 4 Click the OK button to save the settings and exit the interface 5 In the HDD Information menu the HDD property will be displayed in the list Note At least 2 hard disks must be added...

Page 142: ...rebooted to enable the changes to take effect Figure 10 15 Storage Mode Settings Interface 3 Select a camera for which you want to configure quota 4 Enter the storage capacity in the text fields of Ma...

Page 143: ...ame quota settings You can also click the checkbox of Analog to select all cameras 7 Click the OK button to finish the Copy settings and back to the Storage Mode interface 8 Click the Apply button to...

Page 144: ...n the list as shown in Figure 10 18 Figure 10 18 View HDD Status 1 Note If the status of HDD is Normal or Sleeping it works normally If the status is Uninitialized or Abnormal please initialize the HD...

Page 145: ...anticipating failures Steps 1 Enter the HDD Detect interface Menu HDD HDD Detect 2 Click the S M A R T Settings tab to enter the interface 3 Select the HDD to view its S M A R T information list as s...

Page 146: ...10 21 Bad Sector Detection 2 Click the Bad Sector Detection tab to enter the interface 3 Select a HDD and click the Detect button to start detecting Figure 10 22 Bad Sector Detecting 4 You can click...

Page 147: ...m the dropdown list 3 Click the checkbox s below to select the HDD error alarm type s as shown in Figure 10 23 Note The alarm type can be selected to Audible Warning Notify Surveillance Center and Sen...

Page 148: ...SDI DVR User s Manual 148 Chapter 11 Camera Settings...

Page 149: ...the OSD font Figure 11 1 OSD ConfigurationInterface 6 You can use the mouse to click and drag the text frame on the preview window to adjust the OSD position 7 Copy Camera Settings 1 If you want to c...

Page 150: ...mouse to draw a zone on the window The zones will be marked with different frame colors Note Up to 4 privacy mask zones can be configured and the size of each area can be adjusted 5 The configured pri...

Page 151: ...SDI DVR User s Manual 151 Chapter 12 DVR Management and Maintenance...

Page 152: ...2 1 Figure12 1 12 1 2Viewing Camera Information Steps 1 Enter the System Information interface Menu Maintenance System Info 2 Click the Camera tab to enter the Camera Information menu to view the stat...

Page 153: ...he Alarm tab to enter the Alarm Information menu to view the alarm information as shown in 0 Figure 12 4 Alarm Information Interface 12 1 5Viewing Network Information Steps 1 Enter the System Informat...

Page 154: ...D Information Steps 1 Enter the System Information interface Menu Maintenance System Info 2 Click the HDD tab to enter the HDD Information menu to view the HDD status free space property etc as shown...

Page 155: ...2 Set the log search conditions to refine your search including the Start Time End Time Major Type and Minor Type 3 Click the Search button to start search log files 4 The matched log files will be d...

Page 156: ...opdown list of Device Name 8 Click the Export to export the log files to the selected backup device You can click the New Folder button to create new folder in the backup device or click the Format bu...

Page 157: ...teps 1 Enter the Import Export Configuration File interface Menu Maintenance Import Export Figure 12 11 Import Export Config File 2 Click the Export button to export configuration files to the selecte...

Page 158: ...up device 5 Click the Upgrade button to start upgrading 6 After the upgrading is complete reboot the DVR to activate the new firmware 12 4 2Upgrading by FTP Before you start Configure PC running FTP s...

Page 159: ...aintenance Default Figure 12 14 Restore Factory Default 2 Click the OK button to restore the default settings Note Except the network parameters including IP address subnet mask gateway MTU default ro...

Page 160: ...SDI DVR User s Manual 160 Chapter 13 Others...

Page 161: ...fault language used is English Resolution Select the output resolution which must be the same with the resolution of the monitor screen Time Zone Select the time zone Date Format Select the date forma...

Page 162: ...General Settings interface Menu Configuration General 2 Choose DST Settings tab Figure 13 2 DST Settings Interface You can check the checkbox before the Auto DST Adjustment item Or you can manually ch...

Page 163: ...terface 3 Configure the following settings Device Name Edit the name of DVR Device No Edit the serial number of DVR The Device No can be set in the range of 1 255 and the default No is 255 Operation T...

Page 164: ...l Set the user level to Operator or Guest Different user levels have different operating permission Operator The Operator user level has permission of Local Log Search in Local Configuration Remote Lo...

Page 165: ...DD property upgrading system firmware clearing I O alarm output Local Shutdown Reboot Shutting down or rebooting the DVR Remote Configuration Remote Log Search Remotely viewing logs that are saved on...

Page 166: ...ling PTZ movement of the selected camera s Local Video Export Locally exporting recorded files of the selected camera s 7 Click the OK button to save the settings and exit interface Note Only the admi...

Page 167: ...C address Check the checkbox of Change Password if you want to change the password and input the new one in the text field of Password and Confirm Admin You are only allowed to edit password and MAC a...

Page 168: ...Shutdown Figure 13 12 Shutdown Menu 2 Click the Logout button to log out or Click the Shutdown button to shut down the device or Click the Reboot button to reboot the device Note After you have logged...

Page 169: ...SDI DVR User s Manual 169 Chapter 14 Appendix...

Page 170: ...r modem over Ethernet and in plain Metro Ethernet networks DDNS Dynamic DNS is a method protocol or network service that provides the capability for a networked device such as a router or computer sys...

Page 171: ...amps in use nearby Why does the PTZ seem unresponsive If the PTZ seem unresponsive please check a The RS 485 cable is properly connected b The dome decoder type is correct c The dome decoder speed con...

Reviews: