


QBC STAR System Operator’s Manual
6000-300-000 2–6
Upgrading the Software
Updated versions of the QBC STAR Hematology System software may be provided to you from time
to time. You should install new software as soon as you receive it. You should also log the update on
the form in Appendix C of this manual. Updated software is provided on a USB stick, labeled “QBC
STAR Software.”
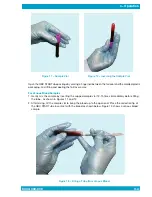
To install a software update:
1. Verify your STAR analyzer is turned off
2. Insert the upgrade USB drive into any rear USB port
3. Turn on STAR
A. The STAR will automatically read the upgrade software from the USB drive.
B. The upgrade software will verify that it is being installed on compatible hardware.
C. The software will be installed and the STAR will progress through System Check.
D. Once installation is complete, the STAR will print the System Check with the date, time,
software version, and QC label checks.
4. Confirm software version on print out matches upgrade version
5. Turn off the STAR
6. Remove USB drive from STAR and discard
7. Turn on the STAR
8. Remove printouts from step 4 and step 7 from device and mail to Drucker Diagnostics in Appendix
D-1, scan a copy to [email protected], or fax to 814-692-7662.
DO NOT turn off the device while the software is upgrading. If you have any questions please contact
Drucker Diagnostics Technical Support at +1-866-265-1486 (U.S Only) or +1-814-692-7661.
System Setup and Utilities
Before using the QBC STAR instrument for sample testing, you should review system setup parameters
to see if they are suitable for your laboratory. These parameters include:
• LCD Contrast
• Date and Time
• Printer Settings
• Support
• Set Language
• Units
• Shipping Preparation
Any changes to configuration parameters are in effect from the time of the change forward. Also note
that any changes you make cannot be “cancelled” per se – if you change a value, you must manually
change the new value back to its previous state.
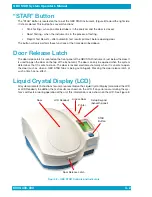
To Enter Setup Mode
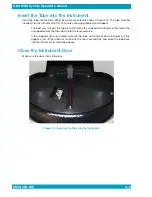
1 Ensure the instrument door is closed and latched.
2 Lift and pull back the printer access door.
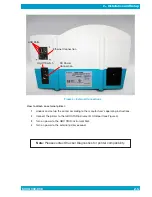
3 Turn on instrument power with the power switch on the rear of the instrument (Figure 4).
4 After the instrument completes a self-check and the door unlocks, press the ESC key on
the setup keypad.
5 A menu appears listing all the setup functions:
6000-300-000 2-6
Summary of Contents for QBC STAR
Page 14: ...THIS PAGE INTENTIONALLY LEFT BLANK...
Page 28: ...THIS PAGE INTENTIONALLY LEFT BLANK...
Page 40: ...QBC STAR System Operator s Manual 6000 300 000 4 12 THIS PAGE INTENTIONALLY LEFT BLANK...
Page 50: ...THIS PAGE INTENTIONALLY LEFT BLANK...
Page 72: ...6000 300 000 A 1 8 Appendices 6000 300 000 8 1...
Page 74: ...THIS PAGE INTENTIONALLY LEFT BLANK...
Page 76: ...THIS PAGE INTENTIONALLY LEFT BLANK...
Page 78: ...THIS PAGE INTENTIONALLY LEFT BLANK...
Page 80: ...THIS PAGE INTENTIONALLY LEFT BLANK...


