background image

Preparing the Bed

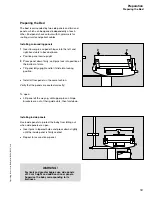
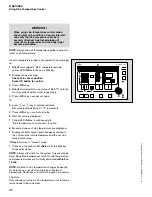
The bed is surrounded by two side panels and two end
panels, which can be opened independently of each
other. End panels have cutouts with U-grommets for
routing circuits and patient cables.

Installing surrounding panels

1

Insert lower pins on panel hinges into the left- and
right-hand slots in bassinet base.

Position panel semi-upright.

2

Press panel down firmly, until pins lock into position at
the bottom of slots.

Tilt panel fully upright and let it slide into locking
position.

Install all four panels in the same fashion.

Verify that the panels are seated correctly!

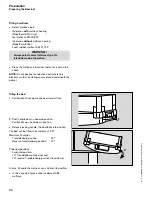
To open:

Lift panel all the way up, until upper pins on hinge
brackets are out of their guide slots, then fold down.

Installing inside panels

Use inside panels to protect the baby from falling out
when side panels are open.

Insert pins in tapered holes and press down slightly
until the inside panel is firmly seated.

Repeat for second inner panel.

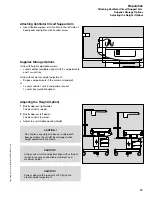
WARNING !

For lively and greater babies use side panels
of 23 cm height and additional inner panels.
Supervise the baby corresponding to its 
liveliness.

Preparation

Preparing the Bed

19

Operating Instructions Babytherm 8004/8010, 2. ed.

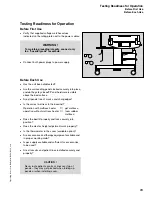
1

1

2

2

Summary of Contents for Babytherm 8004

Page 1: ...Babytherm 8004 8010 Infant Warmer System Operating Instructions 1 214 94 D ...

Page 2: ...can be obtained from Dräger or Authorized Dealers Dräger Inc will not be responsible for injury to persons or damage to property arising directly or indirectly out of unauthorized repairs or modifications to this device Furthermore any unauthorized repairs or modifications void any warranty extended by Dräger This document is provided for your information only It will not be exchanged or updated w...

Page 3: ...nded Use 12 Theory of Operation 13 Description of System Components 14 Alarm System 15 Operating Concept 16 Preparation 18 Preparing Column Accessories 18 Preparing the Bed 19 Attaching Ventilator Circuit Support Arm 21 Supplies Storage Options 21 Adjusting the Height Option 21 Preparing for Intra Hospital Patient Transport 22 Testing Readiness for Operation 23 Before First Use 23 Before Each Use ...

Page 4: ... and use of the equipment are restricted to trained professionals and that certain inherent characteristics of the equipment are known to the trained operator Instructions warnings and caution statements are limited therefore largely to the specifics of the Dräger design This publication excludes references to various hazards which are obvious to a medical professional and operator of this equipme...

Page 5: ...e equipment The above is the sole warranty provided by Dräger Inc No other warranty expressed or implied is intended Representatives of Dräger are not authorized to modify the terms of this warranty Dräger Inc Telford PA Warranty All Dräger products are guaranteed to be free of defects for a period of one year from date of delivery The following are exceptions to this warranty 1 The defect shall b...

Page 6: ...y Preventive Maintenance measures at regular Maintenance intervals Typing conventions in this manual Display messages are printed in bold type e g Battery discharged Controller keys are designated as Key Name e g man CAUTION A CAUTION statement designates the possibility of damage to equipment if disregarded WARNING A WARNING statement refers to conditions with a possibility of personal injury if ...

Page 7: ...uced peripheral blood flow the skin temperature of these babies occasionally lies well below the core body temperature Using a skin tem perature control system could lead to over heating We recommend to set heater output manually when caring for patients with such conditions General WARNINGS and CAUTIONS WARNING Do not use cellular phones within 33 feet 10 m of the equipment Wireless phones may ca...

Page 8: ...onding to its liveliness WARNING Never leave patient unattended when surrounding panels are down Risk of patient injury by infant falling out of the bassinet Precautions During Preparation CAUTION Never route patient circuits or lines over top of panels they may get pinched when folding up panels or when installing cover CAUTION Do not place any objects above or underneath bassinet where they migh...

Page 9: ...reduced peripheral blood flow the skin temperature of these babies occasionally lies well below the core body temperature Using a skin temperature control system could lead to overheating We recommend to set heater output manually when caring for patients with such conditions see page 28 WARNING Do not put any medications or infusion solutions in the heated area WARNING Never leave baby unattended...

Page 10: ...ion at regular intervals and verify that skin temperature probe is securely attached A detached probe will measure air temperature and the baby might become overheated WARNING Never use skin temperature probes for rectally measuring core temperature Specifically never use skin temperature probe rectally for skin temperature control as this would measure and use core instead of skin temperature for...

Page 11: ...sses in an automatic washing machine Do not autoclave mattresses CAUTION Do not expose Babytherm 8004 8010 to high levels of ultraviolet radiation This may cause cracks in the PMMA acrylic glass parts CAUTION Certain components of the bassinet consist of materials that are sensitive to certain organic sol vents sometimes used for cleaning and disinfect ing e g alcohols phenols halogen releasing co...

Page 12: ...Optional accessories Bronchial suction equipment O2 management accessories flowmeter headhood monitor Interface for data output Intended Use Babytherm 8004 8010 is an infant warmer system intended as a therapeutic device providing warmth for premature and full term neonates and infants with a weight up to16 lbs It is intended for use in delivery rooms operating theatres maternity and obstetric uni...

Page 13: ...iew 13 Operating Instructions Babytherm 8004 8010 2 ed Check Inop Babytherm 8004 OK 1 5 10 C Skin man Skin C manual D Babytherm 8004 Check Inop Babytherm 8010 OK 1 5 10 38 C 36 C C C Skin man Skin C manual Mattress C D Babytherm 8010 ...

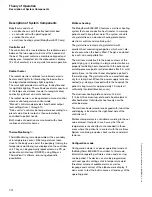
Page 14: ...rammed with user specific settings of skin temperature alarm threshold volume of audible alarms as well as language and contrast of the alphanumeric display It also serves to test the built in nurse call and keys of the operating panel Description of System Components Babytherm consists of a mobile chassis with the attached infant bed a controller unit with operating panel a radiant heater and a m...

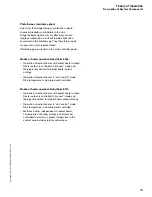
Page 15: ...s time limited for higher heater output settings Operation of radiant heater in skin control mode Skin temperature is monitored and controlled Modes of heater operation Babytherm 8010 Operation of radiant heater with preset heater output Heater output is controlled in manual mode and therapy time limited for higher heater output settings Operation of radiant heater in skin control mode Skin temper...

Page 16: ... for deviation between set and measured value for skin or mattress temperature exceeding tolerance 15 minute alarm as a reminder to check core temperature during manual mode with heater levels higher than 3 Low potential for patient risk Display messages for measured values out of measuring range low battery voltage Any alarm that has not been acknowledged is indicated by flashing red central alar...

Page 17: ... LEDs Green LED continuously on during operation Red LED continuously on during power outages OK key for confirming settings and to acknowledge alarms NOTE If the OK key is not pressed within 10 seconds after changing a setting the previous settings will remain in effect Red indicator LED for Inop alarm Key for testing LEDs displays enunciator and audible alarm Key for silencing audible alarms Vis...

Page 18: ...5 lbs Put clamp of instrument tray on one of the columns and tighten hand screw Recommended height mattress level Keep area clear for swiveling tray See above CAUTION for load limits to maintain a safe level of stability against tipping over pursuant IEC standards CAUTION Always verify that monitor shelves and other accessories are securely attached Always observe the following load limits per she...

Page 19: ...cking position Install all four panels in the same fashion Verify that the panels are seated correctly To open Lift panel all the way up until upper pins on hinge brackets are out of their guide slots then fold down Installing inside panels Use inside panels to protect the baby from falling out when side panels are open Insert pins in tapered holes and press down slightly until the inside panel is...

Page 20: ...t 2 Push handle down head up position Pull handle up head down position Release locking handle the bed locks into position The bed can be tilted in increments of 0 5 Maximum tilt angles Trendelenburg position 20 Reverse Trendelenburg position 15 Preferred positions horizontal position 10 Trendelenburg head up and 10 reverse Trendelenburg position head down At max tilt angle the mattress can slip f...

Page 21: ...e Height Option 1 Briefly depress right pedal The bassinet is raised 2 Briefly depress left pedal The bassinet is lowered Adjust to comfortable working height CAUTION Do not place any objects above or underneath bassinet where they might be damaged when height adjustments are made Preparation Attaching Ventilator Circuit Support Arm Supplies Storage Options Adjusting the Height Option 21 Operating...

Page 22: ... from power For intra hospital transport of a patient with Babytherm 8004 8010 Install cover available accessory to protect patients from cold drafts 1 Position cover on the end panels Side panels can still be opened when cover is installed end panels cannot be opened 2 Verify inside temperature with thermometer mounted inside the cover NOTE When using cover use 230 mm high side panels Preparation...

Page 23: ...er foam rubber mattress Does the bed tilt properly and lock securely into position Does the electric height adjustment work properly Is the thermometer in the cover available option Are accessories and therapy equipment available and in proper working order Is gas supply available and sufficient for accessories to be used Are all circuits and patient lines installed securely and properly CAUTION N...

Page 24: ...low LED will be off 6 If the red Inop LED is lit device malfunction see Troubleshooting page 53 Testing LEDs displays and audible alarm 7 Press k key 8 Display shows message All displays on horn on All display elements remain on for about 2 seconds all LEDs are lit the digital displays show 88 8 simultaneously with a continuous audible alarm from the enunciator 8 Display shows message All displays...

Page 25: ...fore power failure Testing lights 2 Press key bed surface is now lit by work light 2 Press key again work light will go off 3 Press key bed surface is now lit by night light 3 Press key again night light will go off Testing Readiness for Operation Before Each Use 25 Operating Instructions Babytherm 8004 8010 2 ed 15min Babytherm 8010 1 5 10 36 C C skin man skin C manual mattress C 1 2 3 ...

Page 26: ...ys consider effects of additional sources of heat such as phototherapy lamps or radiant heaters They increase the heat directed to the patient Avoid direct sunlight WARNING Patient Temperature Monitoring Check the baby s core temperature and skin condition at regular intervals and adjust tem perature setting to individual patient needs Core temperature of the baby must be monitored particularly ca...

Page 27: ...approved for use in explosive environments Radiant heater Phototherapy available option WARNING Always operate phototherapy lights in combi nation with radiant heater Otherwise risk of hypothermia for the undressed infant Core temperature of the baby must be moni tored particularly carefully during photo therapy because of the additional transfer of thermal energy to the patient WARNING Do not use...

Page 28: ...iding the maximum power output For more details see Technical Data page 61 To enter manual mode when Skin mode is still on 2 Press key the yellow LED man starts blinking 3 The display shows message Set radiant heater level Press OK button to cancel 4 Babytherm will offer the current calculated heater output setting as default After switching on default heater level is 3 Each LED segment reflects a...

Page 29: ...patient temp check required Press OK button to confirm NOTE After 15 minutes one minute from time of message the heater would shut off if alarm not acknowledged Check patient temperature 8 Press G key its yellow LED will be lit continuously Or 9 press OK key The audible alarm will stop the red central alarm light will go off and the heater will be switched on again will remain switched on NOTE No ...

Page 30: ... skin temperature control for infants with a high temperature Their skin temperature is significantly higher than normal so that controlling skin temperature would lead to hypothermia We recommend to set heater output manually when caring for patients with such conditions see page 28 WARNING Skin temperature control must not be used with babies in thermic shock Because of reduced peripheral blood ...

Page 31: ... on the abdomen in the liver region If the infant is lying on his stomach Place sensor on the back preferably in the kidney region Secure sensor cable with adhesive tape as necessary to provide strain relief WARNING Never use skin temperature probes for rectally measuring core temperature Specifically never use skin temperature probe rectally for skin temperature control as this would measure and ...

Page 32: ...kin temperature and the set skin temperature value If Babytherm was in manual mode 1 Press key the yellow LED Skin will start blinking Proceed as above NOTE Always allow time for the system to reach steady state Deviations between set value for skin temperature and measured values are normally eliminated within 5 to 15 min NOTE An infant s skin temperature changes frequently for instance as a resu...

Page 33: ...dible alarm Additionally flashing red central alarm light on the radiant heater 3 Display shows message Plug in skin temp sensor Press OK button to acknowledge Or Skin temp sensor fault Press OK button to acknowledge Audible alarm starts after 10 seconds Immediately connect sensor plug or replace sensor Audible alarm can be silenced and red central alarm light be switched off for 10 minutes 4 Pres...

Page 34: ...arm are turned off Prior to removing skin temperature probe temporarily switch to manual mode Refer to Setting Heater Output Manually page 28 Skin temperature above 39 C 6 Display of skin temperature starts blinking 7 Red LED starts blinking together with audible alarm Additionally blinking red central alarm light on the radiant heater 8 Display shows message Skin temperature above 39 C Press OK b...

Page 35: ...perature sensor 5 The foot symbol for peripheral skin temperature is continuously lit If three dashes show in the display for peripheral skin temperature please refer to Troubleshooting page 53 NOTE The measured value of peripheral temperature has no bearing on radiant warmer control Both skin temperatures can also be displayed or queried when heater is operated in manual mode Data output via opti...

Page 36: ...button to confirm 3 Press OK key Radiant heater is turned off 1 Press key again radiant heater can be turned on again see page 28 Operation Switching Radiant Heater Off 36 Operating Instructions Babytherm 8004 8010 2 ed 15min Babytherm 8010 1 5 10 36 C C skin man skin C manual mattress C 3 1 2 ...

Page 37: ...lue 38 0 ºC is displayed 7 Display shows message Set mattress temperature Confirm temp above 38 ºC with OK 8 Press OK key release extended range 9 Yellow display 38 ºC is now blinking 5 Press P or p key until desired temperature is showing on the display 7 Display shows message Set mattress temperature Press OK button to confirm 8 Press OK key confirm new set value 6 Display of new set value of ma...

Page 38: ...asuring range of 5 C to 45 C Three lines in the bottom of the display temperature is below 5 C Wait until mattress temperature reaches 5 ºC Three lines in the top of the display temperature is above 45 C Wait until mattress temperature is below 45 ºC For temperatures below 5 ºC the display message Mattress temp below 5 ºC will appear NOTE These conditions may occur e g when Babytherm had been stor...

Page 39: ... off After the mattress heater is initially switched on Audible alarm is silenced for 1 hour warm up 1 Yellow LED is lit continuously Mattress temperature above 40 C 6 Red LED 40 C starts flashing 7 Measured value of mattress temperature starts blinking 8 Display shows message Mattress temp above 40 ºC Press OK button to acknowledge Audible alarm starts red central alarm light on radiant heater st...

Page 40: ... ºC and 38 3 ºC for a premature and to 37 ºC for a term baby Set skin temperature to a value appropriate for the particular patient e g to 37 ºC for a premature and to 36 5 ºC for a term baby To add warmth Set mattress temperature to desired skin temperature If necessary set skin temperature to a slightly higher value To achieve a neutral heat balance Set mattress heater temperature to an infant c...

Page 41: ...ys cover patients and or dress them NOTE Do not obstruct conductive heat transfer by blankets or other insulating covers placed underneath the patient To add warmth Set mattress temperatue to core temperature desired or slightly higher in order to accelerate warm up To cool patient set mattress temperature below current core temperature e g to 36 C WARNING Check the baby s core temperature at regu...

Page 42: ...effect The acrylic hood is not transparent for infared radiation from the radiant heater Do not cover or dress patient Otherwise the radiant heater effect is impaired in an uncontrolled fashion WARNING Check the baby s core temperature at regular intervals and adjust temperature setting to individual patient needs Operating Instructions Babytherm 8004 8010 2 ed ...

Page 43: ... Radiant heater output is adjusted automatically to patient needs when operated in Skin mode To reset the babycounter phototherapy 1 Press key for 3 seconds 2 Display shows Phototherapy duration XX XX XX Press OK to reset the counter 3 Press OK key reset 3 Display shows Phototherapy duration 00 00 0X Switching phototherapy lights off 1 Press key 2 Display shows message Phototherapy OFF Press OK bu...

Page 44: ... 8 State changes within activities 9 Display setting for current activity Activating configuration mode 1 Keep OK button pressed for 3 seconds A brief alert sound is generated 2 Display message Configuration mode Press OK button to start 1 Press OK button again A brief alert sound is generated Configuration mode is now active The device defaults to activity c01 and displays the current software ve...

Page 45: ...set speaker volume Factory default 2 A brief audible alarm tone sequence is generated with that volume 6 Press keys P or p until desired value is displayed Values from 1 to 8 selectable A brief audible alarm tone sequence is generated with the new volume setting Displaying phototherapy hours of operation 1 Press P key briefly 2 Display message Configuration mode Mode c04 Time counter phototherapy ...

Page 46: ... Configuration mode Mode c06 Nurse call relay 3 Abbreviation for this activity is displayed Nuc 4 The current activity code is displayed c06 5 Display showing 0 nurse call relay open Display showing 1 nurse call relay closed 6 Press G key the relay is switched 7 Keep k key pressed for 4 seconds The relay becomes active An Inop alarm is generated red LED Inop will light up accompanied by a continuo...

Page 47: ...t 128 6 Press keys P or p until desired contrast is displayed Values from 1 to 255 selectable in increments of 1 Reading error cache 1 Press key error reporting is now active 2 Display message Configuration mode Error memory 3 Displaying error code FXX 4 Displaying Err 5 Frequency of error displayed here 6 Pressing keys P or p will call up the next error code 7 Pressing k key will invoke the devic...

Page 48: ... Press key again night light is switched off Central Alarm 3 The red central alarm light on the radiant heater unit starts blinking with any alarm being activated It will be switched off after acknowledging alarms Operation Switching Lighting On Off Central Alarm 48 Operating Instructions Babytherm 8004 8010 2 ed 15min Babytherm 8010 1 5 10 36 C C skin man skin C manual mattress C 1 2 3 ...

Page 49: ...radiant heater back into its normal position Babytherm 8010 Place x ray film cartridge directly underneath patient Swivel radiant heater sideways Heater will continue warming patient Place x ray machine above bed surface When x ray procedure is finished remove cassette from under the patient Swivel radiant heater back into its normal position Shutting Down Press On Off button Green LED indicating ...

Page 50: ...pounds strong organic acids etc Exposure to such substances may cause damage that is not always immediately recognized Sterilization of the bassinet itself with ethylene oxide EtO is also not recommended Care The Babytherm 8004 8010 infant warmer system must be thoroughly cleaned and disinfected after each patient or at least once a week Perform any disinfection procedures according to established...

Page 51: ...nside and outside surrounding panels inside and outside bed surface Plexiglas cover mattress chassis including attachments Remove visible impurities with a disposable cloth wetted in a detergent Wipe disinfect surfaces Wipe and dry with a clean damp cloth Silicone U grommets Wash with a detergent and rinse with clear water Bath disinfect parts Then rinse in clear water and dry or sterilize at 120 ...

Page 52: ...icians Inspection and Maintenance WARNING Never operate the infant warmer system if it has suffered physical damage or does not seem to operate properly In this case always refer servicing to properly trained and factory authorized service personnel WARNING Always disconnect power supply before servicing WARNING Maintenance work on the Babytherm 8004 8010 may be performed by trained and factory au...

Page 53: ...ue display message Mattress temp sensor fault audible alarm Temperature sensors in heater surface defective Call DrägerService Three upper segments blinking in measured value display Three lower segments blinking in measured value display message Mattress temp below 5 ºC Mattress temperature above 45 C Mattress temperature below 5 C Wait until temperature is below 45 C Wait until temperature is ab...

Page 54: ...ack to Skin mode Red LED flashing blinking display of measured value message Skin temperature above 39 ºC audible alarm Skin temperature 39 C Check that skin temperature sensor is properly attached Check whether external heat sources are warming infant e g sun light phototherapy Three upper segments blinking in measured value display message Skin temp above range Three lower segments blinking in m...

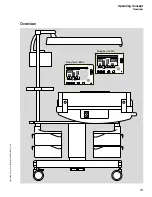
Page 55: ... Side panel 4 Inner panels 2 each available option 5 Handle with inner unlocking bar for tilting the bassinet 6 Bassinet mounted rail with hook for drainage canisters available option 7 Swivel cabinet option 8 Chassis with casters 2 of which can be locked 9 Height adjustable column available option 10 Foot controls for height adjustable column 9 11 Height adjustment warning label 12 Main WARNING C...

Page 56: ... alarm light flashes if an alarms needs to be acknowledged 3 Ceramic heater elements 4 Lighting work light night light 5 Phototherapy lights 6 What s What Radiant Heater 56 Operating Instructions Babytherm 8004 8010 2 ed 1 2 5 5 4 3 3 ...

Page 57: ... LED lit for operation Red LED lit during power failure 2 OK key for confirming settings and to acknowledge alarms NOTE If the OK key is not pressed within 10 seconds after changing a setting the previous settings will remain in effect 3 Red LED Inop indicates device malfunction 4 Key for testing LEDs displays speaker and audible alarms 5 Key for silencing audible alarms for 10 minutes 6 Yellow al...

Page 58: ...n manual heater control and Skin skin temperature control yellow LED stays lit for the respective mode 11 7 Keys for setting value for skin temperature 11 8 Display of skin temperature set value Display and keypad for mattress heater Babytherm 8010 only 10 1 Display of measured mattress temperature 10 2 Indicator for upper extended range 38 C 10 3 Indicator for lower extended range 36 C 10 4 Keys ...

Page 59: ...al alarm 2 Output port for connecting to paging nurse call systems connection for central alarm 3 RS 232 interface modem available option 4 RS 232 interface BabyLink available option 5 Controller power switch OFF ON 6 Cover panel What s What Controller Rear View 59 Operating Instructions Babytherm 8004 8010 2 ed 1 2 5 4 3 6 ...

Page 60: ...CT ONLY TO A HOSPITAL GRADE RECEPTACLE TO REDUCE RISK OF ELECTRIC SHOCK DO NOT REMOVE COVER FEDERAL USA LAW RESTRICTS THIS DEVICE TO SALE BY OR ON THE ORDER OF A PHYSICIAN WARNING DO NOT SWITCH OFF BABYTHERM WHILE A BABY IS LYING ON THE GEL MATTRESS AS THIS WILL RESULT IN COOLING OF THE PATIENT WARNING CHECK BABY S TEMPERATURE AND SKIN CONDITION AT REGULAR INTERVALS AND ADJUST TEMPERATURESETTINGTO...

Page 61: ...Minimum distance required between top of radiant heater and ceiling 50 cm 20 inches Skin temperature measurement Sensor Use only original Dräger sensors see Ordering Information page 65 Measurement range 15 C to 42 C Accuracy 0 1 C Accuracy of entire measurement system 0 2 C Setting range 35 C to 37 5 C Mattress heater Babytherm 8010 only Temperature measurement Measurement range 5 C to 45 C Accur...

Page 62: ...ght spectrum Operational data Line voltage 120 V 50 60 Hz Power consumption Radiant heater 600 W Mattress heater Babytherm 8010 160 W Infrared light 30 W Phototherapy light 440 W Main Fuses M 15 A UL 198 G two Electric column available option Power consumption 560 W Fuses for electric column T 6 3 A L 250 V IEC 127 2 III two Technical Data 62 Operating Instructions Babytherm 8004 8010 2 ed 400 200...

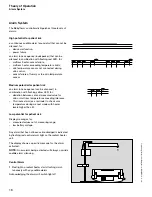
Page 63: ...th patient Isolation test voltage is 1 5 kV BabyLink interface RS 232 Output voltage pursuant RS 232 C Monitor cable part no 83 06 488 Wiring scheme Modem interface RS 232 Connection of external modem for service purposes Wiring scheme Both RS 232 interfaces and central alarm input are not electrically isolated from one another Technical Data 63 Operating Instructions Babytherm 8004 8010 2 ed m m ...

Page 64: ...0 mm 74 2 to 85 8 inches Working height of the bed surface without height adjustment 1025 mm 40 4 inches unit with electric column 885 to 1180 mm 34 8 to 46 5 inches Bed size 750 x 490 mm 29 5 x 19 3 inches Tilting of bed adjustable in small increments maximum of 20 C down maximum of 15 C up Height of surrounding panels 150 mm 5 9 inches or 230 mm 9 1 inches recommended for use with cover Height o...

Page 65: ...ht 150 mm 2M 21 032 Inner panel height 70 mm 2M 20 936 Swivel cabinet 2M 20 638 Cabinet installation hardware 2M 20 868 Interface kit 2M 30 268 Kit phototherapy 2M 30 313 Name and Description Part No Accessories Cover 2M 21 030 Cover prop 2M 21 342 Infusion bottle holder 2M 16 520 Patient circuit support arm 2M 21 191 Instrument tray 2M 21 186 Compact rail addl 2M 85337 Cable clips bag of 4 G 13 1...

Page 66: ...operation 16 18 Theory of operation 13 ThermoMonitoring 35 Tilting bed 20 Tipping safety against 20 Transport intra hospital 22 Troubleshooting 53 Warmer therapy 40 42 WARNINGS and CAUTIONS General 7 What s what 56 60 X rays taking 49 Alarms mattress heater 38 39 skin temperature control 32 33 radiant heater 29 Alarm system 16 Ambient conditions 61 Before next use 51 Bed preparing 19 tilting 20 Ca...

Page 67: ...67 Operating Instructions Babytherm 8004 8010 2 ed ...

Page 68: ... and are not intended for use with any specific machine or device Dräger Medizintechnik GmbH Germany H Moislinger Allee 53 55 D 23542 Lübeck T 4 51 8 82 0 X 26 80 70 FAX 4 51 8 82 20 80 Dräger Medical Inc H 3136 Quarry Road Telford PA 18969 T 215 721 6910 FAX215 721 6915 Manufactured by Distributed by 90 28 625 GA 6132 300 enUS Dräger Medizintechnik GmbH 2nd edition January 1997 Subject to alterat...

Reviews: