


1835-067-A-9-18
29
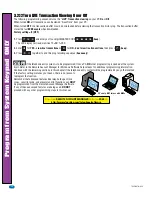
1.
Press and enter your four-digit MASTER CODE (
beep
).
2.
Enter the
10-digit phone number
or
system ID number - assigned during registration
, then press (
beep
).
3.
Press TOGETHER to end this programming sequence (
beeeeeep
).
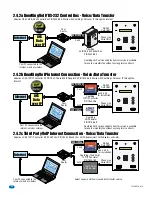
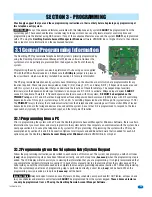
The following programming sequence is necessary
ONLY when using DoorKing DKS Data over IP
. After installing the Remote
Account Manager Software, Version 6.4.i, there is an option to use the DoorKing
DKS Data over IP
service type on the System
Information screen.
When registering an entry system online with the DKS Data over IP requires either the 10-digit phone
number of the entry system or 10 digit ID number which DKS Data over IP will assign when registering.
This phone number
or ID number
MUST
be programmed into the entry system to use the
DKS Data over IP
.
Visit
http://www.doorking.com
for more information.
Factory setting = No number in system
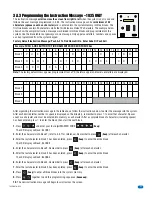
3.2.10 DKS Data over IP Phone Number or System ID Number
Notes:
This programming sequence
automatically
turns
DKS Data over IP
ON (section 6.1.9).
To view programmed number in system see section 6.1.7. To check for problems see section 6.1.8.
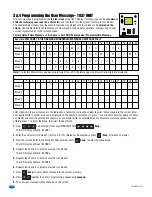
These features
ONLY
need to be
re-programmed
when a NEW 1830 entry system is to be used with EXISTING
OLDER
1830 entry
systems that have
a smaller memory size (less than 3000) with or without cards and anti-pass back capability
and all units are
being managed by DKS Remote Account Manager Software with the “Share Info” feature.
The new 1830
chip specification
MUST MATCH
the older 1830 chip specifications or EXISTING programming conflicts will occur. See section 3.1.3 for more
information about 1830 memory specifications.
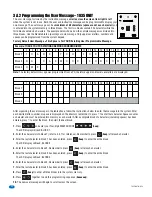
Factory setting = Step 2 - 8 (3000), Step 4 - 2 (Using Cards WITH Anti-Pass Back)
1.
Press and enter your four-digit MASTER CODE (
beep
).
The LCD display will read: MEM SIZE? 1 THRU 8
2.
Enter a
single-digit
for memory size (1-8), then press (
beep
).
1
=25
2
=75
3
=125
4
=250
5
=500
6
=1000
7
=2000
8
=3000
The LCD display will read: xxxx MEM OK? 0=N 1=Y (xxxx is the memory you have chosen).
3.
Press
YES
(
beep
), OR
NO
(
beep
).
Note:
Selecting NO (0*) will go back to the previous step.
After
YES
(1*) is entered, The LCD display will read: CARDS 0=N 1=Y 2=ANTI
4.
Press (
beep
)
NO Cards
, OR (
beep
)
Use Cards
, OR (
beep
)
Use Cards with Anti-Pass Back
The LCD display will read: ERASE MEM? 1=Y 0=N
5.
Press
YES
(
beep
), OR
NO
(
beep
).
Note:
Selecting NO (0*) will go back to the first step.
After
YES
(1* BEEP) is entered, A long beep will be heard after memory has been erased (
beeeeeep
).
CAUTION:
This programming
sequence will
erase ALL
information stored on the
existing memory chip.
3.2.11 Re-Program Memory Size, with/without Cards and Anti-Pass Back
0
?
?
?
?
?
?
?
?
9
5
5
9
0
0
0
1
1
2
1
Program from System Keypad ONL
Y