background image

21

4. 

Air  power  feed  option  can  be  added  to  assist  in 
moving the workpiece through the saw band.

5. 

The  handle  must  be  removed  for  saw  band 
changing.

HMD Hydraulc Table

1. 

This factory-installed hydraulic-powered worktable 
has a 36 inch (914.4 mm) or a 60 inch (1524.0 mm) 
stroke instead of the standard table.  The HMD-36 
table's working surface is 34 by 42 inches (863.6 by 
1066.8 mm). The  HMD-60 table's working surface 
is 34 by 68 inches (863.6 by 1727.2 mm).

2. 

Information  covering  installation,  operation  and 
maintenance of the optional HMD-36 or 60 table are 
provided in a seperate instruction manual included 
with the machine. 

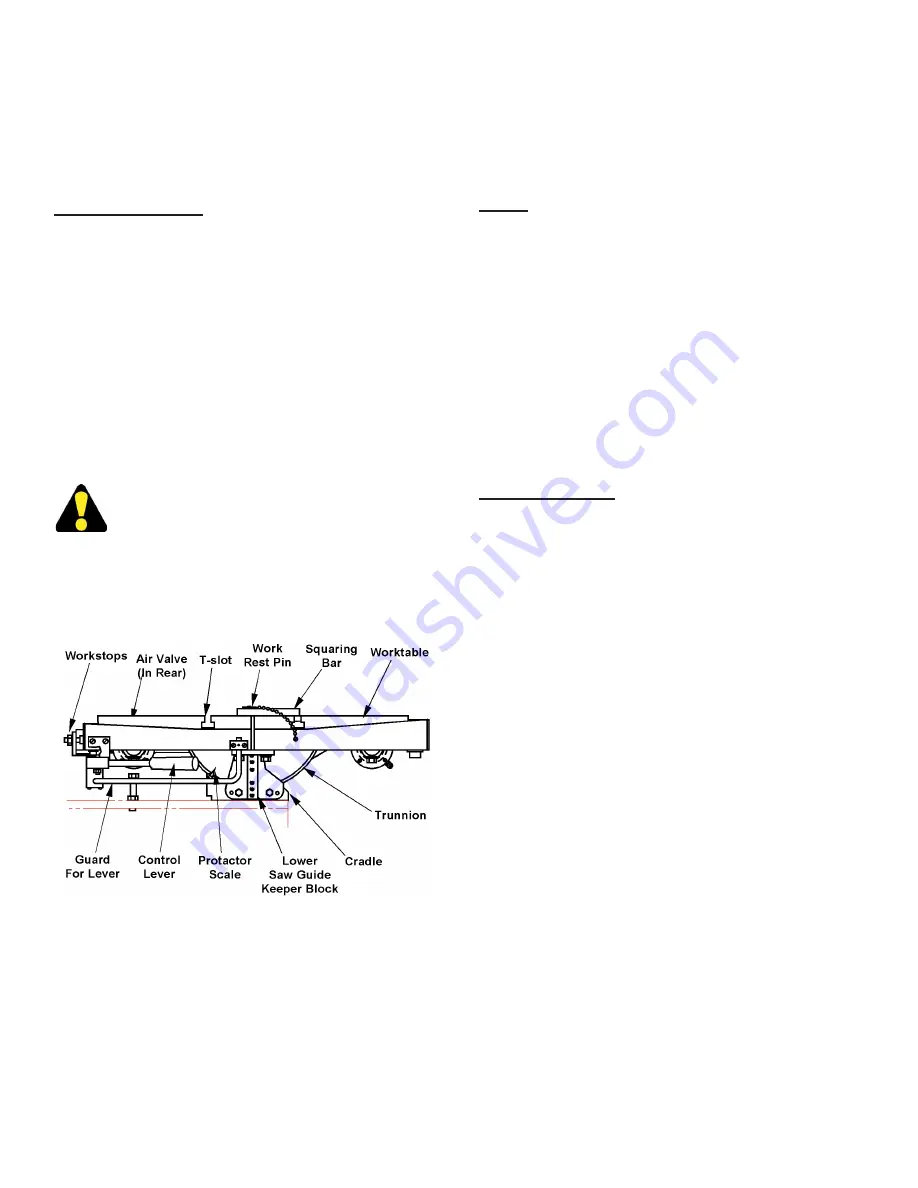
AIR-POWERED WORKTABLE


Ths attachment reduces the machne's work 
heght capacty by one (1) nch (25. mm).

1. 

This optional worktable provides a 24 by 30-1/2 inch 
(609.6 by 774.7 mm) working surface with coolant 
return troughs.  The worktable can be tilted up to 
6° left and 45° right when using this attachment. It 

has two (2) T-slots for work fixture clamping.

Air-Powered Worktable.

2. 

The worktable's air-amplified feed system is lever 

controlled  and  allows  12  inches  (304.8  mm)  of 
worktable travel.  Light hand pressure against the 
lever  will  move  the  worktable  in  forward  motion.  
Release  the  lever  and  pull  back  the  worktable 
manually.

3. 

The worktable has a work rest pin that acts as a 
workstop when inserted into the sawing slot.  Other 
worktable features are:  

(a)

 A squaring bar that fits 

into a worktable T-slot to hold stockpieces during 
production sawing; 

(b)

 Locks that permit the loading 

and positioning of heavy stock; 

(c)

 Special center 

plates for filing and polishing operations.

Set-Up

1. 

Position the workstops located on the left side of 

the worktable to limit travel.  The front stop controls 
cut  depth;  the  rear  stop  minimizes  unnecessary 
travel.  Stops  are  positioned  by:   

(a)

  Loosening 

the  locknuts; 

(b)

  Sliding  the  stops  to  the  desired 

position; and 

(c)

 Tightening the locknuts.

2. 

To tilt the worktable:  

(a)

 Use the wrench provided 

to  reach  through  the  machine  frame  and  under 
the  worktable  to  loosen  the  tilt  locknut; 

(b)

  Tilt 

the  worktable  manually  until  the  pointer  reaches 
desired angle shown on the scale; 

(c)

 Tighten the 

tilt locknut.

Producton Sawng

1. 

Place the rest pin into the worktable's sawing slot to 

serve as a workstop.  Then:  

(a)

 Place the squaring 

bar  in  the  worktable's  T-slot  to  act  as  the  stock 
holder.  

Remove the rest pn and squarng bar 

for contour sawng.

2. 

Place stock on the worktable and secure it at the 

desired position. Then:  

(a)

 Use the control lever to 

carefully move the table forward until the saw band 

has just started cutting into the workpiece; 

(b)

 Push 

the  control  lever  to  obtain  the  desired  feed  force 
(feed force will return to zero (0) when the lever is 
released).

DBW-15 BUTTWELDER

1. 

Information covering blade welding, plus operation 
and maintenance of the optional DBW-15 Buttwelder 

(with flash grinder and blade shear) are provided in 

a seperate instruction manual.

OPTIONAL SAW GUIDE BLOCKS

1. 

It is possible to equip the machine with precision, 
heavy-duty, high speed, insert-type saw guides or 
roller saw guides.

WORKTABLE OPTIONS (Continued....)

Summary of Contents for 2613-V3

Page 1: ...2613 V3 Serial No 589 09101 to Band Sawing Machine Instruction and Parts Manual...

Page 2: ...nine 9 months to file a claim 1 You have fourteen 14 days to report damage not noted at time of delivery a Report damage as soon as possible This makes it easier to prove that it did not happen at co...

Page 3: ...stamped on a plate attached to your machine Be sure to provide machine model and serial numbers with any correspondence or parts orders Specifications contained herein were in effect at the time this...

Page 4: ...ram 13 MAINTENANCE Replacing Crowned Bandwheel Tires 14 Insert Type Saw Guides 14 Electric Motors 14 Head Components 14 Transmission 14 Wheel Brush 14 Machine Cleaning 14 15 Band Drive Belt 15 Mist Co...

Page 5: ...1 MACHINE DIMENSIONS FLOOR PLAN INCHES 03 MILLIMETERS 1 mm...

Page 6: ...CHINE DIMENSIONS Continued FRONT VIEW INCHES 03 MILLIMETERS 1 mm 13 330 2 mm 84 64 2149 9 mm 18 457 2 mm 90 64 2302 3 mm 24 609 6 mm 96 64 2454 7 mm 30 762 0 mm 102 64 2607 1 mm A B D mens ons Work He...

Page 7: ...3 MACHINE FEATURES FRONT VIEW...

Page 8: ...all bolts which fasten the machine to the shipping skid b Check inside the rear drive compartment for other removable brackets extra machine parts or supplies which might have been placed there for s...

Page 9: ...the connections 3 Turn the disconnect switch on the electrical box to ON Then a Alternately jog the Band Start and All Stop pushbuttons b Check to make sure the saw band is running in a clockw se moti...

Page 10: ...type of material to be cut and its thickness It also has a radius guide that shows the minimum radii cuts possible with various saw band widths 2 To use find the material to be cut in the first colum...

Page 11: ...eds 30 to 320 fpm 10 to 100 m min The NEUTRAL position is in the middle of the slot The band speed MUST be at its lowest speed before the shift lever can be moved to NEUTRAL 3 Variable speed within bo...

Page 12: ...g saw bands Wear gloves 1 Release saw band tension Then a Open both bandwheel doors b Remove the post saw band guard c Loosen the screw holding the worktable s sawing slot clamp bar and move it aside...

Page 13: ...and tracks correctly on the bandwheel tires c Retighten the tilt lock handle 4 Close both bandwheel doors POST ADJUSTMENT 1 Post and upper saw guide elevation can be adjusted to accept workpieces with...

Page 14: ...roperly installed and aligned b The band drive motor is off c The proper saw band has been installed is correctly tracked and tensioned d All lubrication procedures have been carried out Procedure 1 R...

Page 15: ...the saw band Insulate the saw band from contact w th the stock or the worktable w ll nsure a better weld Internal Contour Sawing TYPICAL SAWING PROCEDURES Continued 2 The diameter of the drilled star...

Page 16: ...nd Bear ng Clean and apply oil MONTHLY 2 Post Clean and apply oil MONTHLY 3 Upper Bandwheel Sl de H nge and T lt Screw Clean and apply oil MONTHLY Table Trunn on Oil tilt surfaces MONTHLY CHECK MONTHL...

Page 17: ...13 LUBRICATION DIAGRAM REAR VIEW FRONT VIEW...

Page 18: ...easily installed with a light press fit ELECTRIC MOTORS 1 Follow the manufacturer s maintenance instructions for each electric motor These instructions are located in a pocket inside the electrical b...

Page 19: ...new one c Slide the drive motor to the right to tighten the belt so there is very little deflection of the belt d When correct belt tension is acheived tighten the screws MIST COOLANT 1 Intermittent...

Page 20: ...ck for a loose post Adjust the two 2 spring plungers if necessary 7 Check for a poor weld in the saw band 8 Check for an incorrect saw band tension setting SAW BAND IS CUTTING INACCURATELY 1 Check for...

Page 21: ...l tire 5 Incorrect saw guides are being used 6 Check for incorrect saw band tension setting SURFACE FINISH ON WORK IS TOO ROUGH 1 Check for a worn saw guide insert adjust or replace if necessary 2 Ban...

Page 22: ...radius adjustments with the fine adjustment wheel Then a tighten the arm and radius arm clamp bolts while making sure the center pin is square to the table b Adjust the disc cutter for stock thickness...

Page 23: ...low the left worktable surface b A pulley and cable system attached by an adjustable bracket to the rear worktable edge and to an air cylinder mounted to the machine base 3 Operation procedures are as...

Page 24: ...y an on off switch on the lamp or by selector switch on the electrical control box MAGNIFIER 1 Magnifing the cutting area may prove helpful during delicate sawing procedures This is done by placing a...

Page 25: ...kpieces during production sawing b Locks that permit the loading and positioning of heavy stock c Special center plates for filing and polishing operations Set Up 1 Position the workstops located on t...

Page 26: ...inch 1 5 to 25 4 mm can be used with this machine Heavy Duty Saw Guides With Steel or Carbide Faced Back Up Bearing Roller Saw Gu des 1 Use roller saw guides for continuous high speed sawing They are...

Page 27: ...loose may cause the saw band to wobble and affect cutt ng accuracy Tighten the roller lock screws to prevent the eccentric shaft from turning and changing the roller adjustment 90 SAW GUIDE BRACKETS...

Page 28: ...a collection system for disposal of chips and other waste materials MATERIAL HANDLING EQUIPMENT 1 Special material handling equipment such as conveyors or hydraulic tables can enhanced the performanc...

Reviews: