background image

- 9 - 

- 24 - 

Displaylite Reflect 32 / 46


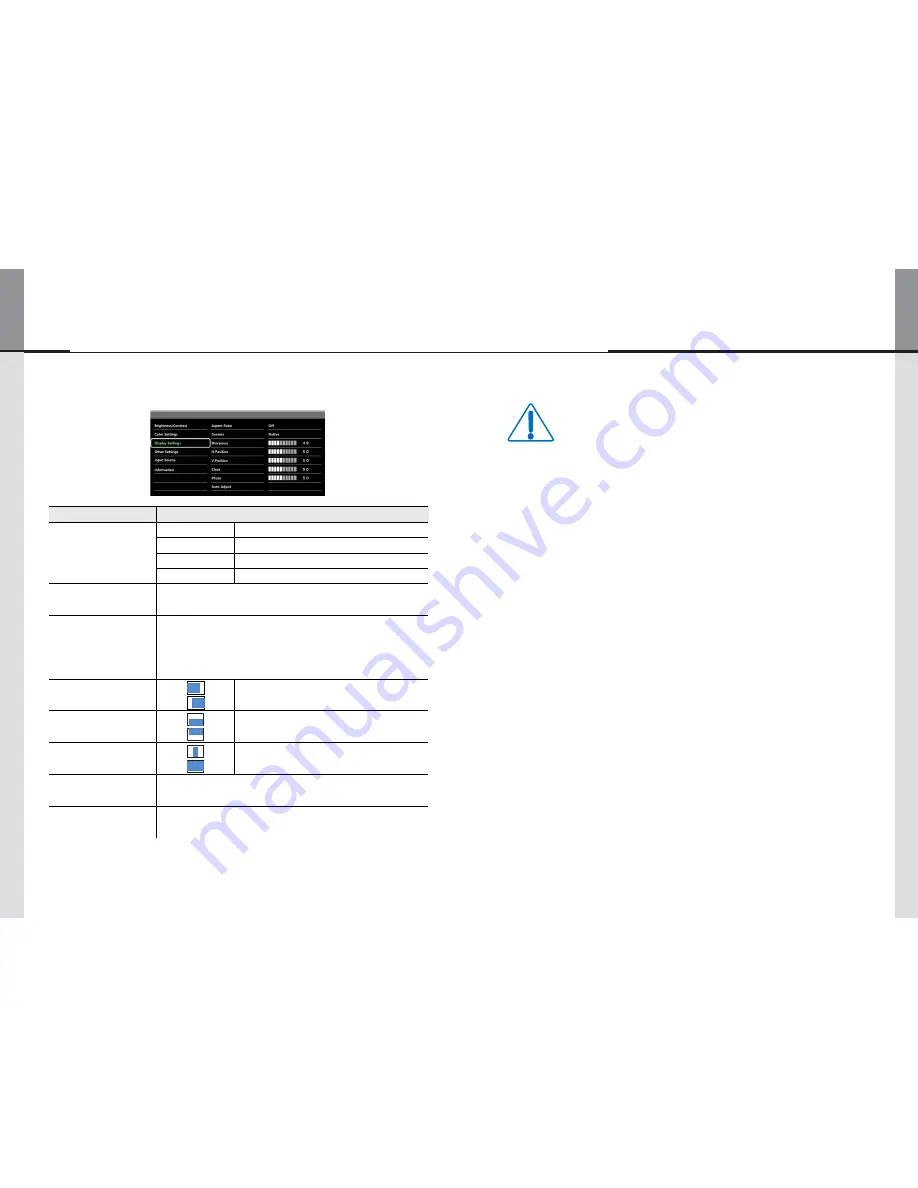
9.3. Display Settings 

CAUTION 

INSTALLATION LOCATION

Do not install the monitor where sudden temperature changes may occur, or in humid,
dusty or smoky areas as it may cause fire, electric shock or damage. You should also

avoid areas where  the sun shines directly on the monitor

.

DO NOT PLACETHE MONITOR IN A HAZARDOUS POSITION

The monitor may topple and cause injury if not suitably located. Please also ensure
that you do not place any heavy objects on the monitor, and that all cables are routed
such that children may not pull the cables and possibly cause injury.

MAINTAIN GOOD VENTILATION

Ventilation slots are provided to keep the monitor from overheating. Covering the slots
may cause fire. To allow adequate air circulation, place the monitor at least 10 cm (or 4
inches) from any walls.

Do not remove the tilt stand when operating the monitor. Ventilation slots on the back
of the cabinet will be blocked and the monitor may overheat if the stand is removed.
This may cause fire or damage. Operating the monitor on its back, side, upside

down or on a carpet or any other soft material may also cause damage

.

DISCONNECT THE CABLES  WHEN YOU MOVE THE MONITOR

When you move the monitor, turn off the power switch, unplug the monitor and be
sure the signal cable is disconnected. If you do not disconnect them, it may cause fire

or electric shock

.

UNPLUG THE MONITOR

If the monitor is not in use for a long period of time it is recommended that it is left

unplugged to avoid accidents

.

HOLDTHE MAINS PLUG WHEN REMOVING

To disconnect the power cable or signal cable, always pull it by the plug. Never pull on

the cable itself as this may cause fire or electric shock

.

DO NOT TOUCH THE PLUG WITH WET HANDS

Pulling or inserting the plug with wet hands may cause electric shock

.

WHEN YOU INSTALL THE MONITOR ON YOUR COMPUTER

Be sure the computer is strong enough to hold the weight of the monitor,
otherwise, you may damage your computer.

RECOMMENDATIONS FOR 24/7 USAGE

This product is not specifically designed for 24/7 usage in all environments.

*1. Only Analog input.


*2. For best results, use the Auto Adjust in conjunction with an adjustment image or the intended image.

Adjustment Item 

Problem 

Button to Press 

Aspect Ratio 

Off 

Aspect ratio is turned off. 

16 : 10 

Displays all picture in 16 : 10 aspect ratio. 

5 : 4 

Displays all picture in 5 : 4 aspect ratio. 

4 : 3 

Displays all picture in 4 : 3 aspect ratio. 

Gamma 

You can set the gamma. 
Native / 2.2 / 1.8 

Sharpness 

You can change the picture quality from 0 to 100 
(soft to sharp). 
Press the 

▲ 

button to change the picture quality in 

numerical order. Press the 

▼ 

button change the 

picture quality in reverse numerical order. 


H. Position 

*1


Left 

Right 


V. Position 

*1

Down 

Up 


Clock


Narrow 

Wide 


Phase 

To correct flickering text or lines 


Auto Adjust 

*2

Adjust H. / V. position, clock and phase automatically. 

Summary of Contents for OLS-3250MD

Page 1: ...7 www displaylite com 44 0 1480 455114 info displaylite co uk The colour and appearance may differ depending on the product Specifications are subject to change without prior notice to improve perform...

Page 2: ...Displaylite Ltd Huntingdon Business Centre 16 Blackstone Road Huntingdon Cambridgeshire PE29 6EF United Kingdom Tel 44 0 1480 455114 Email support displaylite co uk Online www displaylite com If you...

Page 3: ...the other A grounding type plug has two blades and a third grounding prong The wide blade or the third prong are provided for your safety If the provided plug does not fit into your socket consult an...

Page 4: ...a properly grounded plug and socket 5 CAUTION These servicing instructions are for use by qualified service personnel only To reduce the risk of electric shock do not perform any servicing other than...

Page 5: ...46 Back Light Unit Type TFT LCD Edge LED Outline Dimension mm 1044 08 H x 598 67 V x 9 9 D Display Area mm 1018 08 H x 572 67 V Pixel Pitch mm 0 53025 H x 0 53025 V Number of Pixels 1 920 x 1 080 Disp...

Page 6: ...bolo colocadonoprodutoounarespectivaembalagem indica que oproduton odeve ser tratado como lixo dom stico aquando da sua elimina o Em vezdisso deve serentregue num ponto de recolha de quipamentosel ctr...

Page 7: ...ly reduce time and effort forservice Regarding higher locations consider the installation location and exterior design for easier service WARNING Problem Ensure 1 The picture does not appear The power...

Page 8: ...e computer are off the monitor enters into power management mode which reduces the power consumption to less than 0 5W The screen becomes dark From power management mode the image reappears in several...

Page 9: ...uring the power management mode 9 6 Information CASE Stains can be removed with a cloth lightly moistened with a mild detergent solvent Then wipe the case with a soft dry cloth LCD Periodic cleaning w...

Page 10: ...tage will cause malfunctionand may cause fire or electric shock PROTECT THE CABLES Do not pull or bend the power cable and signal cable Do not place the monitor or any other heavy objects on the cable...

Page 11: ...ect them it may cause fire orelectric shock UNPLUG THE MONITOR If the monitoris not in use for a long period of timeit is recommendedthat it is left unplugged to avoid accidents HOLDTHE MAINSPLUGWHEN...

Page 12: ...ise it may be dropped and result in a serious injury When moving shipping the monitor please hold by the carton cut outs Adjust the brightness when you are using the monitor in a dark room and feel th...

Page 13: ...creen does not recognise touch made with the finger If the screen is not touched with a pen for 1 second it will automatically return to the finger mode The screen works only with conductive pens with...

Page 14: ...stment or setting 4 Press the EXIT button to leave the menu any changes will be automatically saved For example to correct vertical position select Menu item of Display Settings Select V Position by u...

Page 15: ...mpliant The MULTI TOUCH function runs on Windows 7 8 10 by connecting the monitor to DDC2B compliant computer LED IR Use with the USB cable supplied MULTI TOUCH support operationsystem Microsoft Windo...

Page 16: ...utton will select the previous submenu Navigates through submenus and settings Up Button MENU AUTO OK AUTO AdjustH V Position ClockandPhase automatically POWER UP DOWN AUTO EXIT SOURCE OK MENU DownBut...

Page 17: ...nductive stylus pen or finger 5 1 PREPARING THE REMOTE CONTROL To use the remote control insert the cell battery CR2032 Do not use any other batteries other than those specified in this manual for the...

Page 18: ...E OK MENU LED IR PLAY EXIT STOP SELECT VOL Press the UP DOWN Button on the monitor or the VOL Button on the remote control to adjust the volume when the menu page is not displayed on the screen POWER...

Reviews: