23
©
Dinel, s.r.o. CLM–70
60
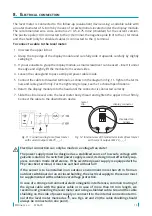
Fig. 18: Drawing of the
rope electrode weight
How to shorten the measuring electrode – ap-
plies only to variants 10, 13, and 30
1. If necessary, remove the rod electrode or rope electrode from the
electrode holder – see points 1 and 2 of “How to replace the measur-
ing electrode”.
2. Shorten the rod electrode with a suitable metal saw and grind the
electrode end. The length of this electrode must be by 7 mm shorter
than the dimension “E”, see Fig. 15. For the rope electrode, the three
fixing screws on the weight have to be loosened, and the rope end
must be pulled out, see Fig. 18. After shortening, make sure that the
length of the rope is appropriate – the rope is recessed in the weight
up to approximately 60 mm. For the rope shortening, cutting pliers
are the best option. Be careful not to fray the end of the rope.
3. Slide the rope back into the weight and secure it by tightening all
three screws.
4. If the electrode has been removed from the electrode holder, reas
-
semble them – see points from 3 to 7 of “How to replace the meas-
uring electrode”.
For places to be heated,
see “How to replace the
measuring electrode”.
Fig. 16: A figure of the threaded joint of the electrode
holder and the rod electrode
Fig. 17: A figure of the threaded joint of the electrode
holder and the rope electrode
4.
Screw the electrode tightly into the electrode holder using appropriate pliers or a wrench (on the
electrode side) and a 10-mm flat spanner (on the electrode holder side).
5.
Let the glued joint cure as recommended by the glue manufacturer; after then, the level meter
is ready for installation.
6. Perform the setting of the level meter.
Rope
3 screws
Summary of Contents for CLM-70
Page 2: ......


