background image

28 


time which is about .025”.  As a guide, one full turn changes the seating depth about .050”, about the 
thickness of a dime.  Replace the cartridge in Station 3 and repeat these steps until the COAL is 
achieved.  


8.7


Station 4--Bullet Crimping 

8.7.1


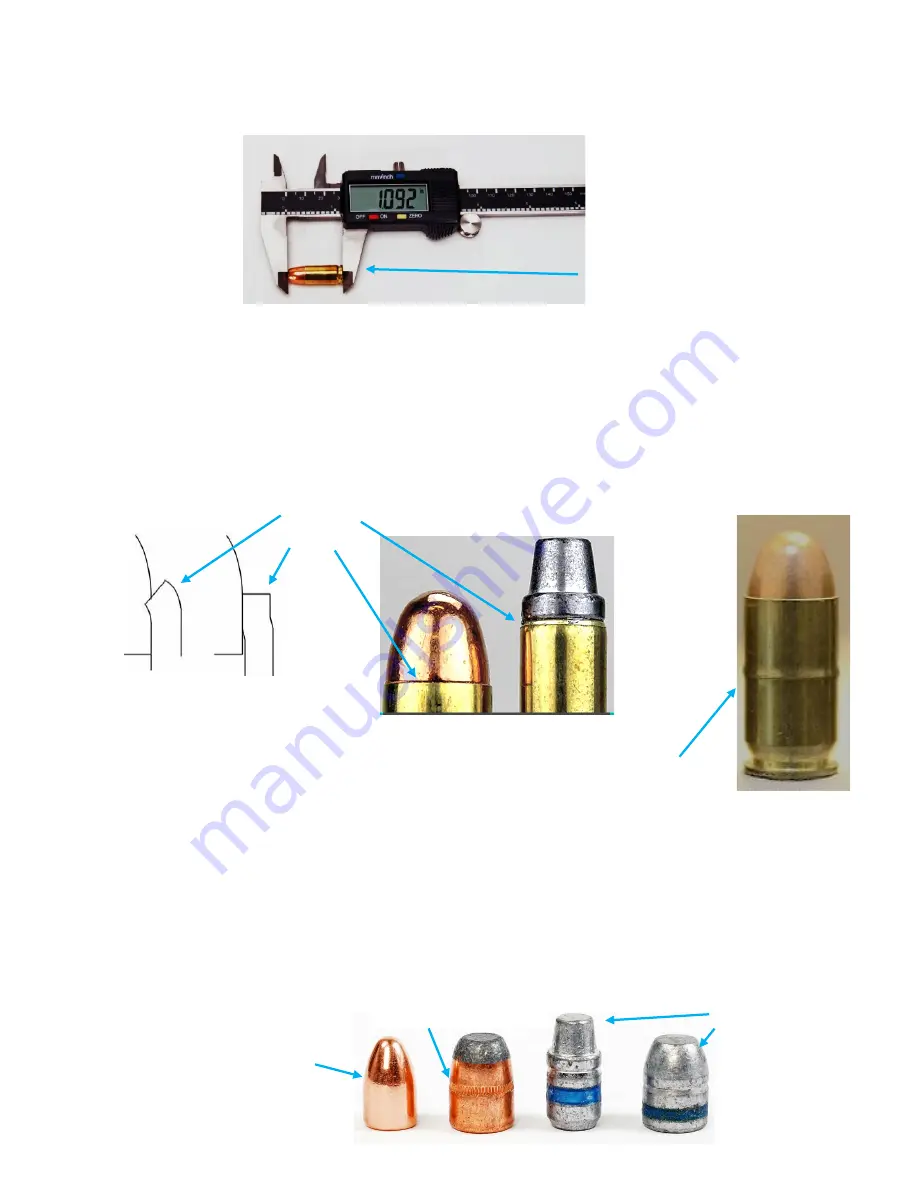
Crimping is the final operation in the reloading process in Station 4.  Crimping removes the belling of the case 

mouth from the previous neck expanding or belling step.  Crimping provides added friction for “holding” the bullet 
by the case. 


8.7.2


There are two types of crimping--the roll crimp and the taper crimp.   In general, taper crimping is used for 

semi-autos with rimless cartridges and roll crimping for revolvers with rimmed cartridges.  Excessive crimping can 
“buckle” the cartridge case as shown below. 


8.7.3


Roll Crimping—Generally for revolver cartridges 


The edge of the case mouth is rolled inward into the bullet during roll crimping, leaving a slight radius at 
the top of the case mouth.  Cast lead bullets or jacketed bullets may or may not have a crimp groove or a 
cannelure that accepts the roll crimp.  If there is no groove or cannelure, take care not to over crimp the 
bullet.  Over crimping can damage the bullet and reduce the “hold” on the bullet due to the bullet being 
deformed and the brass case springing back away from the deformed bullet.  Crimping a bullet without a 
crimp groove should only reduce the diameter of the brass case mouth/outer diameter .001-.003” 
maximum.  A reduction of case mouth diameter greater than .003” may cause bullet deformation and a 
loose bullet.  It is not necessary to use the cannelure if your COAL is not compatible with the location of 
the cannelure. 


Measuring 

COAL 

Bullet without cannelure 

or crimp groove 

Roll Crimp     

Taper 

Crimp 

Buckled case--over crimped 

Bullets with crimp 

grooves and filled 

lube gooves 

Bullet with cannelure  

Summary of Contents for Square Deal B

Page 1: ...l use only No part of this publication may be reproduced distributed or transmitted in any form or by any means including photocopying recording or other electronic or mechanical methods for commercial use without the prior written permission of Dillon Precision Square Deal and Dillon Square Deal B Reloading System are trademarks of Dillon Precision Inc Rev 0 January 2021 ...

Page 2: ...Bullet Seating 8 7 Station 4 Bullet Crimping 9 CONVERSION LIST AND REPLACEMENT PROCEDURES Pages 30 39 9 1 Caliber Conversion List 9 2 Shellplate Caliber and Primer Size Conversion 9 3 Die Caliber Conversion 9 4 Powder Measure Bar Conversion 9 5 Depriming Pin Replacement 9 6 Primer Early Warning Battery Replacement 10 ADJUSTMENT AND REPLACEMENT PROCEDURES Pagers 40 43 10 1 Shellplate Indexing Adjus...

Page 3: ... this manual can result in serious injury or death Keep this manual in a safe location for future reference EXPLANATION OF SAFETY WARNINGS DANGER Danger indicates a hazard with a high level of risk that if not avoided will result in death or serious injury WARNING Warning indicates a hazard with a medium level of risk that if not avoided could result in death or serious injury CAUTION Caution indi...

Page 4: ...e used in the reloading process Again refer to established bullet and powder manufacturers Using the wrong powder or amount of powder or mixing powders can result in serious injury or death Never mix powders Always store the powder in its original container Never have more than one type of powder in the reloading area at one time preferably store powders in a separate room Observe all maximum load...

Page 5: ...ronmental conditions or any unauthorized disassembly repair or modification This limited warranty shall not apply if i the product was not used in accordance with any accompanying instructions ii the product was not used for its intended function or iii the addition of any non authorized equipment 4 SQUARE DEAL B SHIPPING CONTENTS 4 1 Remove the following items from the top protective foam layer o...

Page 6: ...ded Spent Primer Bracket and two 8 32 x 3 8 Button Head Mounting Screws and mount Spent Primer Cup Bracket securely to the bottom of the Square Deal B as shown below 1 Primer Early Warning System and Primer Follower Rod 2 Caliber Conversion Box Parts installed 3 Tube Pack accessory parts bag Primer Pickup and Magazine Tubes and Spare Tips Large Tube Pack PN22016 Small Tube Pack PN22017 4 Powder Me...

Page 7: ...5 hardware or available Dillon Mounting Hardware Kit P N14355 Use small diameter washers on the top and large diameter washers on the bottom especially if using a wooden bench 5 4 3 Slide the Spent Primer Cup into the mounting slots on the Bracket 5 4 4 There are three other optional methods for mounting the Square Deal B to your bench The first option is to use the available Billet Dillon Mountin...

Page 8: ...stall the completed Cartridge Bin on the Chute Bin Bracket of the Strong Mount by sliding the lip on the bin over the bracket and the lip of the Empty Case Bin over the other bracket as shown below 5 4 6 Install the optional Dillon Bullet Tray PN22214 on the left side of Strong Mount in the two holes as shown below with the hardware provided with the Bullet Tray Kit Dillon Billet Mounting Plate fa...

Page 9: ... using the provided Allen wrench Note The Powder Funnel for the cartridge specified for the Square Deal purchased ships in the Powder Die 5 5 2 Slide the Square Deal B Powder Measure down over the Powder Die and install the Clamp and lightly tighten the Clamp Screw Further adjustment of the Powder Die is required later Install Powder Measure oriented as shown and lightly tighten the Clamp Screw wi...

Page 10: ...5 6 A plastic bag is secured to the top of the Primer Magazine Shield Tube and contains four one spare numbered Brass Locator Buttons for the caliber ordered a spare Depriming Pin an alternate Seating Stem Two for 38 357 s a sample case with a primer and a sample reloaded cartridge showing how the press was configured Take three of the Brass Locator Buttons and install them in the Square Deal as s...

Page 11: ...imers in the Magazine Tube until you have read this entire manual 5 8 4 Install the Primer Magazine Follower Rod as shown below You can store the plastic Primer Follower Rod in the Magazine Tube when there are no primers in the Magazine Tube by putting it under the Operating Lever to stop the alarm from sounding when it is not being used 5 9 Your assembly is complete Cycle the Operating Handle mak...

Page 12: ... Mount and Case Bin PN22051 Tool Holder with Wrenches PN19441 Low Powder Warning Sensor PN16306 Square Deal B Toolhead Assy PN20113 Deluxe Quick Change Stand PN62265 Spare Parts Kit PN97015 Bullet Tray PN22214 Note Conversion Kit Shellplate and Dies sold separately ...

Page 13: ...T BULLET Number 3 in the Toolhead STATION 4 CRIMP BULLET AND EJECT COMPLETED CARTRIDGE Number 4 in the Toolhead Note cases are automatically indexed from station to station every time the Operating Handle is cycled down and up Station 1 Station 2 Station 4 Station 3 Station 4 Station 1 Station 2 Station 3 Each Station is numbered on the Toolhead 1 thru 4 as are the Size Die 1 the Seat Die 3 and th...

Page 14: ... is automatically indexed to Station 3 Station 1 Case entering Depriming Sizing Die as the Operating Handle is lowered raising the Shaft Shellplate Station 2 Primer Seated Case Flared Powder Dispensed Station 1 Case manually inserted into Shellplate Station 2 Case being pushed over the nose of the Powder funnel belling the case mouth and dropping powder into the case Station 2 Typical Dillon Powde...

Page 15: ...oke the case is automatically indexed to Station 4 7 4 Station 4 Bullet Crimped and Completed Cartridge Ejected The Bullet is crimped on the downstroke The Cartridge is ejected on the upstroke Station 3 Bullet Placed and Seated Station 3 Bullet Seating Ejector Wire Ejects Cartridge into Cartridge Chute Bin Station 4 Crimp Station 4 Eject ...

Page 16: ... The Dies are numbered 1 Size Die 3 Seat Die and 4 Crimp Die They drop into the Square Deal Frame Station 1 3 and 4 respectively as shown below 8 2 Another unique part of the Square Deal Toolhead Assembly is the Blue Friction Plate which is sandwiched between the Frame below and the Numbered Toolhead above The Friction Plate keeps the threaded parts of the dies from easily turning The remaining pa...

Page 17: ...Magazine Tubes and interchangeable Large and Small Primer Slides The Square Deal B comes with the primer size specific to the cartridge ordered The alternate size Primer Slide is shipped separately A Large Powder Bar for the Powder Measure is also included These components are in the Tube Pack see shipping contents 8 4 2 A Primer Early Warning System EWS Low Primer Alarm system is provided The Pri...

Page 18: ...mer is a critical method in the reloading process The Prime will not be seated to the proper depth if the Handle is not pushed firmly and fully to the rear primer seating position Primer Slide in primer pickup position Operating Handle Down Primer Magazine Blue Tip Operating Handle at rest position Primer Slide return Spring Primer Slide Forward Travel Set Screw Stop Primer seating position Adjust...

Page 19: ...e plastic Magazine Tip red or blue must be gently aligned with the slot down in the Primer Feed Body Housing and then should slide down about a 1 4 more Tighten the knurled Magazine Cap just snug With the Operating Handle up in its at rest position manually take one primer that you will be using and drop it anvil side up in the hole in the Magazine Cap as below Cycle the handle smoothly down and b...

Page 20: ... the Primer Magazine Dillon offers two choices for filling the primer magazine Manually as below with an optional Dillon Primer Flip Tray and Dillon Primer Pickup Tubes Pickup Tubes are included with the Square Deal B The Primer Pick Up Tubes have different colored tips They have been color coded to identify size easily The color code is as follows WARNING Put on safety glasses Place primers on th...

Page 21: ...rimers remain in the Pickup Tube Pivot the Switch Lever back over the hole and gently slide the Follower Rod down through the Switch Lever and into the Primer Magazine Tube The Black Plastic Follower Rod will activate the Primer Early Warning Alarm when there are approximately three to four primers left Primer Alarm Lever pivoted back Primer Alarm switch activated by Rod and Lever Invert Pickup Tu...

Page 22: ...e present in Station 2 There are different size Powder Bars See below Each Powder Bar is adjustable to control the volume of powder dispensed Station 2 powder dispensing and case mouth expanding Dillon RF 100 Automatic Primer Filler Dillon s RF 100 Automatic Primer Filler eliminates the task of manually filling primer pick up tubes Pour your primers from their box into the top of the RF100 Press t...

Page 23: ...ing adjustment 3 Powder charge weight adjustment 8 5 4 Place an empty sized case in Station 2 with no powder in the Powder Measure Loosen the 10 24 Powder Measure Clamp Socket Head Screw with a 5 32 Allen wrench and the Powder Measure Clamp Button Socket Head Screw with a 1 8 Allen Wrench see below Cycle the Operating Handle fully down Proper adjustment is achieved with the Powder Bar reaching the...

Page 24: ...off over and to keep the case from shaving bullet material especially with lead bullets On handgun cartridges a sized belled flared case mouth diameter should measure approximately 010 larger than a sized case Note over flaring can be corrected by gently resizing the case in the Size Die in Station 1 s Bellcrank Arm must touch the Powder Body here without over travel as the Operating Handle reache...

Page 25: ...d Select the powder charge weight in grains from the appropriate established reloading document and write it down WARNING Put on safety glasses Remove the Powder Measure Hopper Lid and fill the Hopper with the prescribed powder and replace the Hopper Lid Label the Hopper with tape or a sticky note as to what powder is in the Hopper Place a primed case in station 2 and cycle the Handle fully down R...

Page 26: ... ONE TYPE OF POWDER IN THE RELOADING AREA AT ONE TIME OBSERVE ALL MAXIMUM LOAD WARNINGS MAXIMUM LOADS MAY NOT BE SAFE IN YOUR FIREARM NEVER LEAVE POWDER IN THE POWDER MEASURE Typical Powder Shapes Flake and perforated disk 8 6 Station 3 Bullet Seating Setup Cartridge Overall Length COAL 8 6 1 The Seating Die pushes the bullet into the case How far the bullet is pushed into the case will determine ...

Page 27: ...s into the Shellplate The Square Deal is shipped with one Seating Stem installed and the other shipped separately There is a third stem included for 38 357 wadcutter bullets Select the Seating Stem that matches the nose of the bullet being seated Thread the Stem into Station 3 on the Toolhead using the Bench Wrench or a 9 16 Wrench Start with the Stem 5 turns down At this point the Die will not be...

Page 28: ...edge of the case mouth is rolled inward into the bullet during roll crimping leaving a slight radius at the top of the case mouth Cast lead bullets or jacketed bullets may or may not have a crimp groove or a cannelure that accepts the roll crimp If there is no groove or cannelure take care not to over crimp the bullet Over crimping can damage the bullet and reduce the hold on the bullet due to the...

Page 29: ...ge of the case mouth 001 003 8 7 5 Installation of the Square Deal Pistol Crimp Die The Crimp Die consists of a Crimp Die Body that drops into the Frame and a hollow Universal Crimp Adjuster Plug that threads into the Toolhead that adjusts the Crimp Die body up and down varying the amount of crimp Thread the Crimp Plug in four turns as a starting point 8 7 6 Adjustment of the Square Deal Pistol Cr...

Page 30: ...3600 40 10mm 11801 40 10mm TRUN 11048 40 10mm SWC 12124 40 10mm 12776 11534Body 15047Carbide 20247 41Magnum 6 13284 1 13930 H 13240 41Magnum 11799 41Magnum SWC 12067 41Magnum 11794 41Magnum 22202 20242 44Special 4 13504 4 14047 G 13427 44Spl 44Magnum 13036 44Magnum SWC 11880 44Magnum RN 12571 44Spl 44Magnum 11863 44Spl 44Magnum 22203 21035 44 40Winchester N 13095 4 14047 4 13474 44 40Winchester 10...

Page 31: ...nate size is shipped separately The Magazine Tube Assembly uses color coded plastic Primer Magazine Feed Tips The Large Prime Magazine Tip is red and Small Primer Magazine Tip is blue The Aluminum Magazine Small and Large Tubes have different inside diameters A Conversion Kit for the alternate size primer is included in the Tube Pack Exploded View 4 Large Primer Pickup Tube Green Tip Yellow Tip is...

Page 32: ...ne Tube assembly straight up out of the Magazine Shield Insert the alternate Magazine Tube Assembly of the appropriate size Red or Blue Tip into the Magazine Shield and gently rotate the Magazine Tube until the tab on the Plastic Tip engages the slot down in the Primer Feed Body allowing the Magazine Tube Assembly to drop into place Replace the Primer Shield Cap making sure the top of the Magazine...

Page 33: ...e Deal with the 3 Screws previously removed Gently cycle the Operating Handle to the priming position full push stroke to the rear to make sure there is no binding of the Priming Cup in the Shellplate and the Shellplate indexes properly Re connect the Return Spring Install the replacement Primer Slide Assembly by rotating it into position as shown Re attach the Primer Assembly with the 3 Mounting ...

Page 34: ... Powder Measure into the original container cycling the Powder Measure right side up and upside down Remove all four of the 10 24 Socket Head Toolhead Mounting Screws and remove the complete Toolhead Assembly exposing the Dies Remove the Spring Clip and disconnect the Failsafe Rod from the Lock link Assembly Store the Spring Clip in the Failsafe Rod Remove the Powder Measure Clamp Remove all four ...

Page 35: ...late is sandwiched between the Frame below and the Toolhead above The Friction Plate keeps the treaded adjusting parts of the dies from turning easily Insert Size Die in Station 1 Remove the Size Die from Station 1 Remove the Seat Die from Station 3 Remove the Crimp Die from Station 4 All Die Bodies removed Toolhead Screws Friction Plate Toolhead Powder Die Clamp Powder Die Deprime Assembly Insert...

Page 36: ... Seat Stem for a Wad Cutter Select the Seat Stem that best fits the nose of the bullet being used Install the adjustable Seat Stem by threading it into Station 3 of the Toolhead five turns down as a starting point Round Nose Seat Stem Wad Cutter Seat Stem 38 Special Flat Nose Seat Stem Select the Stem that best fits the nose of the bullet Thread Stem into Station 3 using the Bench Wrench or a 9 16...

Page 37: ... Lock Link Assembly with Spring Clip Install three numbered Locator Pins from the Conversion Kit Slide the Powder Measure down over the Powder Die and secure it with the Powder Measure Clamp Screw Reconnect the Failsafe Rod to the Powder Measure and secure it with the Spring Clip Thread the Crimp Adjustment Plug into Station 4 using the Bench Wrench or a 3 4 Wrench four turns down as a starting po...

Page 38: ... White Plastic Bell Crank Cube in the Powder Bar slot Remove the Spacer Bar Retainer Plug and slide the Spacer Bar and Powder Bar and Spacer out of the Powder Measure Slide Powder Bar out of the Powder Measure Self locking Locknut on back of Pivot Screw Powder Bar Drive Slot Bell Crank White Cube Drive Pin Bell Crank Loosen the Pivot Screw and Self Locking Locknut on the back using a 7 16 wrench a...

Page 39: ... and unscrew the Knurled Nut holding the Priming Pin in place with a pair of pliers or Vice Grips Replace the Pin spares available from Dillon or use the spare in the Conversion Kit Box and retighten the Knurled N with the pliers Re tighten the Pivot SHCS and the Self Locking Nut do not over tighten check that the Lock Link Assembly moves freely back and forth Push out on the Drive Pin and Cube wh...

Page 40: ...13860 shown below are factory aligned and should not require service nor should be loosened or removed from the Square Deal Frame Doing so may require that the Square Deal be returned to Dillon for re alignment Before doing any adjustments to the Indexing or Priming System verify that the Shellplate bolt 13328 above is securely tight and the Primer Slide is assembled correctly and to the proper he...

Page 41: ...e set screw in until it is centered and not catching Note the Shellplate alignment with the Handle in the at rest position is controlled by the Index Ball and Spring under the Shellplate and is factory set and not adjustable If the Primer Cup is catching on the right edge of the Cup in any of the 4 Shellplate pockets as the Handle is cycled fully up the Shellplate is over indexing Adjust the Index...

Page 42: ...a small flashlight in the opening as shown below Look down the Shield Tube and verify the Primer Hole in the Primer Slide is centered concentric under the opening in the Primer Feed body as shown below If not adjust the Primer Slide Stop Set Screw on the back of the Square Deal B in or out no more than 1 8 of a turn at a time to fine tune the position of the Primer Slide See the graphical depictio...

Page 43: ...ble Push the Primer Slide Assembly firmly against the Set Screw Stop with your finger Shine a Flashlight here and look down Primer Shield Tube while adjusting the Set Screw in out with an Allen Wrench to center the Cup in the Primer Feed Body Tube holding the all the way back with your finger Proper primer presentation Correct View down inside Primer Shield Tube Drop one primer in Magazine WARNING...

Page 44: ...due will build up in the Size Die even carbide over extended periods especially if the brass cases are not cleaned well This very hard brass residue will leave vertical scratches on the case Remove any hardened brass buildup in the size die with Red 3M Scotch Brite wrapped around a wood mandrel Chuck the mandrel in a drill motor and run it gently back and forth inside the size die to remove harden...

Page 45: ...ough the Magazine Tube 1 Perform a single primer drop test with the Magazine Tube out of the system Hold the Mag Tube vertically with the tip resting on a flat surface Drop one primer into the top of the tube shiny side down Gently pick up the tube The Primer should be sitting on the flat surface If not check the tip for damage and or burrs on the semicircular fingers If no damage and the primer i...

Page 46: ...e sure that the Failsafe Return Rod Blue Wing Nut is tight enough to fully retract the Powder Bar With the handle fully down tighten the Blue Wing Nut until two business cards just slip between the coils of the spring Adjust Powder Die height to obtain full Powder Bar travel 2 Powder not settled in Hopper Cycle more powder charges until stable 3 Wrong size Powder Bar for requirements Replace Powde...

Page 47: ...t helps maintain the Square Deal B Square Deal Spare Parts Kit PN90715 Compressed Air Pipe Cleaners Lubricating Grease Syringe Nylon Brush 12 2 Remove Clean and Lubricate the Link arm bearings on each side of the press the 4 Corner Wave Bearings the Mainshaft Pivot Pin and the Used Primer Track every 10 000 cycles Remove the 4 BHCS 13896 that retain the Link Arms 13822 to the Frame and Operating H...

Page 48: ...ly grease and reinstall With the Mainshaft out of the Frame carefully pry the white plastic spent Primer Track Cover from the right side of the Square Deal Mainshaft and clean the primer and powder reside out of the Track Reinstall the Track Cover Remove Clean and Grease Pivot Pin Used Primer Track Cover Clean out Primer Track Cover and replace Cover ...

Page 49: ...Washers and re tighten the Retaining Screws 12 3 General Cleanliness The reloading process is inherently dirty because of residue from used primers leftover corn cobb from tumbling and spilled powder The reloading process of sizing seating bullets and primers can generate metal particles Carefully blow the system out frequently and remove any debris Clean and apply grease to inside and outside sur...

Page 50: ...50 13 DILLON PRECISION Square Deal B EXPLODED VIEWS AND PARTS IDENTIFIER 13 1 Main Assembly ...

Page 51: ...51 13 2 Frame and Lower Assembly Index Assembly Index Assembly installed in Frame Index Pawl ...

Page 52: ...52 13 3 Typical Toolhead Assembly 45ACP Shown ...

Page 53: ...53 13 4 Automatic Primer Assembly ...

Page 54: ...54 13 5 Primer Slide Assemblies Large Primers 20124 Small Primers 20125 Small Primer Slide Large Primer Slide 1 404 005 1 404 005 ...

Page 55: ...55 13 6 Primer Early Warning System ...

Page 56: ...56 13 7 Automatic Powder System ...

Page 57: ...bricant is distributed over the cases Let the cases dry for about 3 4 minutes before using them 14 3 Head Space Case Sizing Headspace is an important reloading parameter Cartridge headspace is the distance from the case head to the part of the case on which the cartridge stops moving forward in the chamber Chamber headspace is the distance from the breech face to the part of the chamber that stops...

Page 58: ...on It is important to keep records of the important parameters that were used in reloading the cartridge in a record book and labeling the cartridge storage container A quantity of 100 stick on labels with loading parameters is available from Dillion PN10446 see below Recording additional data such as the Date and the Powder Lot number is also recommended 15 PRIMER BASICS DANGER Primers contain a ...

Page 59: ...s a fire and an explosion hazard Keep the loading area and equipment free of any accumulated primer dust Use alcohol and paper towels to remove this residue WARNING Using the right primer is a very important issue in the reloading process Use the primer recommended in your reloading manual for that specific load There are two basic types of cartridge cases and associated primers Boxer and Berdan T...

Page 60: ..._________________________________________________________ __________________________________________________________________________________________ __________________________________________________________________________________________ __________________________________________________________________________________________ _____________________________________________________________________...

Page 61: ...61 Dillon Precision Inc 8009 E Dillon s Way Scottsdale AZ 85260 480 948 8009 1 800 223 4570 FAX 480 998 2786 Website www dillonprecision com E mail dillon dillonprecision com ...

Reviews: