background image

License 


ISOFLOW application – User manual for XeedSystem v1.6 

|


15 


5.


License 

5.1


What is license? 

The system’s some particular features – actual and planned features - require additional 
payment to access to. To use these features the appropriate license must be bought. So 
essentially the license is a right to use a given feature. In reality the license is a license key, 
which is a 24 character long code. The purchased key can be applied in the application, – 
see below - and the belonging feature becomes available. 

One  of  these  activable  functions  is  the  displaying  of  the  seed  counting  or  the  fertilizer 
performance. 

If there are blockage sensors in the system, by buying a license key the seed counting or 
the fertilizer performance feature can be activated. 

The Pro sensors are capable of seed counting or fertilizer performance display by default 
without buying license key. 

The blockage sensors doesn’t have these functions, to use these functions a license key 
must be bought. 

5.2


Performance view 

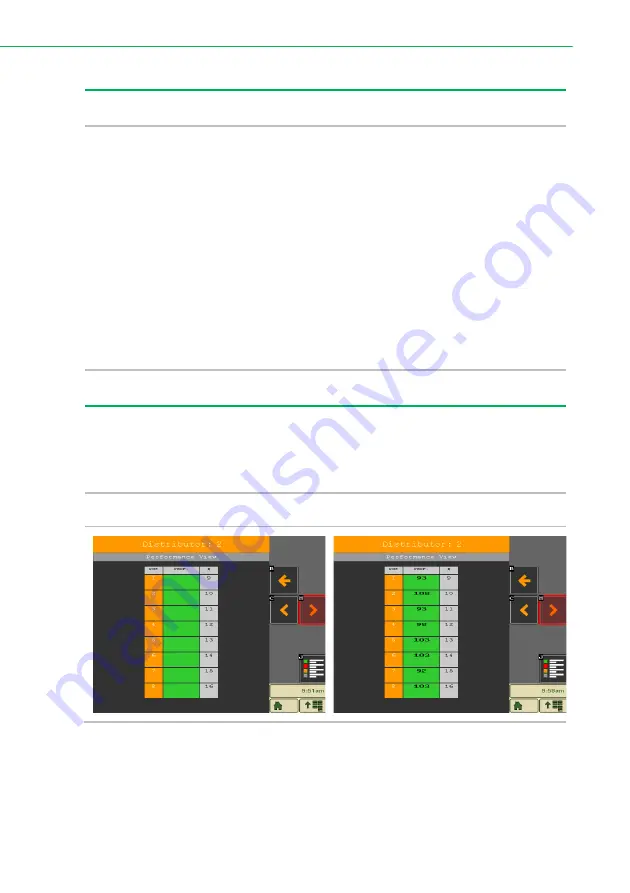
In case of blockage sensors in absence of license key only the status colors can be seen 
on the performance view. 

In case of Pro sensors however the seed application or the fertilizer performance can be 
seen. 

Blockage sensors 

Pro sensors 


Summary of Contents for XeedSystem

Page 1: ...THE SEED MONITORING SYSTEM ISOFLOW application USER MANUAL ...

Page 2: ...prior written permission of the copyright owner except in the case of brief quotations embodied in critical reviews and certain other noncommercial uses permitted by copyright law For permission requests write to the publisher addressed Attention Permissions Coordinator at the address below Copyright owner Digitroll Ltd Bánomkerti st 63 Hajdúszoboszló 4200 Hungary E mail info digitroll hu Webpage ...

Page 3: ...em build up____________________________________ 8 4 2 Change sensor type _________________________________ 9 4 3 X line module setup _______________________________ 10 4 4 Seed settings _____________________________________ 11 4 4 1 Seed alarms settings__________________________________12 4 5 Fertilizer settings __________________________________ 13 4 5 1 Fertilizer alarms settings________________...

Page 4: ...etails screen ____________________________________ 28 7 9 Confirm performance______________________________ 29 8 Errors _________________________________________ 29 8 1 Blockage ________________________________________ 29 8 2 Alerts___________________________________________ 31 9 Troubleshooting_________________________________ 33 10 Settings ______________________________________ 36 10 1 About___...

Page 5: ... XeedSystem v1 6 5 11 4 Alarm settings ____________________________________ 47 11 4 1 Seed alarms_________________________________________47 11 4 2 Fertilizer alarms _____________________________________48 12 ISOFLOW and SeedView cooperation _______________48 ...

Page 6: ...is through the use of standardized connectors communication protocols and operational guidelines What is the virtual terminal According to the virtual terminal VT technology specification of ISO 11783 standard a virtual terminal product is designed When electronic control farm implements connect with the tractor the VT can be used as man machine interface for parameters adjustment and work data di...

Page 7: ... it and connect one of the Y cable s connector to it Connect the Y cable s other connector to the XeedGATE unit s connector labelled as ISOBUS 9 pole in cab connector image on the left Look for it in the cab 2 2 2 The XeedGATE s LED signal The ISOBUS LED on the XeedGATE helps to check the connection or to define some of the connectivity errors In case the terminal isn t connected to the XeedGATE u...

Page 8: ...e ISOBUS terminal 4 System installation 4 1 System build up Press the Reset button to perform a device reset The ISOFLOW application installation s first step On this page a summary can be seen about every device connected to the system Such as the number and the type of the sensors and modules If everything seems right press the next button to continue the installation If the number of the sensor...

Page 9: ...nging as well SEED SENSORS or FERTILIZER SENSORS If there are more than five X LiNE modules in the system use the paging buttons to page through them Only five X LiNE module can be displayed on a screen at the same time By pressing the back button the changes related to the sensor types can be applied or canceled Press the confirm button to apply the sensor type changes It performs a quick system ...

Page 10: ...the given X LiNE module If there are more than five X LiNE modules in the system use the paging buttons to page through them Only five X LiNE module can be displayed on a screen at the same time The next button becomes active if the binding has done right For example in case of two distributor heads there wasn t set bigger value than two By pressing the next button the system installation continue...

Page 11: ...he Enter button to access to the seed alarms settings By pressing the next button the system installation continues with the next step By pressing the back button the application goes back to the previous step of the system installation Setting the seed type properly is very important for blockage detection and seed counting If the applied seed type is not in the list select the most suitable size...

Page 12: ...elay can be set in seconds for how long the errors blockage under overflow should persist continuously before the system indicates it In case of under or overflow the sensor color marking can be turned on or off by the Show under and overflow status swtch See Chapter 6 7 Legends Press the Back button to go back to the seed settings Press the Reset button to reset the alarm settings ...

Page 13: ...sitive should the system be in case of blockages Press the Enter button to access to the seed alarms settings By pressing the next button the system installation continues with the next step By pressing the back button the application goes back to the previous step of the system installation The Blockage sensitivity has five predefined values The Medium default option is a good choice in the most ...

Page 14: ...y before the system indicates it In case of under or overflow the sensor color marking can be turned on or off by the Show under and overflow status swtch See Chapter 6 7 Legends Press the Back button to go back to the fertilizer settings Press the Reset button to reset the alarm settings 4 6 Finishing the installation The installation s final step Press the Start using XeedSystem to finish the in...

Page 15: ...hese activable functions is the displaying of the seed counting or the fertilizer performance If there are blockage sensors in the system by buying a license key the seed counting or the fertilizer performance feature can be activated The Pro sensors are capable of seed counting or fertilizer performance display by default without buying license key The blockage sensors doesn t have these function...

Page 16: ...n rate is 0 since without seed counts it is impossible to calculate the momentary application rate In case of seed counting sensors or active license key the actual application rate can be seen too Blockage function Seed counting Fertilizer performance function 5 4 License management The License management screen can be accessed by Settings License management ...

Page 17: ... features If there aren t any fertilizer sensors in the system the fertilizer performance feature appears to be light gray and inactive in the list On license management screen the following can be seen depending on the sensors in the system blockage or Pro sensors Blockage sensors In case of blockage sensors the following icon can be seen This means the function is not active license key must be ...

Page 18: ...erformance feature appears by default because of the Pro sensors If there are Pro sensors in the system the green check mark indicates that the feature is already activated without license key only because of the Pro sensors There is no need to purchase license key In case of a successfully activated key the following icon can be seen This icon mean the function has been successfully activated by ...

Page 19: ...ription of the feature below it the order information necessary to order the license key These information are needed to order the license key to activate the given feature later with the received license key 5 6 License key activation In case there is already a new license key available the feature can be activated on the license management and the license details belonging to the feature screen ...

Page 20: ...d In case of successful license activation In case of failed license activation In case of failed license activation check the followings the entered license key check for typos the license ordering happened with the appropriate data In case of successful license activation a green check mark appears beside the key icon on the license management screen This icon means that there is an active licen...

Page 21: ...es but provides access to the given feature for a limited time period In this case after the time limit expires the function becomes unavailable again Of course in this case by buying a new license key the affected feature becomes available again If a time limited license key has been activated the remaining time can be seen on the license management and the license details screen too License mana...

Page 22: ...other popup alert until system restart By pressing the License details button the License management screen appears and the licenses can be checked If another license expires in the same work flow there will be another popup alert The expired license keys can be checked on the License management screen The expired key s remaining time is 0 00 After a license key has expired on the license details ...

Page 23: ...ion about seeding The settings and other important screens can be accessed from here Every orange rectangle represents a seeder distributor head Every blue rectangle represents a fertilizer distributor head The little squares inside the orange blue rectangles represent the sensors During seeding many unpredictable errors may occur The seed monitoring screen or main screen primarily helps to detect...

Page 24: ... The triangle functions as a button as well by pressing it the error list appears 7 2 The area icon The area icon shows the sown area and it works as a button as well For precise area measurement it is crucial to set the working width and to calibrate the speed properly These options can be set on the machine settings screen which can be accessed from the settings or by pressing the area icon on t...

Page 25: ...ensor s interpretation Changing the interpretation changes the working position icon too The XeedGATE saves this option the interpretation of the working position so there is no need to adjust it again 7 4 The speed icon The speed icon shows the speed of the seeder The speed value is crucial for the area measurement so the precise speed calibration is very important The speed calibration can be ac...

Page 26: ... squares are the expected behavior because it means there is no seeding minimal seed flow in lifted work state If the machine is in working state every square turns to green or gray yellow red depending on the status of the sensors on the distributor head If square s color is green it is the expected behavior because it means that the sensor on the distributor head perceives seed flow minimal seed...

Page 27: ... means the sensor is working as intended It perceives seed flow while the machine is in working position Yellow it means the sensor overperforms compared to the other sensors average performance Mustard yellow it means the sensor underperforms compared to the other sensors average performance Gray it could mean the sensor is dusty and it needs to be cleared or the sensor doesn t perceive seed flow...

Page 28: ... screen can be seen Press the Back button to return to the main screen Use the paging buttons to page through the distributors Press the legends button to access to the legends screen If more than 12 distributor heads are used the paging button will be active and with it the user has the possibility to swap between the first and the second seed monitoring screen so that all of the distributor head...

Page 29: ... seconds The XeedSystem processes numerous parameters of the seed flow in each seeding hose It analyzes and compares the results of each sensor and define blockage considering this information It can be said that XeedSystem detects not the blockage itself but only those unexpected changes in the seed flow which is mostly caused by blockage Every blockage before or after the sensor changes the seed...

Page 30: ...here the sensor sees no seed flow from the beginning The system reports no flow The interpretation of this status is the operator s task Was it intentional or not is it really an error or not This is a special case because it can be a an intentionally closed seed row tramline b or a full blockage in the seeding hose before the sensor which is formed during the previous seeding Altough it seem like...

Page 31: ...nt and new errors will cause alerts again Error list button Opens the error list screen The error list screen gives more information about every error Ignore button Ignore every error similar to the current one on the given sensor The system won t notify the user in case of similar errors on the similar sensor anymore Until system restart Ignore all button Ignore all errors in the future The syste...

Page 32: ...creen a summary can be seen about the Active and disappeared errors The active errors are marked with a exclamation mark and sorted to the top of the list The disappeared errors are marked with an x The application can only display five errors at the same time If more error occurred it can be paged through the pages with the paging buttons Press the home button to return to the main screen The err...

Page 33: ...s the Error list button A simple troubleshoot process is helping the oprerator to make the changed system usable again To start troubleshoot press the next button On the troubleshoot screen the operator can choose from the following options Modify the existing system setup if the system has missing or replaced devices Or create a new system setup for intentionally changed system Note if the system...

Page 34: ... setup press the Next button Follow along and complete the simplified installation process until the Ready to start screen can be seen Press the Start using XeedSystem button to start working with the modified system If the second option has been chosen Create new system setup press the Reset button Upon Resetting total configuration all data will be lost and the installation must be completed fro...

Page 35: ... next system start the system doesn t offer the Modify existing system setup only the Create new system setup option These cases can be occur mainly when there are more X LiNE modules and or sensors in the system than it was before Press the reset button to perform a reset and create a new system installation See chapter 4 Installation ...

Page 36: ...ress the Enter button to enter any of the setting s submenu Press the Home button to return to the main screen 10 1 About Press the About button on the settings screen to access to the about screen This page provides basic information about the legal and Digitroll Ltd from such as accessibility website Press the Home button to return to the main screen Press the Back button to return to the system...

Page 37: ... detection sensitivity Defines the sensitivity of blockage detection How sensitive should the system be in case of blockages Press the Enter button to access to the seed alarms settings Setting the seed type properly is very important for blockage detection and seed counting If the applied seed type is not in the list select the most suitable size for the most accurate blockage detection NOTE The ...

Page 38: ...rrors blockage under overflow should persist continuously before the system indicates it In case of under or overflow the sensor color marking can be turned on or off by the Show under and overflow status swtch See Chapter 6 7 Legends Press the Back button to go back to the seed settings Press the Home button to return to the main screen Press the Reset button to reset the alarm settings ...

Page 39: ...ied fertilizer type For example Granular Blockage detection sensitivity Defines the sensitivity of blockage detection How sensitive should the system be in case of blockages Press the Enter button to access to the seed alarms settings The Blockage sensitivity has five predefined values The Medium default option is a good choice in the most situation however sometimes it may require using another o...

Page 40: ...rrors blockage under overflow should persist continuously before the system indicates it In case of under or overflow the sensor color marking can be turned on or off by the Show under and overflow status swtch See Chapter 6 7 Legends Press the Back button to go back to the fertilizer settings Press the Home button to return to the main screen Press the Reset button to reset the alarm settings ...

Page 41: ...tic page Press the Cancel button to return to the previous page The diagnostics of XeedGATE and the related information can be found here Such as software hardware bootloader version the sensor s voltage status its place in the system Use the Back and Next buttons to see the other device s diagnostics Press the Home button to return to the main screen The diagnostics of X LiNE modules and the rela...

Page 42: ... device s diagnostics Use the paging buttons to page through the device s list Press the Home button to return to the main screen The diagnostics of fertilizer sensors and the related information can be found here Use the Back and Next buttons to see the other device s diagnostics Use the paging buttons to page through the device s list Press the Home button to return to the main screen ...

Page 43: ...w The summary of the detected device s list can be seen here Press the Home button to return to the main screen Press the Back button to return to the System settings screen If the systems structure has changed or if the sensors and distributor heads quantity is not right press the refresh button to refresh the detected device s list Press the Sensor type change button to change the type of the se...

Page 44: ...system gives a warning System is changed 11 2 Machine settings The working width and the speed calibration can be modified here For precise area measurement it is crucial to set the working width and to calibrate the speed properly The machine settings also can be accessed from the main screen by pressing the area icon 11 2 1 Speed calibration The seeder s speed calibration can be modified or set ...

Page 45: ... the display 3 Maintain your speed When you reach the stake marking the end of the track the axel of the back wheel is in line with the stake touch the Stop symbol on the display 4 As Distance covered enter 100 00 m 5 The program calculates the impulses per meter Calibration is concluded you can leave the screen Method B In this case there is no need to do the speed calibration if the impulse mete...

Page 46: ...ds can be modified here that were specified during the setup flow Use the paging buttons to page through the device s list Press the Back button to return to the system settings screen The binding of the sensors can be modified here Use the paging buttons to page through the device s list Press the Back button to return to the system settings screen ...

Page 47: ... return to the main screen 11 4 1 Seed alarms On the seed alarms settings the under and overflow limits can be set The alarm delay can be set in seconds for how long the errors blockage under overflow should persist continuously before the system indicates it In case of under or overflow the sensor color marking can be turned on or off by the Show under and overflow status swtch See Chapter 6 7 Le...

Page 48: ...s to the default option Press the Home button to return to the main screen Press the Back button to return to the Alarm settings screen 12 ISOFLOW and SeedView cooperation Currently there is no cooperation between the ISOFLOW and the SeedView application Only one of them can be active at the same time Whenever the iPad SeedView application connects to the system with a running ISOFLOW application ...

Reviews: