background image

36     

Operational Introduction

Operational Introduction


37

4. 

9

REVERSE SKIP

5. 

:

FORWARD SKIP

6.  JUMP
7.  Variable Speed, Bi-directional Slow Motion 

Viewing -

;

PAUSE + 

7

FAST REWIND or 

;

PAUSE +

8

FAST FORWARD

8.  Frame by Frame - 

;

PAUSE repeated. 

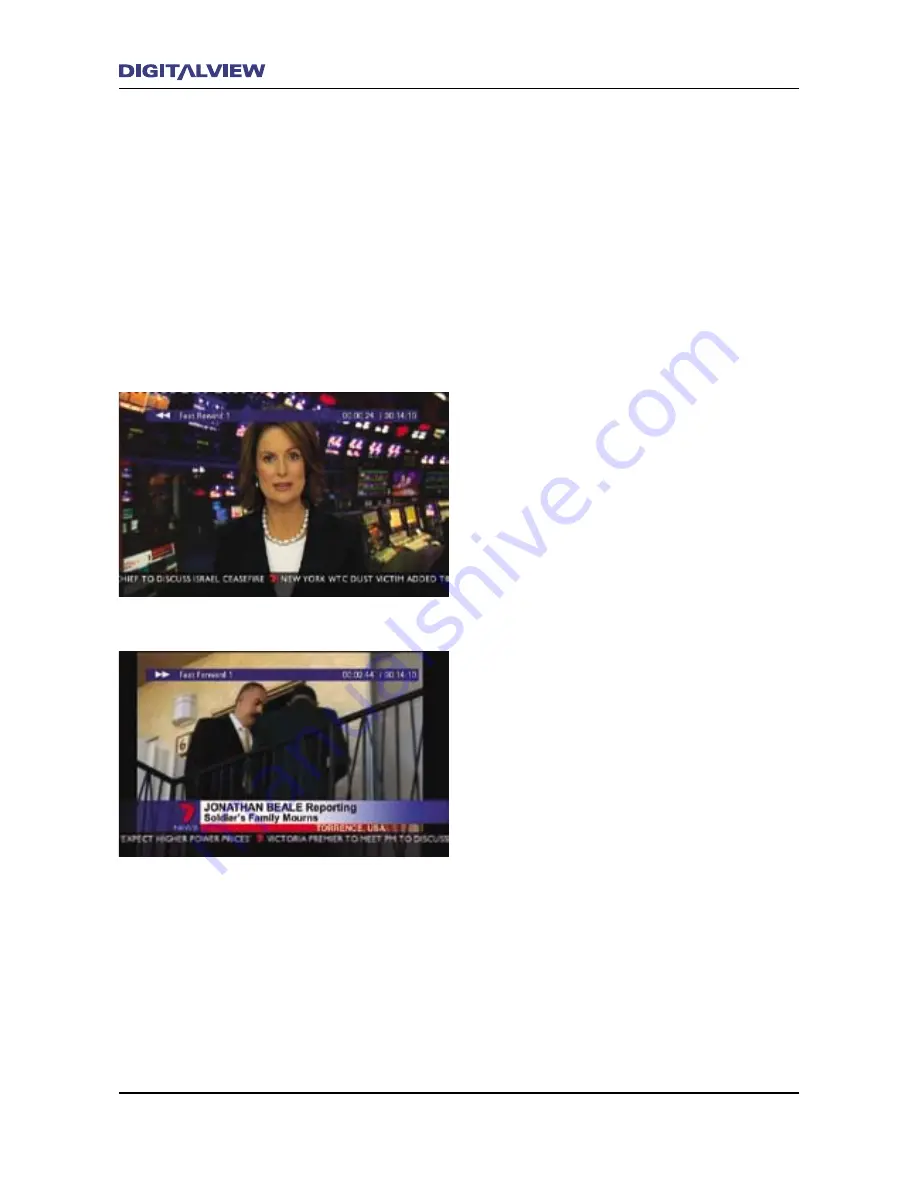
Use these simple steps to operate the Trick Mode 
controls while recording. When pressing the Trick 
Mode controls, a status bar at the top of the 
screen shows any information related to that 
function.

1.  Press the 

7

(FAST REWIND) button.  Each 

press after that will rewind the current 
position in increments of x2, x3, x4 and x5 
normal speed.

2.  Press the 

8

 (FAST FORWARD) button. Each 

press after that will move the current position 
forward in increments of x2, x3, x4 and x5 
normal speed.

Note:


8

FAST FORWARD is only possible if 

7

FAST 

REWIND had previously been activated.

• 

When pressing either the 

7

FAST REWIND or 

8

FAST FORWARD button, a status bar at the 

top of the screen indicates the number of 
times that button has been pressed.  Refer to 
following relationship between the number of 
button presses and actual speed.

  x1= x2 normal speed, 

x2= x4 normal speed,
x3= x8 normal speed,
x4= x16 normal speed,
x5= x32 normal speed,

Summary of Contents for DVR-810

Page 1: ...DVR 810 Dual T uner DVB T High Definition Digital Video Recorder Ver 1 0 2006 2007 Digitalview Australia Owner s Manual...

Page 2: ...For addendums or supplementary information to this manual please refer to our Support page at digitalview com au...

Page 3: ...IMPORTANT SAFETY INSTRUCTIONS CAUTION PLEASE READ AND OBSERVE ALL WARNINGS AND INSTRUCTIONS IN THIS OWNERS MANUAL AND THOSE MARKED ON THE UNIT RETAIN THIS GUIDE FOR FUTURE REFERENCE 6 Clean only with...

Page 4: ...Schedule Timers 29 Using the EASY TIMER Function for Scheduled Recordings 29 Using the TIMER REC Function for Scheduled Recordings 30 Using the EPG for Scheduled Recordings 31 Using Timeshift to Reco...

Page 5: ...ce any difficulties with the operation of your DVR 810 please consult the relevant section of this manual or alternatively go to our web page for support at www digitalview com au Introduction DVB and...

Page 6: ...odes Variable speed Fast Forward and Rewind Bi directional and Variable Speed Slow Motion JUMP One Touch Recording with Variable Time Extension Record a program and choose between the default program...

Page 7: ...rding Resolutions The DVR 810 supports 1080i 720p 576p and 576i resolutions TV Monitor Connections Multiple video outputs are provided for connection to most TV monitors These include Composite Baseba...

Page 8: ...troduction Package Contents Antenna Cable Component YPbPr Cable Power Cable Remote Control Unit Owners Manual Warranty Registration Card Quickstart Guide The following items are included with your DVR...

Page 9: ...ies may be very close to electrical wiring This may lead to impulse noise drop outs when switching lights or other electrical appliances If you live in a fringe reception area and have had a mast head...

Page 10: ...ch Dolby Digital 2 5 1 ch Interlaced i and Progressive p Scanning Interlaced format shows half of an image on the odd rows of pixels every fiftieth of a second and then shows the other half on the eve...

Page 11: ...l digital TV input formats are converted to the selected video output resolution Refer to the section in System Settings Video Ensure that your TV monitor supports one or more of the resolutions 576i...

Page 12: ...ize of picture that could be displayed in a video frame The official widescreen format for digital TV was therefore set as 16 9 which covered both Standard and High Definition broadcasts The following...

Page 13: ...Format Received digital TV broadcast in 16 9 format DVR 810 aspect ratio set to 4 3 Received digital TV broadcast in 16 9 format DVR 810 aspect ratio set to 4 3 Letter box Received digital TV broadca...

Page 14: ...10 DVR 810 Front and Rear Panel Front Panel Overview...

Page 15: ...or is On during Playback or Chase modes 7 Indicator is On during Timeshift or while Paused in Playback mode 8 Indicator is On during Recording or Playback and only if the Fast Forward function has bee...

Page 16: ...Navigation button Scroll or Move UP when a Menu option is selected Also used to change the channel service 8 Navigation button Scroll or Move RIGHT when a Menu option is selected Also used to increas...

Page 17: ...DVR 810 Front and Rear Panel 13 Rear Panel Overview...

Page 18: ...14 Remote Control Unit Remote Control Unit Button Definitions 1...

Page 19: ...Remote Control Unit 15 Button Definitions 2...

Page 20: ...16 Remote Control Unit Button Definitions 3...

Page 21: ...ection using an Analog TV The connection diagram show below is used in some situations where a standard definition or analog TV will be connected to the DVR 810 Ensure that power to both the DVR 810 a...

Page 22: ...sing a Flat Panel Display with Component Inputs Use this type of connection with a high definition analog TV monitor or Flat Panel Display If an analog TV monitor is used it must support either 576p 7...

Page 23: ...with a high definition analog TV monitor or Flat Panel Display The RGB input for some monitors may use five separate leads for connection The inputs will usually be identified as R G B H and V If an...

Page 24: ...tion that combines both video and audio in one cable HDMI is designed to maximise the picture and sound quality from a Flat Panel Display plasma or LCD and or Home Theatre System The results will in m...

Page 25: ...ompanies like AMX Crestron and others The DVR 810 provides one RS232 port and one External IR port on the rear panel to meet most installation requirements A bi directional RS232 serial interface port...

Page 26: ...ment in your system Once you are familiar the basic operation of the DVR 810 and want to explore the extended features refer to The MAIN MENU section of this manual Using the STBY Button The STBY Stan...

Page 27: ...next screen displayed is the MAIN MENU 4 Using the button on the RCU select the INSTALLATION option in the MAIN MENU 5 Press the ENTER button on the RCU 6 The next screen displayed is the Installatio...

Page 28: ...l select the TV channels services within that group or 2 Press the CH or buttons This will scroll through all the TV channels services in ascending or descending order or 3 Press the ENTER button This...

Page 29: ...e box shows a detailed description of the NOW and NEXT programs Press the INFO or EXIT button to clear all dialogue boxes Also refer to the section EPG Electronic Program Guide 3 While recording or in...

Page 30: ...EPG main dialogue box is shown with a list of the current TV channels services program information 2 Press the or button to select the required TV channel service 3 Once the TV channel service is sel...

Page 31: ...n on the RCU A dialogue box is displayed indicating the remaining program duration 3 Press ENTER to accept the value of the remaining program duration Alternatively press the REC button repeatedly to...

Page 32: ...hose two channels and their associated services can be selected for viewing If two programs are being recorded using only one discrete Channel Group e g ABC only then all Channel Groups can be viewed...

Page 33: ...ed for multiple timer entry and scheduling i e daily weekly etc and can be programmed in increments of 1 minute Using the EASY TIMER Function for Scheduled Recordings 1 Press the EASY TIMER button The...

Page 34: ...de Everyday any weekday i e Monday Tuesday etc Weekends or Weekly 4 Press the button to move to the Start Time The current time in hours is highlighted 5 Press the or buttons to change the time in hou...

Page 35: ...he EPG main dialogue box is shown 2 Press the or button to select the required TV channel service 3 Press the EPG button again The EPG main dialogue box is shown with the currently selected TV channel...

Page 36: ...ogram from the time it was paused to the current time Recording with Timeshift 1 While watching Live TV press the PAUSE button The Live TV video and audio stop and a single video frame is displayed Th...

Page 37: ...er dialogue box is displayed showing all Recorded Titles 2 Press the or buttons on the RCU to select one of the Recorded Titles 3 Press ENTER The selected title commences playback in full screen mode...

Page 38: ...splayed 3 Select the Genre classification you wish to choose from using the or buttons 4 Press ENTER 5 Press the or buttons on the RCU to select one of the Recorded Titles 6 Press ENTER The selected t...

Page 39: ...eal time recording and the time position being watched is delayed and is referred to as Chase or Chase Play Simply put Chase only occurs when a Trick Mode is activated and the program being watched is...

Page 40: ...will rewind the current position in increments of x2 x3 x4 and x5 normal speed 2 Press the 8 FAST FORWARD button Each press after that will move the current position forward in increments of x2 x3 x4...

Page 41: ...the RCU The program being recorded will Jump to the that value If the value entered is greater current duration of the recording no Jump will take place 5 While recording press the FORWARD SKIP button...

Page 42: ...top and a single video frame is displayed Press PAUSE repeatedly to move forward frame by frame Press the 4PLAY button to return to normal viewing Bookmarking During Recording or Playback A Bookmark i...

Page 43: ...d 2 To playback the captured video frames Photos first select Photo Viewer from the MAIN MENU and press ENTER To view the Photos in order of the most recently captured first select Sort Created Time o...

Page 44: ...program in both the main screen and the PIP 2 To change the Live TV program in the PIP press the YELLOW CH or CH buttons 3 To change the program being viewed in the PIP to the main screen press the SW...

Page 45: ...to select Subtitle 5 Press the button to select On 6 Press the EXIT button to clear any menus and return to normal viewing Closed Captions or Teletext is now enabled Note To disable Closed Captions o...

Page 46: ...related to its operation In most cases the MAIN MENU does not need to be accessed All operational control is by way of the Remote Control Unit The MENU Button When pressed the MENU button displays all...

Page 47: ...ce The selected channel service is then displayed in full screen mode after a few seconds Recording 1 Select the Channel Browser from the MAIN MENU or press the ENTER button 2 Press the or buttons to...

Page 48: ...deselect lock press u again 4 Press ENTER The TV channel service is now locked from viewing 5 Press the EXIT button to clear any menus and return to normal viewing To Unlock a Channel Service 1 Select...

Page 49: ...nnel service If required and to deselect lock press v again 4 Press ENTER A confirmation dialogue box is displayed 5 Confirm the delete option by selecting Yes 6 The specified TV channel service is de...

Page 50: ...ndow This will remove the existing Channel Group assignment from the selected channel service 4 Now press any one of the other BLUE buttons to assign a new Channel Group to the selected channel servic...

Page 51: ...1 Select Installation from the MAIN MENU and press ENTER 2 Select Add Carrier using the or buttons 3 Press ENTER or the button Country Australia is selected 4 Select and highlight Carrier Number usin...

Page 52: ...ue box is displayed showing the progress of operation When complete the unit displays the new service 6 Press the EXIT button to clear any menus and return to normal viewing Installation Delete Carrie...

Page 53: ...selected 4 Press ENTER or the button The Set option is displayed 5 Press ENTER 6 The option High Definition HD Aspect Ratio 16 9 is highlighted This is the default selection if you are using the HDMI...

Page 54: ...he resolution that is determined by that specific broadcaster In this case the TV Monitor that is used must support all video resolutions i e 576I 576p 720p and 1080i If you need to change the default...

Page 55: ...ng should be selected 1 While viewing a current channel service press the INFO button twice A dialogue box showing detailed information about the NOW NEXT programs is displayed 2 At the top of dialogu...

Page 56: ...ess ENTER 2 Select Password Settings using the or buttons and press ENTER 3 Old Password is highlighted Enter the digits 0000 4 New Password is highlighted Enter a new four digit number 5 Confirm Pass...

Page 57: ...The GMT Auto option should be selected for normal operation 1 Select Setup from the MAIN MENU and press ENTER 2 Select Time Setting using the or buttons and press ENTER Time Offset is highlighted 3 Pr...

Page 58: ...ample if the C code is specified for blocking only programs with a P rating will be allowed for general viewing and not require password access All other codes below and including C will be blocked an...

Page 59: ...sing the or buttons and press ENTER The Transparency option is highlighted with 20 shown 3 Press the or buttons to select the required transparency and press ENTER 4 Press the EXIT button to clear any...

Page 60: ...5 Press the EXIT button to clear any menus and return to normal viewing OSD Settings Event Notification Event Notification is a feature that can be enabled that informs the viewer of the NEXT program...

Page 61: ...vices Signal Strength should be within the range 70 99 while Signal Quality should be within the range 95 100 1 Select Signal Strength from the MAIN MENU and press ENTER 2 A dialogue box showing the a...

Page 62: ...lect Sort using the or buttons and press ENTER A dialogue box shows the Sort options 3 Alphabetic A Z sorts the Recorded Titles on your HDD in alphabetic order starting with A To confirm this option p...

Page 63: ...he first Recorded Title is highlighted 3 Select a Recorded Title to assign a Genre classification to using the or buttons 4 Press the button A dialogue box showing the Genre classifications is display...

Page 64: ...LOW buttons are used to clear single characters or the full title respectively 5 Enter the new name for the Recorded Title and press the BLUE button to Save and Exit 6 Repeat steps 1 5 for other title...

Page 65: ...permit viewing or Unlocking once the Recorded Title is Locked 1 Select Disc Navigator from the MAIN MENU and press ENTER 2 Select Lock using the or buttons and press ENTER The first Recorded Title is...

Page 66: ...Title starts to play in the Video Preview Window The Record Editing main dialogue box is split into the following sections and shows the Recorded Title information and specific editing options Title S...

Page 67: ...Recorded Title playback commences from the beginning in the Video Preview Window 2 To edit the Recorded Title from the very start of the title press the 9REVERSE CONTROLLED SKIP button until TITLE ST...

Page 68: ...clear any menus and return to normal viewing Book Mark The Book Mark option is used to edit or remove any Bookmarks that were previously inserted while recording or during playback The Book Mark menu...

Page 69: ...n the RCU 6 Press the EXIT button to clear any menus and return to normal viewing Merge The Merge option allows two Recorded Titles to be combined 1 Select Disc Navigator from the MAIN MENU and press...

Page 70: ...ominated buttons on the RCU For detailed information refer to the following sections in this manual Timer Recording main dialogue box Refer to the section To Record Programs Using the Schedule Timers...

Page 71: ...cted Photo The preset time for viewing the photo slideshow can be adjusted in the Photo Viewer Slide Time dialogue box Adjusting the Preset Time 1 Select Photo Viewer from the MAIN MENU and press ENTE...

Page 72: ...d HDD temperature HDD Format Formatting essentially configures the HDD for the recording and storage of data Caution When the HDD format option is used all files stored on the HDD are deleted and cann...

Page 73: ...ip can only be used if the program title is in Chase mode Refer to the section on Chase and Chase Play There are 5 incremental preset times associated with the Forward Skip button including Title Star...

Page 74: ...If required repeat steps 5 6 for the remaining button presets 8 Press the EXIT button to clear any menus and return to normal viewing Reverse Skip During recording or playback the 9Reverse Skip butto...

Page 75: ...The Main Menu 71 About Information associated with the DVR 810 hardware and software including contact details...

Page 76: ...er 2 Single Dual Joint Stereo Stereo ISO IEC 11172 3 Dolby Digital AC 3 Frequency Response 20Hz 20 kHz 2dB Sampling Frequencies 32 44 1 48kHz Audio Connections Audio Analog MPEG 1 Layer 2 Left and Rig...

Page 77: ...THIS IS THE INSIDE REAR COVER PAGE WHICH IS BLANK NO PRINTING ON THIS PAGE...

Page 78: ...a 5 Bookham Street Morley Western Australia Australia 6062 Tel 08 9275 9700 Fax 08 9275 9717 www digitalview com au Digitalview is a business unit of Control Dynamics Pty Ltd www controldynamics com a...

Reviews: