background image

EN-4

90147

gENERal INFoRMaTIoN 

  CONTENTS:  Innova Nasal Vented Mask with headgear

  This product is not manufactured with natural rubber latex

  Rx ONLY    MADE IN U.S.A.

The Innova Vented Nasal Mask is intended to provide an interface for application of positive airway pressure therapy, such 

as CPAP or bilevel. The mask is intended for single patient use in the home or multi-patient use in the hospital or 

institutional environment on adult patients (>66lbs/30kg) for whom CPAP or bilevel therapy has been prescribed. The mask 

has a non-transferable three month limited warranty for manufacturer’s defects from the date of purchase by the initial 

consumer. If a mask used under normal conditions should fail, DeVilbiss will replace the mask or its components. For 

additional information about the DeVilbiss Warranty, please visit http://www.devilbisshealthcare.com.
NOTE:  The mask has a service life of 6 months.
NOTE:  Please dispose of the mask and accessories in accordance with local and regional guidelines. 
NOTE:  THIS PRODUCT IS NOT MANUFACTURED WITH NATURAL RUBBER LATEX 
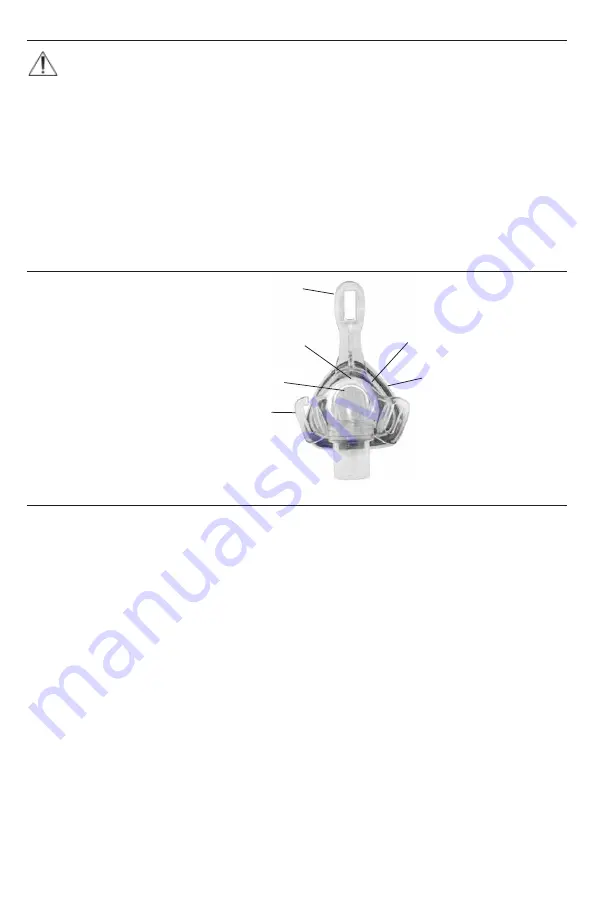
IMpoRTaNT paRTS 

Innova Mask

1.   Touchless Spacebar™

2.   Mask Shell

3.   Airgel™ Cushion

4.   Quick Release Headgear Connector

5.   Vented Elbow Assembly

6.   Active Headgear Connector™

uSER INTRucTIoNS

1.    Remove the mask and the headgear from the package. 

2.    Place the headgear on a table, label side down with the narrowest part close to you.

3.    Set the mask with the gel side down onto the center of the headgear. 

4.    Take each headgear strap and connect it to its respective location on the mask by looping the Velcro strap through 

the headgear slots and attaching it back to itself (Figure 1). 

5.    Once the headgear has been properly attached to the mask, follow the fitting tips below to fit the mask: 

6.    Detach one Velcro strap by sliding the Velcro loop off the quick release hook, slip the headgear over the head and 

center the mask on the face. 

7.    Find the detached Velcro strap and slide the Velcro loop back on the quick release hook (Figure 2). 

8.    Be sure the headgear straps are parallel and the headgear is fully extended and flat across the back of the head 

(Figure 3).

9.    Adjust the bottom headgear straps by using the Velcro tabs. Make sure the Active Headgear Connector is parallel to 

the face and that there is equal tension from the headgear on both sides. After tightening, make sure the Active 

Headgear Connector can move freely (Figure 4).

NOTE:  Do NOT over tighten the headgear.

NOTE:  The Touchless Spacebar will be tilted away from the face after tightening the bottom straps.

10.    Adjust the upper headgear straps by using the tabs. Be sure they are tightened evenly and that the Touchless 

Spacebar is parallel to the forehead (Figure 5).

NOTE: The Touchless Spacebar should NOT touch the forehead. It should be parallel to the forehead (Figure 6).

11.    Adjust the bottom headgear straps to make sure the bottom of the mask is seated comfortably on the face.

12.    For optimal seal and comfort, mask should be snug but not tight. Adjust the tension by detaching the Velcro straps, 

tightening or loosening the straps, and reattaching the Velcro . 

13.    Connect the mask tubing assembly to the positive airway pressure device tubing and turn the device on to the 

prescribed pressure (Figure 7). 

14.    Turn head from side to side while lying on the bed and identify areas of leak that may prevent sleep.

15.    In the event of leaks, tighten the Velcro tabs closest to the area of leak. Do NOT over tighten the headgear.

6

1

3

4

5

2

Summary of Contents for Innova Large 50168

Page 1: ...rand 50168 ATTENTION En vertu de la loi f d rale am ricaine cet appareil ne peut tre vendu que par un m decin ou sur ordonnance de ce dernier Fabriqu aux Etats Unis Fabriqu sans latex DE Innova Nasenm...

Page 2: ...90147 2 1 2 3 4 5 6 7 figures X p...

Page 3: ...hen the positive airway pressure device is turned on and functioning properly new air from the device flushes the exhaled air out through the mask s vent holes When the positive airway pressure device...

Page 4: ...self Figure 1 5 Once the headgear has been properly attached to the mask follow the fitting tips below to fit the mask 6 Detach one Velcro strap by sliding the Velcro loop off the quick release hook s...

Page 5: ...arranty does not cover these types of product failures Therefore please handle your new mask with care Weekly Cleaning if desired The Innova Mask is dishwasher safe if placed in top rack small compone...

Page 6: ...n positiva de las v as a reas est encendido y funcionando adecuadamente el aire nuevo que entra del dispositivo limpia el aire espirado por los orificios de ventilaci n de la m scara Cuando el disposi...

Page 7: ...jo en el centro del casco 4 Sujete cada correa del casco y f jela a su ubicaci n respectiva en la m scara introduciendo la correa de Velcro por las ranuras del casco y fij ndola sobre s misma Figura 1...

Page 8: ...perder en condiciones normales de uso y siguiendo los procedimientos de limpieza y mantenimiento recomendados pero no es indestructible Su manipulaci n indebida o forzada puede desprenderlo cortarlo o...

Page 9: ...n expiratoire positive est en marche et fonctionne convenablement l air frais qui entre dans le dispositif chasse l air expir par les fentes du masque Toutefois si le dispositif de pression expiratoir...

Page 10: ...Placer le casque sur une table l tiquette dirig e vers le bas avec la partie la plus troite pr s de vous 3 Placer le masque avec le gel dirig vers le bas sur le centre du casque 4 Prendre les sangles...

Page 11: ...fuit pas ou ne se d tache pas du masque dans des conditions normales d utilisation et pour autant que les protocoles de nettoyage et d entretien recommand s soient observ s Toutefois le coussinet de g...

Page 12: ...nktioniert verdr ngt die Frischluft vom Ger t die ausgeatmete Luft durch die Entl ftungs ffnungen der Maske Wenn das berdruckatmungsger t jedoch nicht funktioniert kann die ausgeatmete Luft wieder ein...

Page 13: ...es Kopfgurtes 4 Befestigen Sie die Riemen des Kopfgurtes an ihren entsprechenden Anschl ssen an der Maske indem Sie den Klettverschluss als Schlaufe durch die Kopfgurtschlitze ziehen und an seiner R c...

Page 14: ...iegt Hinweis Obwohl sich das Gelkissen seidig anf hlt reisst leckt bzw trennt es sich bei nor maler Verwendung und bei Befolgung der empfohlenen Reinigungs und Wartungs protokolle nicht von der Maske...

Page 15: ...ispositivo di pressione positiva per le vie respiratorie attivo e funziona correttamente l aria nuova del dispositivo fa scorrere l aria espirata attraverso i fori di sfiato della maschera Tuttavia se...

Page 16: ...una delle cinghiette della cuffia alla maschera nei punti indicati facendo passare le parti in Velcro attraverso i fori della cuffia ed unendole sulla parte posteriore Figura 1 5 Dopo aver collegato i...

Page 17: ...e manutenzione consigliate di seguito Tuttavia l imbottitura in gel non indistruttibile e pu lacerarsi tagliarsi e strapparsi se utilizzata in modo errato La garanzia non copre questo tipo di difetti...

Reviews: