3. Maintenance and troubleshooting
MERMAID E1100-I
STD00
Page 29 of 54
Reassemble the seals support unit as shown in fig. 42
– 43, replacing components
(fig.43, position 1, 2, 3)
Assemble the support - liner unit by manually screwing the M 6x40 screws (fig .44) then proceed
with calibration using a torque wrench.
Summary of Contents for MERMAID E1100-I
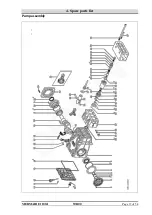
Page 38: ...4 Spare parts list MERMAID E1100 I STD00 Page 37 of 54 Pump assembly ...
Page 46: ...4 Spare parts list MERMAID E1100 I STD00 Page 45 of 54 ...
Page 47: ...4 Spare parts list MERMAID E1100 I STD00 Page 46 of 54 ...
Page 53: ...5 Wiring Diagram MERMAID E1100 I STD00 Page 52 of 54 5 Wiring Diagram ...


