


Installing System Board Options
6-11
2.
Remove the computer cover according to the
instructions in “Removing the Computer Cover”
in Chapter 5.
3.
To access the battery on the system board, remove
the expansion-card cage as described in “Remov-
ing the Expansion-Card Cage” in Chapter 5.
4.
Locate the battery and remove it.
The battery (see Figure 6-1) is mounted in a socket
labeled “BATTERY” at the back left corner of the
system board (as you face the front of the system).
Pry the battery out of its socket with your fingers or
with a blunt, nonconductive object, such as a plastic
screwdriver.
5.
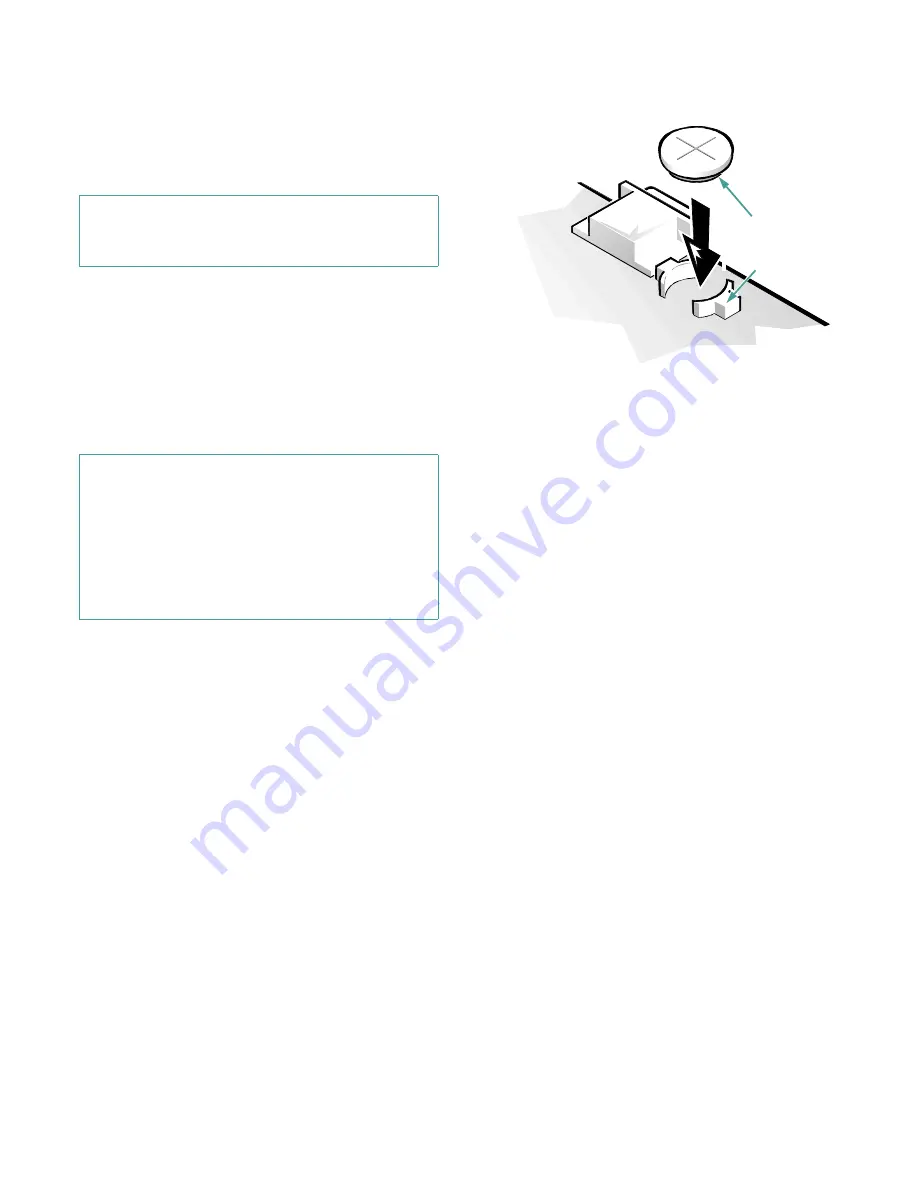
Install the new battery.
Orient the battery with the side labeled “+” facing up
(see Figure 6-14). Then insert the battery into the
socket, and snap it into place.
Figure 6-14. System Battery and Battery
Socket
6.
Replace the expansion-card cage as described in
“Replacing the Expansion-Card Cage” in Chap-
ter 5.
7.
Replace the computer cover; reconnect your com-
puter and peripherals to their power sources, and
turn them on.
8.
Enter the System Setup program, and confirm
that the battery is operating properly.
See Chapter 2, “Using the System Setup Program,”
for information on running the System Setup
program.
Enter the correct time and date through the System
Setup program’s
TIME
and
DATE
categories. Also, use
the copy you made in step 1 to restore the correct set-
tings for other system configuration information.
Then exit the System Setup program.
9.
Turn your computer off, and unplug it for at least
ten minutes.
10. After ten minutes, plug in the computer, turn it
on, and enter the System Setup program. If the
time and date are still incorrect, see the chapter
titled “Getting Help” in your Diagnostics and Trou-
bleshooting Guide for instructions on obtaining
technical assistance.
CAUTION: See “Protecting Against Electro-
static Discharge” in the safety instructions at
the front of this guide.
CAUTION: If you pry the battery out of its
socket with a blunt object, be careful not to
touch the system board with the object. Make
certain that the object is inserted between the
battery and the socket before attempting to pry
the battery out. Otherwise, you may damage
the system board by prying off the socket or by
breaking circuit traces on the system board.
BATTERY
socket
battery
Summary of Contents for OptiPlex GXi
Page 1: ... Dell OptiPlex GXi Midsize Systems REFERENCE AND INSTALLATION GUIDE Model DCM ...
Page 2: ......
Page 3: ... Dell OptiPlex GXi Midsize Systems REFERENCE AND INSTALLATION GUIDE ...
Page 8: ...viii ...
Page 12: ...xii ...
Page 23: ...xxiii ...
Page 24: ...xxiv ...
Page 56: ...3 12 Dell OptiPlex GXi Midsize Systems Reference and Installation Guide ...
Page 64: ...4 8 Dell OptiPlex GXi Midsize Systems Reference and Installation Guide ...
Page 73: ...Working Inside Your Computer 5 9 Figure 5 7 System Board Jumpers jumpered unjumpered ...
Page 75: ...Working Inside Your Computer 5 11 ...
Page 90: ...6 12 Dell OptiPlex GXi Midsize Systems Reference and Installation Guide ...
Page 104: ...7 14 Dell OptiPlex GXi Midsize Systems Reference and Installation Guide ...
Page 110: ...A 6 Dell OptiPlex GXi Midsize Systems Reference and Installation Guide ...
Page 120: ...B 10 Dell OptiPlex GXi Midsize Systems Reference and Installation Guide ...
Page 126: ...C 6 Dell OptiPlex GXi Midsize Systems Reference and Installation Guide ...
Page 139: ......
Page 140: ... Printed in the U S A P N 50577 ...