


Troubleshooting Tools and Utilities
317
Diagnostic Lights
CAUTION:
Before you begin any of the procedures in this section, follow the safety instructions
located in the
Product Information Guide
.
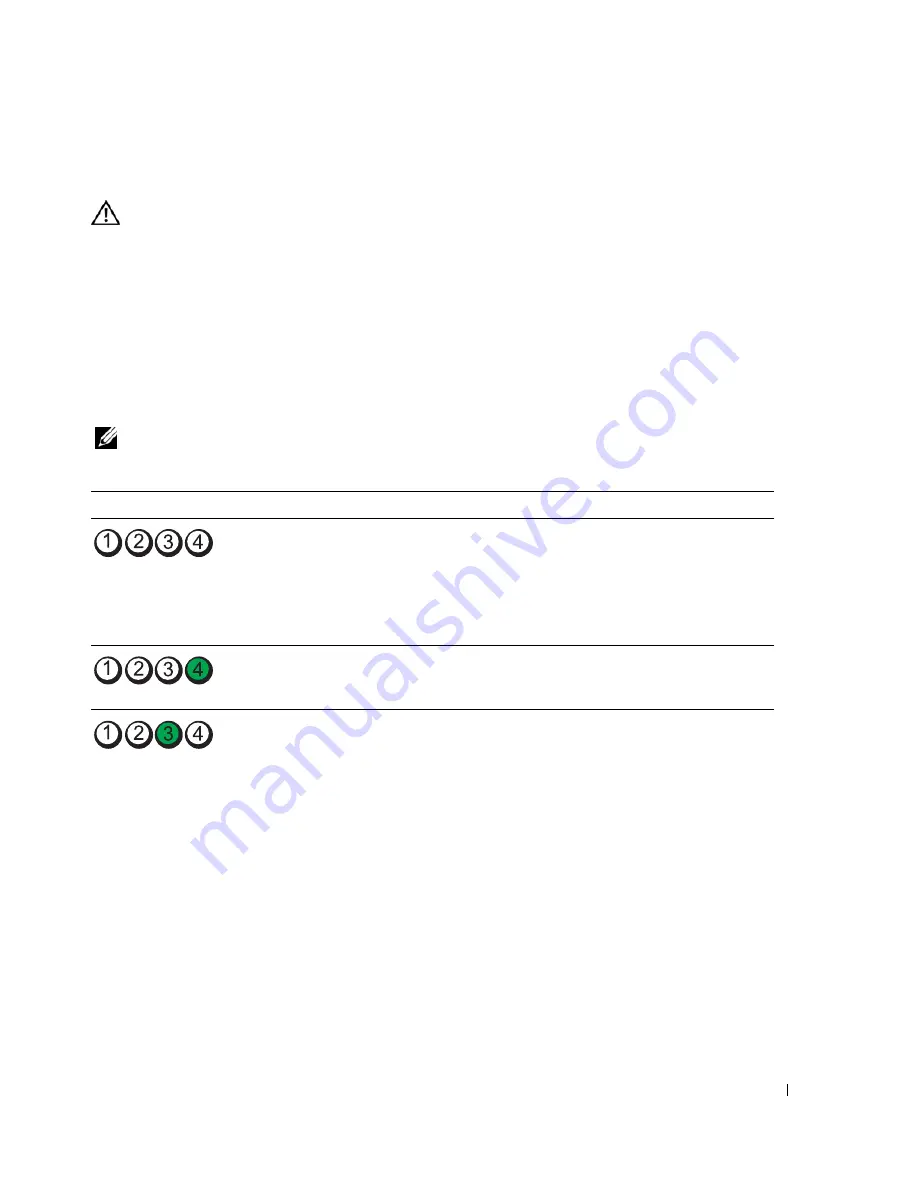
To help you troubleshoot a problem, your computer has four lights labeled "1," "2," "3," and "4"on the
front or back panel. The lights can be off or green. When the computer starts normally, the patterns or
codes on the lights change as the boot process completes. When the computer starts normally, the
patterns or codes on the lights change as the boot process completes. If the POST portion of system
boot completes successfully, all four lights display solid green. If the computer malfunctions during
the POST process, the pattern displayed on the LEDs may help identify where in the process the
computer halted.
NOTE:
The orientation of the diagnostic lights may vary depending on the system type. The diagnostic
lights can appear either vertical or horizontal.
Light Pattern
Problem Description
Suggested Resolution
The computer is in a normal "off"
condition, or a possible pre-BIOS failure
has occurred.
The diagnostic lights are not lit after the
computer successfully boots to the
operating system.
Plug the computer into a working electrical
outlet and press the power button.
A possible BIOS failure has occurred; the
computer is in the recovery mode.
Run the BIOS Recovery utility, wait for
recovery completion, and then restart the
computer.
A possible processor failure has occurred.
Reinstall the processor and restart the
computer.
Summary of Contents for GX620 - 3.6GHz Desktop 1GB RAM 80GB Windows XP SFF
Page 1: ...1 Dell OptiPlex GX620 User s Guide ...
Page 14: ...14 Contents ...
Page 22: ...22 Chassis Intrusion Switch w w w d e l l c o m s u p p o r t d e l l c o m Desktop Computer ...
Page 23: ...Chassis Intrusion Switch 23 Small Form Factor Computer ...
Page 27: ...27 Mini Tower Computer w w w d e l l c o m s u p p o r t d e l l c o m Back View 4 3 5 6 2 1 ...
Page 40: ...40 w w w d e l l c o m s u p p o r t d e l l c o m ...
Page 64: ...64 w w w d e l l c o m s u p p o r t d e l l c o m ...
Page 65: ...65 ...
Page 66: ...66 w w w d e l l c o m s u p p o r t d e l l c o m ...
Page 82: ...82 w w w d e l l c o m s u p p o r t d e l l c o m ...
Page 90: ...90 w w w d e l l c o m s u p p o r t d e l l c o m ...
Page 96: ...96 w w w d e l l c o m s u p p o r t d e l l c o m ...
Page 144: ...144 w w w d e l l c o m s u p p o r t d e l l c o m ...
Page 151: ...151 2 COM Black 3 5 VDC Red 4 COM Black 5 12 VDC Yellow Pin Number Signal name 18 AWG Wire ...
Page 152: ...152 w w w d e l l c o m s u p p o r t d e l l c o m ...
Page 170: ...170 w w w d e l l c o m s u p p o r t d e l l c o m ...
Page 196: ...196 w w w d e l l c o m s u p p o r t d e l l c o m ...
Page 212: ...212 Ultra Small Form Factor Computer w w w d e l l c o m s u p p o r t d e l l c o m ...
Page 218: ...218 w w w d e l l c o m s u p p o r t d e l l c o m ...
Page 220: ...220 w w w d e l l c o m s u p p o r t d e l l c o m ...
Page 225: ...225 1 bottom of computer 2 device locking screw 1 2 ...
Page 226: ...226 w w w d e l l c o m s u p p o r t d e l l c o m ...
Page 238: ...238 w w w d e l l c o m s u p p o r t d e l l c o m ...
Page 255: ...Advanced Features 255 Small Form Computer Ultra Small Form Factor Computer ...
Page 262: ...262 Battery w w w d e l l c o m s u p p o r t d e l l c o m ...
Page 274: ...274 Replacing the Computer Cover w w w d e l l c o m s u p p o r t d e l l c o m ...
Page 302: ...302 Microsoft Windows XP Features w w w d e l l c o m s u p p o r t d e l l c o m ...
Page 326: ...326 Troubleshooting Tools and Utilities w w w d e l l c o m s u p p o r t d e l l c o m ...
Page 350: ...350 Warranty w w w d e l l c o m s u p p o r t d e l l c o m ...


