


133
8
Lower the card retention latch and press it into place, securing the card(s) in the computer.
9
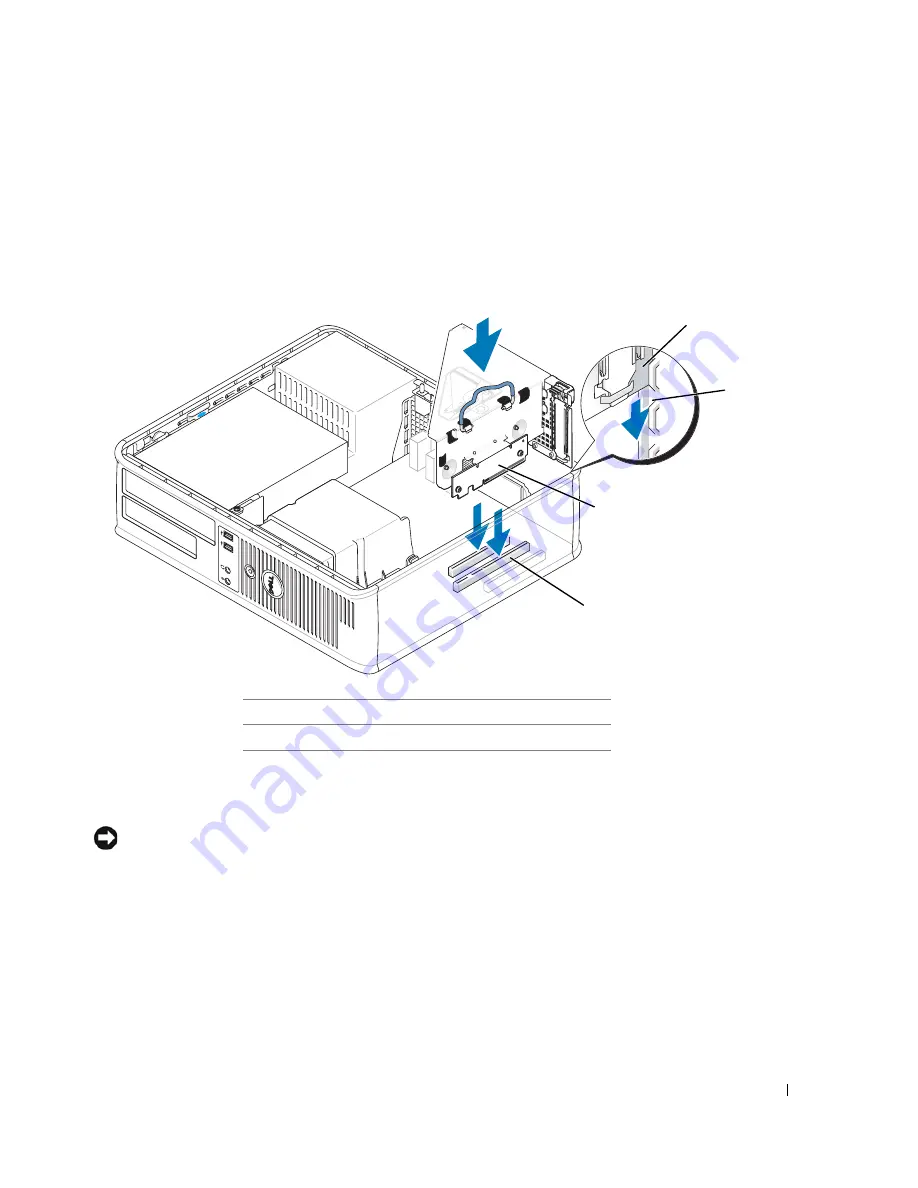
Replace the riser-card cage:
a
Align the tabs in the side of the riser-card cage with the slots on the side of the computer, and
slide the riser-card cage down into place.
b
Ensure that the riser cards are fully seated in the connectors on the system board.
10
Reconnect any cables that you removed in step 3.
11
Connect any cables that should be attached to the card.
NOTICE:
Do not route card cables over or behind the cards. Cables routed over the cards can prevent
the computer cover from closing properly or cause damage to the equipment.
12
Replace the computer cover
.
13
If you installed a sound card, perform the following steps:
a
Enter system setup
, select
Audio Controller
, and change the setting to
Off
.
b
Connect external audio devices to the sound card’s connectors. Do not connect external
audio devices to the microphone, speaker/headphone, or line-in connectors on the back
panel.
14
If you installed an network adapter card and want to turn off the integrated network adapter:
1
riser-card cage
3
riser cards (2)
2
slots
4
system board connectors (2)
1
2
4
3
Summary of Contents for GX620 - 3.6GHz Desktop 1GB RAM 80GB Windows XP SFF
Page 1: ...1 Dell OptiPlex GX620 User s Guide ...
Page 14: ...14 Contents ...
Page 22: ...22 Chassis Intrusion Switch w w w d e l l c o m s u p p o r t d e l l c o m Desktop Computer ...
Page 23: ...Chassis Intrusion Switch 23 Small Form Factor Computer ...
Page 27: ...27 Mini Tower Computer w w w d e l l c o m s u p p o r t d e l l c o m Back View 4 3 5 6 2 1 ...
Page 40: ...40 w w w d e l l c o m s u p p o r t d e l l c o m ...
Page 64: ...64 w w w d e l l c o m s u p p o r t d e l l c o m ...
Page 65: ...65 ...
Page 66: ...66 w w w d e l l c o m s u p p o r t d e l l c o m ...
Page 82: ...82 w w w d e l l c o m s u p p o r t d e l l c o m ...
Page 90: ...90 w w w d e l l c o m s u p p o r t d e l l c o m ...
Page 96: ...96 w w w d e l l c o m s u p p o r t d e l l c o m ...
Page 144: ...144 w w w d e l l c o m s u p p o r t d e l l c o m ...
Page 151: ...151 2 COM Black 3 5 VDC Red 4 COM Black 5 12 VDC Yellow Pin Number Signal name 18 AWG Wire ...
Page 152: ...152 w w w d e l l c o m s u p p o r t d e l l c o m ...
Page 170: ...170 w w w d e l l c o m s u p p o r t d e l l c o m ...
Page 196: ...196 w w w d e l l c o m s u p p o r t d e l l c o m ...
Page 212: ...212 Ultra Small Form Factor Computer w w w d e l l c o m s u p p o r t d e l l c o m ...
Page 218: ...218 w w w d e l l c o m s u p p o r t d e l l c o m ...
Page 220: ...220 w w w d e l l c o m s u p p o r t d e l l c o m ...
Page 225: ...225 1 bottom of computer 2 device locking screw 1 2 ...
Page 226: ...226 w w w d e l l c o m s u p p o r t d e l l c o m ...
Page 238: ...238 w w w d e l l c o m s u p p o r t d e l l c o m ...
Page 255: ...Advanced Features 255 Small Form Computer Ultra Small Form Factor Computer ...
Page 262: ...262 Battery w w w d e l l c o m s u p p o r t d e l l c o m ...
Page 274: ...274 Replacing the Computer Cover w w w d e l l c o m s u p p o r t d e l l c o m ...
Page 302: ...302 Microsoft Windows XP Features w w w d e l l c o m s u p p o r t d e l l c o m ...
Page 326: ...326 Troubleshooting Tools and Utilities w w w d e l l c o m s u p p o r t d e l l c o m ...
Page 350: ...350 Warranty w w w d e l l c o m s u p p o r t d e l l c o m ...


