92
Installing System Components
5
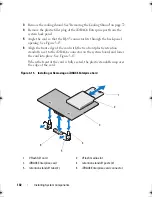
Open the expansion-card latch and remove the filler bracket.
See Figure 3-11.
NOTE:
Keep this bracket in case you need to remove the expansion card.
Filler brackets must be installed over empty expansion-card slots to maintain
FCC certification of the system. The brackets also keep dust and dirt out of the
system and aid in proper cooling and airflow inside the system.
6
Holding the card by its edges, position the card so that the card-edge
connector aligns with the expansion-card connector on the expansion-card
riser.
7
Insert the card-edge connector firmly into the expansion-card connector
until the card is fully seated.
8
Close the expansion-card latch. See Figure 3-11.
Figure 3-11.
Installing or Removing an Expansion Card
9
Connect any cables to the expansion card.
1
expansion-card riser
2
expansion-card latch
3
expansion card
3
2
1
book.book Page 92 Friday, February 26, 2010 11:22 AM
Summary of Contents for DX6012S
Page 10: ...10 Contents ...
Page 40: ...40 About Your System ...
Page 62: ...66 Using the System Setup Program and UEFI Boot Manager ...
Page 118: ...122 Installing System Components ...
Page 134: ...144 Troubleshooting Your System ...
Page 144: ...154 Jumpers and Connectors ...
Page 146: ...156 Getting Help ...
Page 152: ...162 Index ...


