background image

With today's ever increasing demands placed on data transfers with high-definition video content, terabyte storage devices, high 
megapixel count digital cameras etc., USB 2.0 may not be fast enough. Furthermore, no USB 2.0 connection could ever come close to the 
480Mbps theoretical maximum throughput, making data transfer at around 320 Mbps (40 MB/s) — the actual real-world maximum. 
Similarly, USB 3.0/USB 3.1 Gen 1 connections will never achieve 4.8Gbps. We will likely see a real-world maximum rate of 400MB/s with 
overheads. At this speed, USB 3.0/USB 3.1 Gen 1 is a 10x improvement over USB 2.0.

Applications

USB 3.0/USB 3.1 Gen 1 opens up the laneways and provides more headroom for devices to deliver a better overall experience. Where USB 
video was barely tolerable previously (both from a maximum resolution, latency, and video compression perspective), it's easy to imagine 
that with 5-10 times the bandwidth available, USB video solutions should work that much better. Single-link DVI requires almost 2Gbps 
throughput. Where 480Mbps was limiting, 5Gbps is more than promising. With its promised 4.8Gbps speed, the standard will find its way 
into some products that previously weren't USB territory, like external RAID storage systems.

Listed below are some of the available SuperSpeed USB 3.0/USB 3.1 Gen 1 products:

External Desktop USB 3.0/USB 3.1 Gen 1 Hard Drives

Portable USB 3.0/USB 3.1 Gen 1 Hard Drives

USB 3.0/USB 3.1 Gen 1 Drive Docks & Adapters

USB 3.0/USB 3.1 Gen 1 Flash Drives & Readers

USB 3.0/USB 3.1 Gen 1 Solid-state Drives

USB 3.0/USB 3.1 Gen 1 RAIDs

Optical Media Drives

Multimedia Devices

Networking

USB 3.0/USB 3.1 Gen 1 Adapter Cards & Hubs

Compatibility

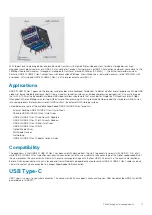
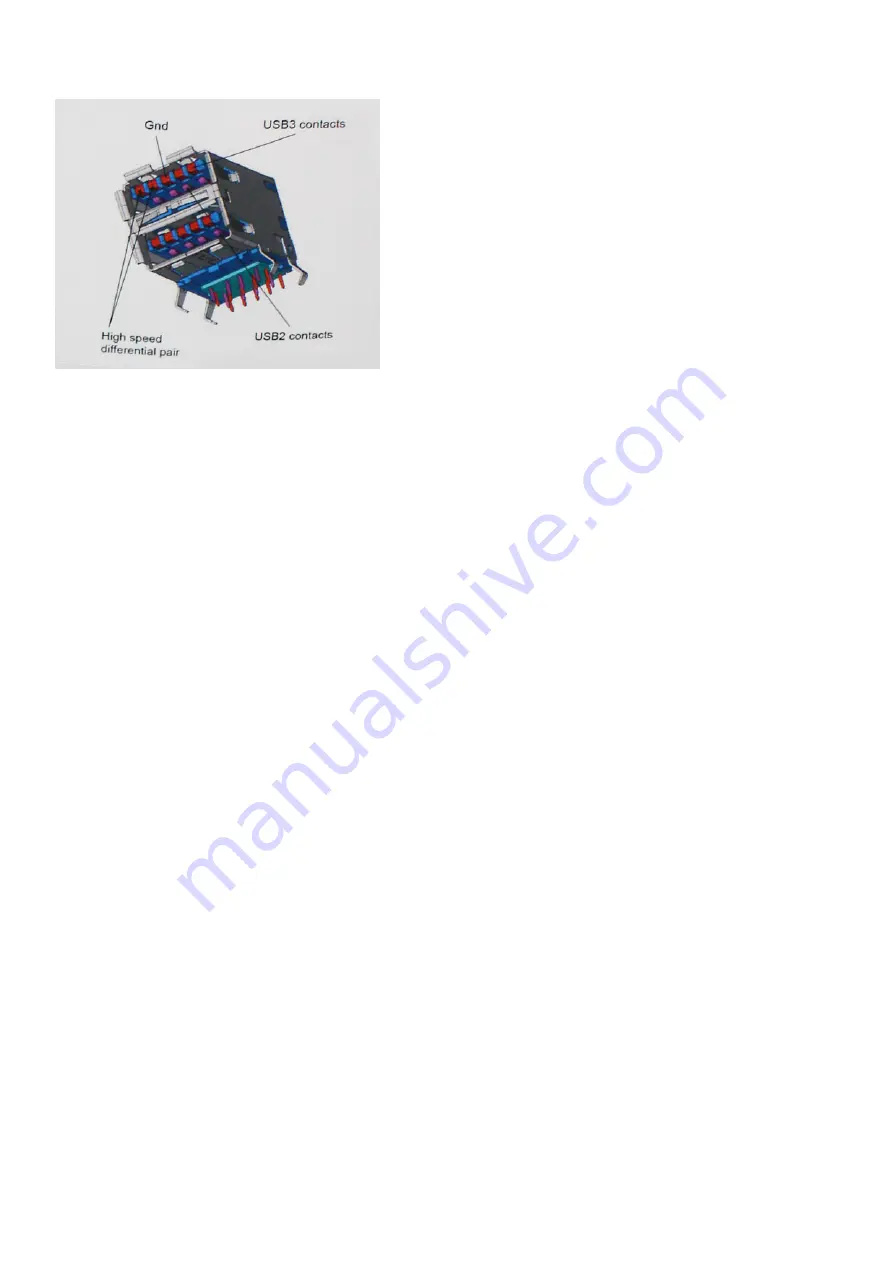
The good news is that USB 3.0/USB 3.1 Gen 1 has been carefully planned from the start to peacefully co-exist with USB 2.0. First of all, 
while USB 3.0/USB 3.1 Gen 1 specifies new physical connections and thus new cables to take advantage of the higher speed capability of 
the new protocol, the connector itself remains the same rectangular shape with the four USB 2.0 contacts in the exact same location as 
before. Five new connections to carry receive and transmitted data independently are present on USB 3.0/USB 3.1 Gen 1 cables and only 
come into contact when connected to a proper SuperSpeed USB connection.

USB Type-C

USB Type-C is a new, tiny physical connector. The connector itself can support various exciting new USB standards like USB 3.1 and USB 
power delivery (USB PD).

Technology and components

11

Summary of Contents for D11S

Page 1: ...Dell Precision 3431 Small Form Factor Service Manual Regulatory Model D11S Regulatory Type D11S004 ...

Page 2: ...amage to hardware or loss of data and tells you how to avoid the problem WARNING A WARNING indicates a potential for property damage personal injury or death 2019 Dell Inc or its subsidiaries All rights reserved Dell EMC and other trademarks are trademarks of Dell Inc or its subsidiaries Other trademarks may be trademarks of their respective owners 2020 01 Rev A01 ...

Page 3: ... 19 Installing the side cover 20 Expansion card 21 Removing expansion card 21 Installing the expansion card 22 Coin cell battery 23 Removing coin cell battery 23 Installing the coin cell battery 24 Hard drive assembly 25 Removing the hard drive assembly 25 Installing the hard drive assembly 27 Front Bezel 28 Removing front bezel 28 Installing front bezel 29 Hard drive and optical drive module 30 R...

Page 4: ...SD card reader 56 Internal Antenna optional 57 Removing the Internal Antenna 57 Installing the Internal Antenna 60 External Antenna optional 65 Removing the External Antenna 65 Installing the External Antenna 68 M 2 2230 WLAN card optional 73 Removing the M 2 2230 WLAN card 73 Installing the M 2 2230 WLAN card 74 Power supply unit 75 Removing power supply unit or PSU 75 Installing the power supply...

Page 5: ...96 Contacting Dell 96 A Dust Filter for Dell Precision 3431 Small Form Factor 97 B Installing the USB Type C card 99 C Installing the VGA card 112 D Cable cover for Dell Precision 3431 Small Form Factor 125 Contents 5 ...

Page 6: ...lectrostatic discharge ground yourself by using a wrist grounding strap or by periodically touching an unpainted metal surface at the same time as touching a connector on the back of the computer CAUTION Handle components and cards with care Do not touch the components or contacts on a card Hold a card by its edges or by its metal mounting bracket Hold a component such as a processor by its edges ...

Page 7: ...e cable from the network device 5 Disconnect your computer and all attached devices from their electrical outlets 6 Press and hold the power button while the computer is unplugged to ground the system board NOTE To avoid electrostatic discharge ground yourself by using a wrist grounding strap or by periodically touching an unpainted metal surface at the same time as touching a connector on the bac...

Page 8: ...raphics 630 Intel Core Processor i7 9700 8 Cores 12MB 8T up to 4 9GHz 95W Intel UHD Graphics 630 Intel Core Processor i9 9900 8 Cores 16MB 16T up to 5 0GHz 95W Intel UHD Graphics 630 Intel Pentium Gold G5420 2 Cores 4MB Cache 3 8GHz Intel UHD Graphics 630 Intel Xeon E Processor E 2224 4 Core 8MB Cache 3 4GHz 4 6GHz Turbo NA Intel Xeon E Processor E 2224G 4 Core 8MB Cache 3 5GHz 4 7GHz Turbo Intel ...

Page 9: ...mory Deep power down mode is expected to reduce standby power consumption by 40 to 50 percent DDR4 Details There are subtle differences between DDR3 and DDR4 memory modules as listed below Key notch difference The key notch on a DDR4 module is in a different location from the key notch on a DDR3 module Both notches are on the insertion edge but the notch location on the DDR4 is slightly different ...

Page 10: ... as follows Higher transfer rates up to 5 Gbps Increased maximum bus power and increased device current draw to better accommodate power hungry devices New power management features Full duplex data transfers and support for new transfer types Backward USB 2 0 compatibility New connectors and cable The topics below cover some of the most commonly asked questions regarding USB 3 0 USB 3 1 Gen 1 Spe...

Page 11: ...to some products that previously weren t USB territory like external RAID storage systems Listed below are some of the available SuperSpeed USB 3 0 USB 3 1 Gen 1 products External Desktop USB 3 0 USB 3 1 Gen 1 Hard Drives Portable USB 3 0 USB 3 1 Gen 1 Hard Drives USB 3 0 USB 3 1 Gen 1 Drive Docks Adapters USB 3 0 USB 3 1 Gen 1 Flash Drives Readers USB 3 0 USB 3 1 Gen 1 Solid state Drives USB 3 0 ...

Page 12: ... the device and the cable have to support USB Power Delivery Just having a USB Type C connection doesn t necessarily mean they do USB Type C and USB 3 1 USB 3 1 is a new USB standard USB 3 s theoretical bandwidth is 5 Gbps while USB 3 1 s is 10 Gbps That s double the bandwidth as fast as a first generation Thunderbolt connector USB Type C isn t the same thing as USB 3 1 USB Type C is just a connec...

Page 13: ... take full advantage of their IP enabled devices without a separate Ethernet cable Audio Return Channel Allows an HDMI connected TV with a built in tuner to send audio data upstream to a surround audio system eliminating the need for a separate audio cable 3D Defines input output protocols for major 3D video formats paving the way for true 3D gaming and 3D home theater applications Content Type Re...

Page 14: ...video source such as a DVD player and the DTV enabling new functionality Advantages of DisplayPort over USB Type C Full DisplayPort audio video A V performance up to 4K at 60Hz Reversible plug orientation and cable direction Backwards compatibility to VGA DVI with adaptors SuperSpeed USB USB 3 1 data Supports HDMI 2 0a and is backwards compatible with previous versions 14 Technology and components...

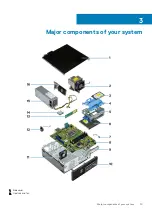
Page 15: ...Major components of your system 1 Side cover 2 Heatsink and fan 3 Major components of your system 15 ...

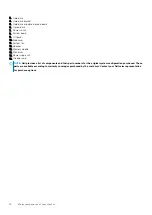
Page 16: ...peaker 13 Memory module 14 Processor 15 Power supply unit 16 Graphics card NOTE Dell provides a list of components and their part numbers for the original system configuration purchased These parts are available according to warranty coverages purchased by the customer Contact your Dell sales representative for purchase options 16 Major components of your system ...

Page 17: ...e Solid State Drive SSD Intel Optane card SD card reader optional Internal Antenna optional External Antenna optional M 2 2230 WLAN card optional Power supply unit Speaker System fan System board Recommended tools The procedures in this document require the following tools Phillips 0 screwdriver Phillips 1 screwdriver Philips 2 screwdriver Plastic scribe T 30 torx screwdriver NOTE The 0 screw driv...

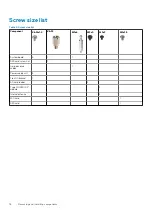
Page 18: ...x1 4 6 32 M3x6 M3x5 M3x3 M2x3 5 System board 5 1 1 SSD card screw nut 1 Hard disk drive caddy 1 Power supply unit 3 Front IO bracket 1 SD card reader 2 Type C HDMI DP module 2 Internal antenna 2 Wifi card 1 SSD card 1 18 Removing and Installing components ...

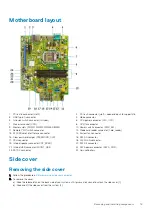
Page 19: ...ptane connector 14 System fan connector 15 Clear password jumper PASSWORD_CLR 16 SATA 0 connector 17 PSU connector 18 M 2 WLAN connector 19 Internal speaker connector INT_SPKR 20 SATA 3 connector 21 Internal USB connector FRONT_USB 22 SATA power connector SATA_PWR 23 SATA 2 connector 24 Coin cell battery Side cover Removing the side cover 1 Follow the procedure in Before working inside your comput...

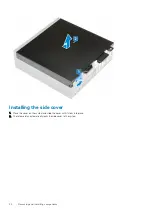
Page 20: ...lling the side cover 1 Place the cover on the system and slide the cover until it clicks into place 2 The release latch automatically locks the side cover to the system 20 Removing and Installing components ...

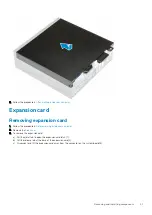
Page 21: ...efore working inside your computer 2 Remove the Side cover 3 To remove the expansion card a Pull the metal tab to open the expansion card latch 1 b Pull the release tab at the base of the expansion card 2 c Disconnect and lift the expansion card away from the connector on the system board 3 Removing and Installing components 21 ...

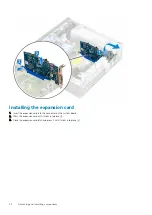
Page 22: ...Insert the expansion card into the connector on the system board 2 Press the expansion card until it clicks into place 1 3 Close the expansion card latch and press it until it clicks into place 2 22 Removing and Installing components ...

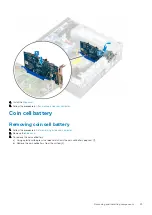
Page 23: ... coin cell battery 1 Follow the procedure in Before working inside your computer 2 Remove the Side cover 3 To remove the coin cell battery a Using a plastic scribe press the release latch until the coin cell battery pops out 1 b Remove the coin cell battery from the system 2 Removing and Installing components 23 ...

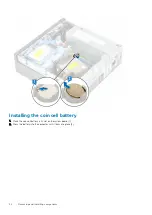
Page 24: ...Installing the coin cell battery 1 Place the coin cell battery in its slot on the system board 1 2 Press the battery into the connector until it locks into place 2 24 Removing and Installing components ...

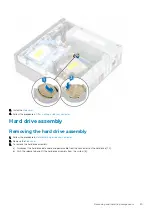
Page 25: ...mbly 1 Follow the procedure in Before working inside your computer 2 Remove the Side cover 3 To remove the hard drive assembly a Disconnect the hard drive data cable and power cable from the connectors on the hard drive 1 2 b Push the release tab and lift the hard drive assembly from the system 3 Removing and Installing components 25 ...

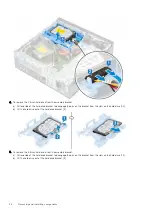
Page 26: ...slots on the hard drive 1 2 b Lift the hard drive out of the hard drive bracket 3 5 To remove the 3 5 inch hard drive from the assembly bracket a Pull one side of the hard drive bracket to disengage the pins on the bracket from the slots on the hard drive 1 2 b Lift the hard drive out of the hard drive bracket 3 26 Removing and Installing components ...

Page 27: ...et 2 2 To replace the 3 5 inch hard drive from the assembly bracket a Align the tabs on the hard drive with the slots on the hard drive assembly at a 30 degree angle 1 b Press the hard drive so that it gets secured to the hard drive assembly bracket 2 3 To replace the hard drive assembly a Insert the hard drive assembly into the slot on the system 1 2 b Connect the power cable and hard drive cable...

Page 28: ...e procedure in Before working inside your computer 2 Remove the Side cover 3 To remove the front bezel a Pry the retention tabs to release the front bezel from the system 1 and pull to release the hooks on the front bezel from the front panel slots 2 b Remove the front bezel from the system 3 28 Removing and Installing components ...

Page 29: ...d insert the retention tabs on the bezel into the slots on the system 2 Press the bezel until the tabs clicks into place 3 Install the Side cover 4 Follow the procedure in After working inside your computer Removing and Installing components 29 ...

Page 30: ...ard drive and optical drive module a Disconnect the hard drive data cable and power cable from the connectors on the hard drive 1 2 b Slide the release tab to unlock the hard drive and optical module 3 c Unroute the hard drive cables 1 and optical drive cables 2 through the retention clip and HDD ODD release tab respectively d Lift the hard drive and optical module 3 30 Removing and Installing com...

Page 31: ...rive module a Disconnect the optical drive data cable and optical drive power cable from the connectors on the optical drive 1 2 b Slide and lift the hard drive and optical drive module from the system 3 Removing and Installing components 31 ...

Page 32: ... optical drive module into the slot on the system at a 30 degree angle 1 2 Connect the optical drive data cable and power cable to the connectors on the optical drive 2 3 3 Lower the hard drive and optical drive module so that it is placed in its slot 4 32 Removing and Installing components ...

Page 33: ...4 Route the optical drive data cable and power cable through the retention clips 1 5 Route the hard drive data and power cables through the HDD ODD release tab 2 Removing and Installing components 33 ...

Page 34: ...6 Slide the release tab to lock the module 1 7 Connect the hard drive data cable and power cable from the connectors on the hard drive 2 3 34 Removing and Installing components ...

Page 35: ...edure in Before working inside your computer 2 Remove the a Side cover b Front bezel 3 To remove the optical drive a Disconnect the hard drive data cable and power cable from the connectors on the hard drive 1 2 b Slide the release tab to unlock the hard drive and optical module 3 c Lift the hard drive and optical module 4 Removing and Installing components 35 ...

Page 36: ...ect the optical drive data cable and optical drive power cable from the connectors on the optical drive 1 2 and lower the hard drive and optical module until it is seated 3 36 Removing and Installing components ...

Page 37: ...e Press and push the release latch on the optical drive 1 2 and pull the optical drive out from the system 3 Removing and Installing components 37 ...

Page 38: ...Installing the optical drive 1 Slide the optical drive into its slot in the system 1 2 Lift the hard drive and optical module 2 38 Removing and Installing components ...

Page 39: ...3 Connect the optical drive data cable and power cable to the connectors on the optical drive 1 2 4 Place the hard drive and optical module back on the system 3 Removing and Installing components 39 ...

Page 40: ...5 Connect the hard drive data cable and hard drive power cable to the connectors on the hard drive 1 2 6 Slide the release tab to lock the module 3 4 40 Removing and Installing components ...

Page 41: ...low the procedure in Before working inside your computer 2 Remove the a Side cover b Front bezel c Hard drive and optical drive module 3 To remove the memory module a Pry open the retention tabs from both sides to lift the memory module from the connector 1 b Remove the memory module from the system board 2 Removing and Installing components 41 ...

Page 42: ...h on the memory module with the tab on the memory module connector 2 Insert the memory module into the memory module socket 1 3 Press the memory module until the memory module retention tabs click into place 2 42 Removing and Installing components ...

Page 43: ...fore working inside your computer 2 Remove the a Side cover b Front bezel c Hard drive and optical drive module 3 To remove the heat sink with fan a Disconnect the heat sink fan cable from the system board 1 b Loosen the 4 captive screws that secure the heat sink 2 and lift it away from the system 3 NOTE Loosen the screws in a sequential order 1 2 3 4 as mentioned on the system board Removing and ...

Page 44: ...fan away from the heat sink Installing heat sink and heat sink fan 1 To install the heat sink fan a Align and place the slots on the fan to the slots on the heat sink module b Replace the four screws to secure the heat sink fan to the heat sink 44 Removing and Installing components ...

Page 45: ...e heat sink assembly to the system board 2 NOTE Tighten the screws in a sequential order 1 2 3 4 as mentioned on the system board c Connect the heat sink fan cable to the slot on the system board 3 3 Install the a Hard drive and optical drive module b Front bezel c Side cover Removing and Installing components 45 ...

Page 46: ...nd optical drive module d Heat sink and heat sink fan 3 To remove the intrusion switch a Disconnect the intrusion switch cable from the connector on the system board 1 b Slide the intrusion switch and lift it away from the system 2 Installing the intrusion switch 1 Insert the intrusion switch into the slot on the chassis 1 2 Connect the intrusion switch cable to the system board 2 46 Removing and ...

Page 47: ...ch Removing power switch 1 Follow the procedure in Before working inside your computer 2 Remove the a Side cover b Front bezel c Hard drive and optical drive module 3 To remove the power switch a Disconnect the power switch cable from the system board 1 b Press the power switch retention tabs and pull the power switch out from the system 2 3 Removing and Installing components 47 ...

Page 48: ...e power switch 1 Slide the power switch module into the slot on the chassis until it clicks into place 1 2 Connect the power switch cable to the connector on the system board 2 48 Removing and Installing components ...

Page 49: ...working inside your computer 2 Remove the a Side cover b Front bezel c Hard drive and optical drive module d Heat sink and heat sink fan 3 To remove the processor a Release the socket lever by pushing the lever down and out from under the tab on the processor shield 1 b Lift the lever upward and lift the processor shield 2 c Lift the processor out of the socket 3 Removing and Installing components...

Page 50: ... the socket such that the slots on the processor align with the socket keys 1 2 Close the processor shield by sliding it under the retention screw 2 3 Lower the socket lever and push it under the tab to lock it 3 50 Removing and Installing components ...

Page 51: ... Drive SSD 1 Follow the procedure in Before working inside your computer 2 Remove the a Side cover b Front bezel c Hard drive and optical drive module 3 To remove the M 2 PCIe SSD card a Remove the single M2 x 3 5 screw that secures the M 2 PCIe SSD card to the system board 1 b Lift and pull out the SSD card from its connector on the system board 2 c Peel the thermal pad from the system board 3 Re...

Page 52: ... the thermal pad into the slot on the system board 1 NOTE M 2 PCIe SSD with capacity over 512G 512G 1TB 2TB must be installed with a thermal pad M 2 SATA SSD and M 2 PCIe SSD with 128G and 256G does not require a thermal pad 2 Insert the M 2 PCIe SSD card into the card slot on the system board 2 3 Replace the single M2 x 3 5 screw that secures the M 2 PCIe SSD card to the system board 3 52 Removin...

Page 53: ...he procedure in Before working inside your computer 2 Remove the a Side cover b Front bezel c Hard drive and optical drive module 3 To remove the Intel Optane card a Remove the single M2 x 3 5 screw that secures the Intel Optane card to the system board 1 b Lift and pull out the Intel Optane card from its connector on the system board 2 c Peel the thermal pad 3 Removing and Installing components 5...

Page 54: ...system board 1 2 Insert the Intel Optane card into the card slot on the system board 2 3 Replace the single M2 x 3 5 screw that secures the Intel Optane card to the system board 3 NOTE Intel Optane modules must be installed with a thermal pad 54 Removing and Installing components ...

Page 55: ...eader 1 Follow the procedure in Before working inside your computer 2 Remove the a Side cover b Front bezel c Hard drive and optical drive module 3 To remove the SD card reader a Unroute the power cables from the retention clip on the SD card reader 1 b Remove the two M3 screws that secures the SD card reader to the I O panel and the system board 2 Removing and Installing components 55 ...

Page 56: ...eader 1 Route the power cables back through the retention clip on the SD card reader 1 2 Insert the SD card reader from the slot on the system board 2 3 Replace the two M3 screws that secures the SD card reader to the I O panel and the system board 3 56 Removing and Installing components ...

Page 57: ...ving the Internal Antenna 1 Follow the procedure in Before working inside your computer 2 Remove the a Side cover b Front bezel c Hard drive and optical drive module 3 To remove the antenna from the system a Unroute the antenna cable from the cable hole on the chassis 1 b Unroute the antenna cable from the two hooks on the chassis 2 Removing and Installing components 57 ...

Page 58: ...c Remove the single screw that secures the antenna to the chassis 1 d Remove the black antenna cable from the ANT B slot on the chassis 2 3 58 Removing and Installing components ...

Page 59: ...e Remove the single screw that secures the antenna to the chassis 1 f Remove the white antenna cable from the ANT W slot on the chassis 2 3 Removing and Installing components 59 ...

Page 60: ...Installing the Internal Antenna 1 Peel off the mylar tape from internal antenna 60 Removing and Installing components ...

Page 61: ...l the antenna on the system a Align and insert the white antenna cable into the ANT W slot on the chassis 1 2 b Replace the single screw to secure the antenna to the chassis 3 Removing and Installing components 61 ...

Page 62: ...c Align and insert the black antenna cable into the ANT B slot on the chassis 1 2 d Replace the single screw to secure the antenna to the chassis 3 62 Removing and Installing components ...

Page 63: ...e Route the antenna cable across the two hooks 1 f Route the antenna cable through the cable hole on the chassis 2 Removing and Installing components 63 ...

Page 64: ...g Remove the plastic tube from internal antenna cable 64 Removing and Installing components ...

Page 65: ...tenna optional Removing the External Antenna 1 Follow the procedure in Before working inside your computer 2 Remove the a Side cover b Front bezel c Hard drive and optical drive module 3 To remove the antenna from the system a Loosen and remove the antenna screw that connects to the antenna cable connector screws Removing and Installing components 65 ...

Page 66: ...b Unroute the antenna cable from the retention clip on the chassis 1 c Remove the retention clip from the chassis 2 66 Removing and Installing components ...

Page 67: ...tors on the WLAN card e Remove the nuts to secure the antenna connectors to the chassis 1 f Remove the metal washers on to the antenna connectors 2 g Remove the antenna cables from the antenna slot on the chassis 3 Removing and Installing components 67 ...

Page 68: ...Installing the External Antenna 1 External antenna 68 Removing and Installing components ...

Page 69: ...l the antenna on the system a Remove the caps from the antenna cable 1 b Loosen and remove the nut 2 c Remove the metallic washer 3 d Push the blank filler with a screw driver Removing and Installing components 69 ...

Page 70: ...tenna cables into the antenna slot on the chassis 1 f Replace the metal washers on to the antenna connectors 2 g Replace the nuts to secure the antenna connectors to the chassis 3 70 Removing and Installing components ...

Page 71: ...the retention clip on the chassis as show in the image 1 i Route the antenna cable through the retention clip 2 j Pull off the insulation on the antenna cable connectors 3 Removing and Installing components 71 ...

Page 72: ...k Connect the antenna connectors to the connectors on the WLAN card l Tighten the antenna to the antenna cable connector screws 72 Removing and Installing components ...

Page 73: ...inside your computer 2 Remove the a Side cover b Front bezel c Hard drive and optical drive module 3 To remove the M 2 2230 WLAN card a Remove the screw M2 that secures the WLAN card bracket and the WLAN card to the system board 1 b Slide and lift the WLANs card bracket off the WLAN card 2 c Disconnect the antenna cables from the WLAN card 3 d Slide and remove the WLAN card out of the WLAN card sl...

Page 74: ...nd replace the WLAN card into the WLAN card slot 1 b Connect the antenna cables to the WLAN card 2 c Replace the WLAN card bracket on the WLAN card 3 d Replace the screw M2 that secures the WLAN card bracket and the WLAN to the system board 4 74 Removing and Installing components ...

Page 75: ... procedure in Before working inside your computer 2 Remove the a Side cover b Front bezel c Hard drive and optical drive module 3 To release the PSU a Disconnect the CPU power cable from the connector on the system board 1 b Unroute the power cables from the retention clips on the chassis 2 3 c Disconnect the PSU power cable from the connector on the system board 4 Removing and Installing componen...

Page 76: ...he PSU a Remove the 3 screws that secure the PSU to the system 1 b Press the blue release tab 4 at the rear end of the PSU unit slide the PSU and lift it away from the system 2 76 Removing and Installing components ...

Page 77: ... supply unit or PSU 1 Insert the PSU in the chassis and slide it towards the back of the system to secure it 1 2 Replace the screws to secure the PSU to the rear chassis of the system Removing and Installing components 77 ...

Page 78: ...n the system board 1 4 Route the system power cable through the retention clips 2 5 Route the CPU power cable through the retention clips 3 6 Connect the CPU power cable to the connector on the system board 4 78 Removing and Installing components ...

Page 79: ...ing speaker 1 Follow the procedure in Before working inside your computer 2 Remove the a Side cover b Front bezel c Hard drive and optical drive module 3 To remove the speaker a Disconnect the speaker cable from the connector on the system board 1 b Press the release tab 2 and pull the speaker out from the system 3 Removing and Installing components 79 ...

Page 80: ...he speaker 1 Insert the speaker into the slot on the system chassis and press it until it clicks into place 1 2 Connect the speaker cable to the connector on the system board 2 80 Removing and Installing components ...

Page 81: ...1 Follow the procedure in Before working inside your computer 2 Remove the a Side cover b Front bezel c Hard drive and optical drive module 3 To remove the system fan a Disconnect the system fan cable from the system board 1 b Slide the fan grommets towards the slot on the back of the fan chassis 2 c Lift the fan away from the system 3 4 Removing and Installing components 81 ...

Page 82: ...fan a Align and place the system fan in the system chassis 1 b Pass the grommets through the chassis and slide outward along the groove to secure it in place 2 3 c Connect the system fan cable to the system board 4 82 Removing and Installing components ...

Page 83: ...working inside your computer 2 Remove the a Side cover b Front bezel c Hard drive and optical drive module d Heat sink and heat sink fan e Processor f Memory module g M 2 PCIe SSD card h Intel Optane card i SD card reader j M 2 2230 WLAN card 3 To remove the I O panel a Remove the screw that secures the I O panel 1 b Rotate the I O panel and remove it from the system 2 Removing and Installing comp...

Page 84: ...etention clips on the chassis 4 psu cable 5 and intrusion switch cable 6 from the connectors on the system board 4 Disconnect the intrusion switch cable 1 PSU power cable 2 data cable 3 system fan cable 4 SATA cable 5 SATA power cable 6 84 Removing and Installing components ...

Page 85: ...system board a Remove the standoff single 6 32 screw and single M3x6 caddy screw that secures the system board to the system 1 2 b Remove the 5 screws that secure the system board to the chassis 3 Removing and Installing components 85 ...

Page 86: ...6 To remove the system board a Lift and slide the system board away from the system 1 2 86 Removing and Installing components ...

Page 87: ...em chassis until the connectors at the back of the system board align with the slots on the chassis and the screw holes on the system board align with the standoffs on the system chassis 1 2 3 Replace the 5 screws that secure the system board to the system 1 the single M3x5 screw 2 and the single 6 32 screw 3 Removing and Installing components 87 ...

Page 88: ...th the pins on connectors on the system board and connect intrusion switch cable 1 PSU power cable 2 data cable 3 system fan cable 4 SATA cable 5 SATA power cable 6 to the system board 88 Removing and Installing components ...

Page 89: ...e retention clips on the chassis 4 psu cable 5 and intrusion switch cable 6 from the connectors on the system board 8 Install the a M 2 2230 WLAN card b SD card reader c Intel Optane card d M 2 PCIe SSD card e Memory module f Processor g Heat sink and heat sink fan h Hard drive and optical drive module i Front bezel j Side cover 9 Follow the procedure in After working inside your computer Removing...

Page 90: ...the F12 key when the Dell logo is displayed 3 In the boot menu screen use Up Down arrow key to select the Diagnostics option and then press Enter NOTE The Enhanced Pre boot System Assessment window displays listing all devices detected in the computer The diagnostics starts running the tests on all the detected devices 4 Press the arrow in the lower right corner to go to the page listing The detec...

Page 91: ...s B C and D of table 12 4 SIO spec 40 2 3 Bad MBD DIMMS or CPU Bad MBD DIMMS or CPU Rows F and K from table 12 4 of SIO spec 40 2 4 Bad coin cell Bad coin cell Row M of table 12 4 in SIO spec 40 Table 7 States Under Host BIOS Control Amber LED state White LED state System state Notes 2 5 BIOS state 1 BIOS Post code Old LED pattern 0001 Corrupt BIOS 2 6 BIOS state 2 BIOS Post code Old LED pattern 0...

Page 92: ...e microprocessor has failed Contact Dell CD DRIVE CONTROLLER FAILURE The optical drive does not respond to commands from the computer DATA ERROR The hard drive cannot read the data DECREASING AVAILABLE MEMORY One or more memory modules may be faulty or improperly seated Reinstall the memory modules or if necessary replace them DISK C FAILED INITIALIZATION The hard drive failed initialization Run t...

Page 93: ...isk Drive tests in Dell Diagnostics INSERT BOOTABLE MEDIA The operating system is trying to boot to non bootable media such as an optical drive Insert bootable media INVALID CONFIGURATION INFORMATION PLEASE RUN SYSTEM SETUP PROGRAM The system configuration information does not match the hardware configuration The message is most likely to occur after a memory module is installed Correct the approp...

Page 94: ...ror checking utility to check the file structure on the hard drive See Windows Help and Support for instructions click Start Help and Support If a large number of sectors are defective back up the data if possible and then format the hard drive SEEK ERROR The operating system cannot find a specific track on the hard drive SHUTDOWN FAILURE A chip on the system board may be malfunctioning Run the Sy...

Page 95: ...ble does not solve the problem replace the keyboard No boot device available No bootable partition on hard disk drive the hard disk drive cable is loose or no bootable device exists If the hard drive is your boot device ensure that the cables are connected and that the drive is installed properly and partitioned as a boot device Enter system setup and ensure that the boot sequence information is c...

Page 96: ...ne based support and service options Availability varies by country and product and some services may not be available in your area To contact Dell for sales technical support or customer service issues 1 Go to Dell com support 2 Select your support category 3 Verify your country or region in the Choose a Country Region drop down list at the bottom of the page 4 Select the appropriate service or s...

Page 97: ...e dust filter based on the time interval set Follow these steps to install the dust filter 1 Align the plastic tabs of the dust filter to the slots on the system chassis and gently press to ensure that the dust filter fits firmly onto the system 2 To remove the dust filter a With the help of a plastic scribe gently pry the edge from the bottom to loosen the dust filter 1 b Remove the dust filter f...

Page 98: ...ct from any of the following intervals 15 30 60 90 120 150 or 180 days NOTE Default setting Disabled NOTE Alerts are generated only during a system reboot and not during normal OS operation To clean the dust filter brush or gently vacuum and then wipe down the external surfaces with a moist cloth 98 Dust Filter for Dell Precision 3431 Small Form Factor ...

Page 99: ...ur system until it gives a click sound to unlock the side cover 1 b Slide and lift the side cover from the system 2 3 Remove the front bezel a Pry the retention tabs to release the front bezel from the system 1 and pull to release the hooks on the front bezel from the front panel slots 2 b Remove the front bezel from the system 3 B Installing the USB Type C card 99 ...

Page 100: ... the connectors on the hard drive 1 2 b Slide the release tab to unlock the hard drive and optical module 3 c Unroute the hard drive cables 1 and optical drive cables 2 through the retention clip and HDD ODD release tab respectively d Lift the hard drive and optical module 3 100 Installing the USB Type C card ...

Page 101: ...rive module a Disconnect the optical drive data cable and optical drive power cable from the connectors on the optical drive 1 2 b Slide and lift the hard drive and optical drive module from the system 3 Installing the USB Type C card 101 ...

Page 102: ...sink fan cable from the system board 1 b Loosen the four captive screws that secure the heat sink 2 and lift it away from the system 3 NOTE Loosen the screws in a sequential order 1 2 3 4 as mentioned on the system board 102 Installing the USB Type C card ...

Page 103: ...7 To install the USB Type C card a Remove the filler using a philips screwdriver Installing the USB Type C card 103 ...

Page 104: ...b Connect the USB Type C card cable to the connector on the system board 1 c Align and place the USB Type C card into the slot on the system chassis 2 104 Installing the USB Type C card ...

Page 105: ...d Connect the USB Type C card cable to the connector on the system board 1 e Fasten the two screws to secure the USB Type C card to the system chassis 2 Installing the USB Type C card 105 ...

Page 106: ...ighten the four captive screws to secure the heat sink assembly to the system board 2 NOTE Tighten the screws in a sequential order 1 2 3 4 as mentioned on the system board c Connect the heat sink fan cable to the slot on the system board 3 106 Installing the USB Type C card ...

Page 107: ...and optical drive module into the slot on the system at a 30 degree angle 1 b Connect the optical drive data cable and power cable to the connectors on the optical drive 2 3 c Lower the hard drive and optical drive module so that it is placed in its slot 4 Installing the USB Type C card 107 ...

Page 108: ...d Route the optical drive data cable and power cable through the retention clips 1 e Route the hard drive data and power cables through the HDD ODD release tab 2 108 Installing the USB Type C card ...

Page 109: ...f Slide the release tab to lock the module 1 g Connect the hard drive data cable and power cable from the connectors on the hard drive 2 3 Installing the USB Type C card 109 ...

Page 110: ... To install the front bezel a Align the bezel and insert the retention tabs on the bezel into the slots on the system b Press the bezel until the tabs clicks into place 110 Installing the USB Type C card ...

Page 111: ... install the side cover a Place the cover on the system and slide the cover until it clicks into place b The release latch automatically locks the side cover to the system Installing the USB Type C card 111 ...

Page 112: ...ur system until it gives a click sound to unlock the side cover 1 b Slide and lift the side cover from the system 2 3 Remove the front bezel a Pry the retention tabs to release the front bezel from the system 1 and pull to release the hooks on the front bezel from the front panel slots 2 b Remove the front bezel from the system 3 C 112 Installing the VGA card ...

Page 113: ...from the connectors on the hard drive 1 2 b Slide the release tab to unlock the hard drive and optical module 3 c Unroute the hard drive cables 1 and optical drive cables 2 through the retention clip and HDD ODD release tab respectively d Lift the hard drive and optical module 3 Installing the VGA card 113 ...

Page 114: ...al drive module a Disconnect the optical drive data cable and optical drive power cable from the connectors on the optical drive 1 2 b Slide and lift the hard drive and optical drive module from the system 3 114 Installing the VGA card ...

Page 115: ...heat sink fan cable from the system board 1 b Loosen the 4 captive screws that secure the heat sink 2 and lift it away from the system 3 NOTE Loosen the screws in a sequential order 1 2 3 4 as mentioned on the system board Installing the VGA card 115 ...

Page 116: ...7 To install the VGA card a Remove the filler using a philips screwdriver 116 Installing the VGA card ...

Page 117: ...b Connect the VGA card cable to the connector on the system board 1 c Align and place the VGA card into the slot on the system chassis 2 Installing the VGA card 117 ...

Page 118: ...d Fasten the two screws to secure the VGA card to the system chassis 1 118 Installing the VGA card ...

Page 119: ...b Tighten the four captive screws to secure the heat sink assembly to the system board 2 NOTE Tighten the screws in a sequential order 1 2 3 4 as mentioned on the system board c Connect the heat sink fan cable to the slot on the system board 3 Installing the VGA card 119 ...

Page 120: ...ve and optical drive module into the slot on the system at a 30 degree angle 1 b Connect the optical drive data cable and power cable to the connectors on the optical drive 2 3 c Lower the hard drive and optical drive module so that it is placed in its slot 4 120 Installing the VGA card ...

Page 121: ...d Route the optical drive data cable and power cable through the retention clips 1 e Route the hard drive data and power cables through the HDD ODD release tab 2 Installing the VGA card 121 ...

Page 122: ...f Slide the release tab to lock the module 1 g Connect the hard drive data cable and power cable from the connectors on the hard drive 2 3 122 Installing the VGA card ...

Page 123: ...10 To install the front bezel a Align the bezel and insert the retention tabs on the bezel into the slots on the system b Press the bezel until the tabs clicks into place Installing the VGA card 123 ...

Page 124: ...1 To install the side cover a Place the cover on the system and slide the cover until it clicks into place b The release latch automatically locks the side cover to the system 124 Installing the VGA card ...

Page 125: ...y vary depending on the system s configuration 1 Slide the latch away from the chassis to unlock the cable cover 2 Pull the tab on the cable release latch and lift the latch away from the cable cover 3 Lift the tab 1 to release and pull the cable tie from the slot on the cable release latch 2 4 Align the cable release latch on the system chassis slot 1 Tighten the single screw to secure the cable ...

Page 126: ...lock the tab in place 3 Align the plastic hooks of the cable cover to the slots on the system 4 CAUTION Take care not to break or bend the delicate plastic hooks 6 Gently press down on the cable cover until it clicks into place 1 Slide the latch towards the chassis 2 to lock the cable cover in place 126 Cable cover for Dell Precision 3431 Small Form Factor ...

Page 127: ...ock ring to secure the system 7 To remove the cable cover a Slide the latch away from the chassis to unlock the cable cover 1 b Lift the cable cover away from the system chassis 2 Cable cover for Dell Precision 3431 Small Form Factor 127 ...

Reviews: