background image

NOTE: 

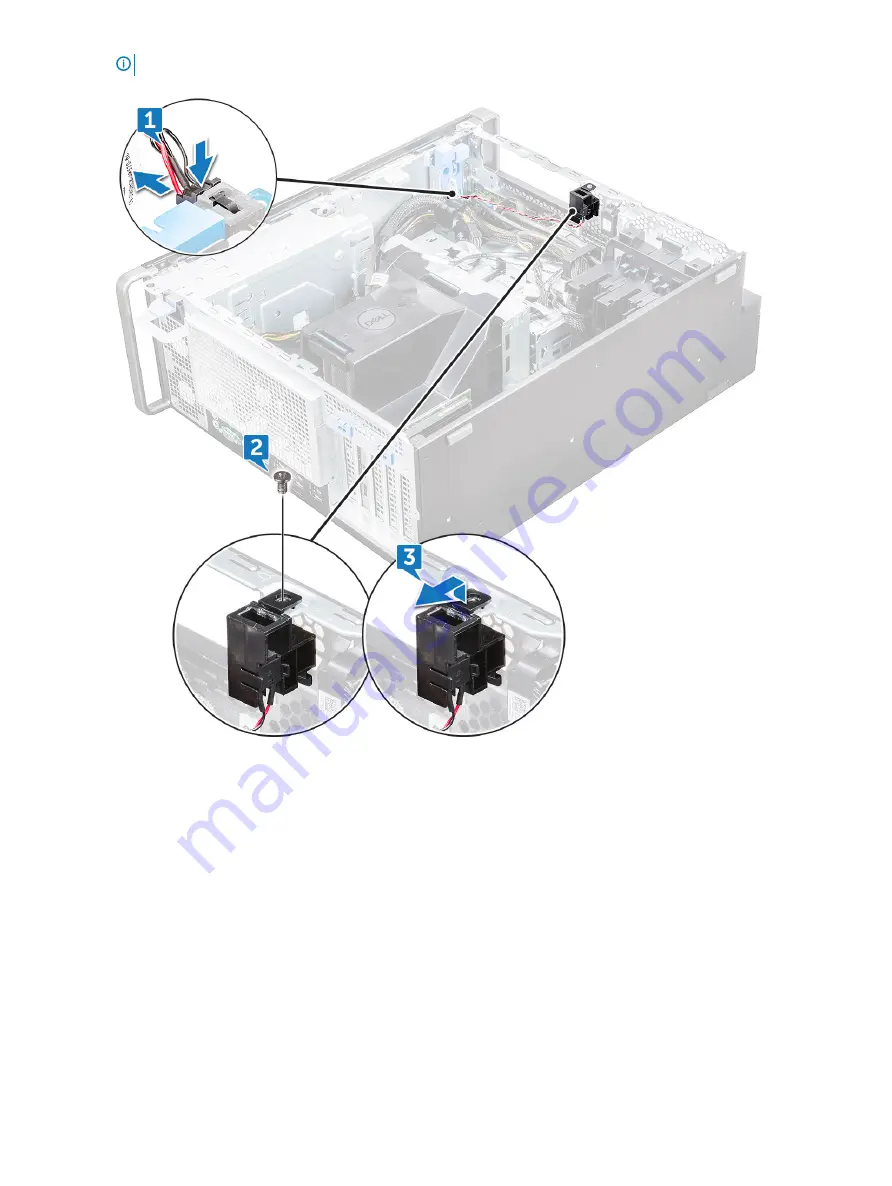
The system will not power on without the intrusion switch installed.

Installing the intrusion switch

Place the intrusion switch into the slot in the system chassis.

Replace the screw and secure the switch to the chassis.

Connect the cable to the system board.

Install the:

a

5.25 inch ODD bracket

b

front bezel

c

side cover

Follow the procedure in 

After working inside your computer

.

Internal chassis speaker

Removing and installing components

33

Summary of Contents for 5820

Page 1: ...Dell Precision 5820 Tower Owner s Manual Regulatory Model D02T Regulatory Type D02T002 ...

Page 2: ...age to hardware or loss of data and tells you how to avoid the problem WARNING A WARNING indicates a potential for property damage personal injury or death 2017 2018 Dell Inc or its subsidiaries All rights reserved Dell EMC and other trademarks are trademarks of Dell Inc or its subsidiaries Other trademarks may be trademarks of their respective owners 2018 07 Rev A03 ...

Page 3: ...5 Installing HDD bezel 16 Hard disk drive assembly 16 Removing the HDD carrier 16 Installing the HDD carrier 18 Removing the HDD 18 Installing the HDD 20 Slim Optical Disk Drive 20 Removing the slim ODD 20 Installing the slim ODD 22 Front input and output bezel 22 Removing front input and output bezel 22 Installing front input and output bezel 24 Optical Disk Drive 24 Removing the ODD 24 Installin...

Page 4: ... 40 System fan 40 Removing the System fan 40 Installing the system fan 42 Fan bracket 42 Removing the fan from the fan bracket 42 Installing the fan into the fan bracket 43 PCIe holder 44 Removing PCIe holder 44 Installing the PCIe holder 45 Heat sink and CPU fan assembly 45 Removing the heat sink and CPU fan assembly 45 Installing heat sink and CPU fan assembly 46 Removing the CPU fan 47 Installi...

Page 5: ...boot 79 Performance 79 Power management 80 Post behaviour 82 Manageability 82 Virtualization support 83 Maintenance 83 System logs 84 Advanced configurations 84 SupportAssist system resolution 84 Updating the BIOS in Windows 84 Updating BIOS on systems with BitLocker enabled 85 Updating your system BIOS using a USB flash drive 85 Updating the Dell BIOS in Linux and Ubuntu environments 86 System an...

Page 6: ...device drivers 90 Software device drivers 91 Human Interface Device drivers 91 Firmware 91 7 Troubleshooting 92 Dell Enhanced Pre Boot System Assessment ePSA Diagnostic 3 0 92 Running the ePSA Diagnostics 92 Preboot blinking power button codes 93 PCIe slots 95 8 Contacting Dell 96 6 Contents ...

Page 7: ...horized by Dell is not covered by your warranty Read and follow the safety instructions that came with the product CAUTION To avoid electrostatic discharge ground yourself by using a wrist grounding strap or by periodically touching an unpainted metal surface at the same time as touching a connector on the back of the computer CAUTION Handle components and cards with care Do not touch the componen...

Page 8: ... 5 Disconnect your computer and all attached devices from their electrical outlets 6 Press and hold the power button while the computer is unplugged to ground the system board NOTE To avoid electrostatic discharge ground yourself by using a wrist grounding strap or by periodically touching an unpainted metal surface at the same time as touching a connector on the back of the computer After working...

Page 9: ...nput and output panel bracket Intrusion switch Internal chassis speaker Air shroud Memory Expansion card Coin cell battery System fan Fan bracket PCIe holder Heat sink and CPU fan assembly Processor Front system fan System board Screw size list Table 1 Screw list Component Screw type Quantity Slim ODD Bracket 6 32 UNC X6 0mm 1 FIO Cable Clip 6 32X1 4 inches 1 FIO Board M3X6 5mm 2 FIO Bracket 6 32 ...

Page 10: ... ODD M3X6 5mm 1 5 25 ODD M3X4 5mm 4 3 5 HDD Bracket M3X4 5mm 4 2 5 HDD Bracket M3X4 5mm 4 2nd CPU Support Bracket 6 32X1 4 inches 2 2nd CPU Board 6 32X1 4 inches 5 UPI Fixed Bracket M3X5 0mm 1 CPU Cooler T 30 torx bolt 4 Liquid Cooler Module 6 32X1 4 inches 6 32 UNC X3 5mm T 30 torx bolt 4 6 4 M 2 Carrier Cover M2X6mm M2X3mm 1 2 Recommended tools The procedures in this document require the followi...

Page 11: ...er CAUTION The system will not power on while the side cover is off Also the system will shut down if the side cover is removed while the system is on 2 To remove the side cover 3 Press the latch 4 Pull the latch 1 upward and rotate it to release the cover 2 Removing and installing components 11 ...

Page 12: ...k on the bottom of the side cover snaps into the notch on the system 3 Press the system cover until it clicks into place CAUTION The system will not power on without the side cover Also the system will shut down if the side cover is removed while the system is on 4 Follow the procedure in After working inside your computer 12 Removing and installing components ...

Page 13: ... cable from the system 3 Press the PSU release latch 1 and slide the power supply away from the system 2 Installing the PSU 1 Slide in the power supply unit to the PSU slot on the system 2 Connect the power cable to the system 3 Follow the procedure in After working inside your computer Removing and installing components 13 ...

Page 14: ...ing inside your computer 2 Remove the side cover 3 To remove the front bezel a Press the latch and pry the retention tabs to release the front bezel from the system b Rotate the bezel forward and lift the front bezel away from the system 14 Removing and installing components ...

Page 15: ...ocedure in After working inside your computer Hard Disk Drive bezel Removing HDD bezel 1 Follow the procedure in Before working inside your computer 2 Remove the side cover 3 To remove the HDD bezel a Press the blue unlock button 1 on the edge of ODD bay b Slide the latch 2 to the unlock position on the front I O bezel c Rotate forward and lift the HDD bezel 3 away from the system Removing and ins...

Page 16: ...bezel to the system 3 Install the side cover 4 Follow the procedure in After working inside your computer Hard disk drive assembly Removing the HDD carrier 1 Follow the procedure in Before working inside your computer 2 Remove the a side cover NOTE Do not remove the side cover if the front I O bezel is unlocked b HDD bezel 3 To remove the HDD carrier 16 Removing and installing components ...

Page 17: ...a Press the release button 1 to unlock the latch 2 b Pull the latch to slide the carrier out of the HDD slot Removing and installing components 17 ...

Page 18: ... open before installing the carrier 2 Lock the latch 3 Install the following components a HDD bezel b side cover 4 Follow the procedure in After working inside your computer Removing the HDD 1 Follow the procedure in Before working inside your computer 2 Remove the following a side cover 18 Removing and installing components ...

Page 19: ...b HDD bezel c HDD carrier 3 To remove the HDD a Expand one side of the carrier b Lift the hard drive out of the carrier Removing and installing components 19 ...

Page 20: ... the following a HDD carrier b HDD bezel c side cover 4 Follow the procedure in After working inside your computer Slim Optical Disk Drive Removing the slim ODD 1 Follow the procedure in Before working inside the computer 2 Remove the side cover 3 To remove the slim ODD a Remove the screw 1 that secures the slim ODD and push the slim ODD 2 out of the chassis 20 Removing and installing components ...

Page 21: ...b Slide the slim ODD out of the system Removing and installing components 21 ...

Page 22: ...n After working inside your computer Front input and output bezel Removing front input and output bezel 1 Follow the procedure in Before working inside your computer 2 Remove the a side cover b front bezel 3 To remove the front input and output I O bezel a Pry the four retention tabs 1 from the chassis and push the bezel out from the chassis 2 22 Removing and installing components ...

Page 23: ...b Lift the bezel from the chassis Removing and installing components 23 ...

Page 24: ...m to the chassis 3 Install the a front bezel b side cover 4 Follow the procedure in After working inside your computer Optical Disk Drive Removing the ODD 1 Follow the procedure in Before working inside your computer 2 Remove the a side cover b front bezel 3 To remove the ODD a Remove the optical drive data cable and optical drive power cable from the ODD 24 Removing and installing components ...

Page 25: ...b Push the optical drive release button 1 and push the optical drive out of the system c Slide the ODD 2 from the ODD bracket Removing and installing components 25 ...

Page 26: ...l drive power cable to the ODD 4 Install the a front bezel b side cover 5 Follow the procedure in After working inside your computer 5 25 inch ODD bracket Removing the 5 25 ODD bracket 1 Follow the procedure in Before working inside your computer 2 Remove the a side cover b front bezel c ODD 3 To remove the ODD bracket 26 Removing and installing components ...

Page 27: ...a Remove the five screws 1 2 that secure the bracket to the chassis b Slide the ODD bracket toward the rear of the system and lift it away from the chassis Removing and installing components 27 ...

Page 28: ... and output panel Removing front input and output panel 1 Follow the procedure in Before working inside your computer 2 Remove the a side cover b front bezel c front input and output bezel d 5 25 inch ODD bracket 3 To remove the front input and output I O panel a Disconnect the intrusion switch cable 1 USB 3 1 cable 2 front I O power cable 3 USB 3 1 cable 4 Speaker cable 5 Audio cable 6 28 Removin...

Page 29: ...disconnect the cable by pulling the connector end Pulling the cable wires may loosen them from the connector b Remove the screw 1 that secures the front I O panel to the chassis and slide the I O panel out of the chassis 2 Removing and installing components 29 ...

Page 30: ... into the chassis hole 3 Tighten the screw to secure the front I O panel to the chassis 4 Connect the following cables intrusion switch cable USB 3 1 cable front I O power cable front I O power cable USB 3 1 cable speaker cable audio cable 5 Install the a front input and output bezel b 5 25 inch ODD bracket 30 Removing and installing components ...

Page 31: ... bracket 1 Follow the procedure in Before working inside your computer 2 Remove the a side cover b front bezel c front input and output bezel d 5 25 inch ODD bracket e front input and output panel 3 To remove the input and output I O panel bracket a Remove the two screws b Slide the I O module out of the bracket Removing and installing components 31 ...

Page 32: ...e cover 4 Follow the procedure in After working inside your computer Intrusion switch Removing the Intrusion switch 1 Follow the procedure in Before working inside your computer 2 Remove the a side cover b front bezel c 5 25 inch ODD bracket 3 To remove the intrusion switch a Disconnect the intrusion cable 1 from the I O module b Remove the screw 2 that secures the intrusion switch to the chassis ...

Page 33: ...switch into the slot in the system chassis 2 Replace the screw and secure the switch to the chassis 3 Connect the cable to the system board 4 Install the a 5 25 inch ODD bracket b front bezel c side cover 5 Follow the procedure in After working inside your computer Internal chassis speaker Removing and installing components 33 ...

Page 34: ...e cover b front bezel c 5 25 inch ODD bracket 3 To remove the internal chassis speaker a Disconnect the speaker cable 1 from the front I O module b Press the speaker securing tabs 2 then pull to release it from the system c Gently push the speaker 3 with its cable out of the system 34 Removing and installing components ...

Page 35: ... system chassis 3 Install the a 5 25 inch ODD bracket b front bezel c side cover 4 Follow the procedure in After working inside your computer Air shroud Removing the air shroud 1 Follow the procedure in Before working inside your computer 2 Remove the side cover 3 To remove the air shroud a Press in the securing tabs by holding the air shroud from both the ends and then lift the air shroud from th...

Page 36: ...36 Removing and installing components ...

Page 37: ... module retention tabs on each side of the memory module 4 Lift the memory module out of the memory slot on the system board WARNING Rotating the memory module out of the slot will cause damage to the memory module Ensure to pull it straight out of the memory module slot Installing the memory module 1 Align the notch on the memory module with the tab on the memory module connector 2 Insert the mem...

Page 38: ...unlock the filler bracket b Lift the expansion card 3 from the PCIe slot on the system board Installing the expansion card 1 Align and place the expansion card to the PCIe slot on the system board 2 Press it down so that it is securely seated on the slot NOTE For expansion card with VGA power connect the data or power cable to the expansion card 3 Rotate both the expansion card locking latch forwa...

Page 39: ...1 Follow the procedure in Before working inside your computer 2 Remove the a side cover 3 To remove the coin cell battery a Press the release latch 1 away from the battery to allow the battery to pop up from the socket 2 b Lift the coin cell battery out of the system board Removing and installing components 39 ...

Page 40: ...your computer System fan Removing the System fan 1 Follow the procedure in Before working inside your computer 2 Remove the a side cover b air shroud c front bezel d ODD e 5 25 inch ODD bracket 3 To remove the system fan a Press the connector tab and disconnect the two fan cables from the system board NOTE Do not pull the connector by the cable wires Instead disconnect the cable by pulling on the ...

Page 41: ...b Remove the screws 1 securing the system fan to the system board and lift the system fan up 2 Removing and installing components 41 ...

Page 42: ...t on the system board 3 Install the a 5 25 ODD bracket b ODD c front bezel d air shroud e side cover 4 Follow the procedure in After working inside your computer Fan bracket Removing the fan from the fan bracket 1 Follow the procedure in Before working inside your computer 2 Remove the a side cover b system fan 42 Removing and installing components ...

Page 43: ...from the fan chassis 1 b Lift the fan and remove it from the fan assembly 2 Installing the fan into the fan bracket 1 Place the fan into the fan bracket 2 Tighten the grommets that secure the fan to the fan bracket 3 Install the a system fan b side cover Removing and installing components 43 ...

Page 44: ... Removing PCIe holder 1 Follow the procedure in Before working inside your computer 2 Remove the a side cover b expansion card 3 To remove the PCIe holder a Press the PCIe holder securing clip 1 and slide the holder 2 out of the chassis 44 Removing and installing components ...

Page 45: ... heat sink and CPU fan assembly 1 Follow the procedure in Before working inside your computer 2 Remove the a side cover b air shroud 3 To remove the heat sink and CPU fan assembly a Disconnect the CPU fan cable 1 from the system board b Loosen the four heat sink captive screws 2 in the diagonal order 4 3 2 1 c Gently lift the heat sink and CPU fan assembly 3 from the system NOTE Lay the assembly w...

Page 46: ... sink and CPU fan assembly to the system board NOTE When installing the heat sink and CPU fan assembly into the system ensure that the airflow arrow is pointed towards the rear of the system 3 Connect the CPU fan cable to the system board 4 Install the a air shroud b side cover 5 Follow the procedure in After working inside your computer 46 Removing and installing components ...

Page 47: ...ink and CPU fan assembly 3 To remove the CPU fan a Unroute the CPU fan cable from the cable holder in the bracket b Lay the assembly with the thermal grease facing up c Remove the four screws 1 securing the heat sink and the CPU fan assembly d Gently lift the heat sink 2 away from the CPU fan Removing and installing components 47 ...

Page 48: ...e Detach the 4 rubber grommets 1 from the CPU fan bracket and lift the fan 2 away from the bracket 48 Removing and installing components ...

Page 49: ... Removing the processor 1 Follow the procedure in Before working inside your computer 2 Remove the a side cover b air shroud c heat sink and CPU fan assembly 3 To remove the processor a Press the left side release lever 1 down then move it inward to release it from the retention hook b Press the right side release lever 2 down then move it inward to release it from the retention hook c Open the re...

Page 50: ...eat sink and CPU fan assembly b air shroud c side cover 5 Follow the procedure in After working inside your computer Front system fan Removing the front system fan 1 Follow the procedure in Before working inside your computer 2 Remove the a side cover b front bezel c PCIe holder 3 To remove the front system fan a Unroute the following cables from the card holder 3 SATA 0 1 2 3 4 5 cable and ODD 0 ...

Page 51: ...ector end Pulling the cable wires may loosen them from the connector b Unroute the fan cable 1 from the system board c Remove the screw 2 that secure the rear system fan to the chassis d Lift the fan to release it from the retention slot in the system chassis 3 Removing and installing components 51 ...

Page 52: ... side cover 6 Follow the procedure in After working inside your computer System board Removing system board 1 Follow the procedure in Before working inside your computer 2 Remove the a side cover b air shroud c expansion card d memory module e heat sink and CPU fan assembly f front bezel g ODD h 5 25 ODD bracket i system fan j PCIe card holder 3 To remove the system board a To remove the system fa...

Page 53: ...isconnect the following cables from the system board connectors audio cable 1 power cable 2 cable holder 3 power control cable 4 24 Pin power cable 5 front I O panel 6 Removing and installing components 53 ...

Page 54: ...le 2 Front system fan cable Flex0 and Flex1 hard drive data cable NOTE Do not pull the connector by the cable wires Instead disconnect the cable by pulling on the connector end Pulling on the cable wires may loosen them from the connector 54 Removing and installing components ...

Page 55: ...e Remove the screws that secure the system board to the chassis Removing and installing components 55 ...

Page 56: ...f Slide the system board towards HDD bracket module to detach it from the system 56 Removing and installing components ...

Page 57: ...g Lift the system board up to remove it from the chassis Removing and installing components 57 ...

Page 58: ...lace the system fan fixed bracket and replace the single screw on the system board 5 Connect the following cables audio cable power cable power control cable 24Pin power cable front I O panel SATA cables ODD cables USB 3 1 cables Front system fan cable Flex0 and Flex1 hard drive data cable 6 Install the a PCIe holder b expansion card c memory module 58 Removing and installing components ...

Page 59: ...ver 7 Follow the procedure in After working inside your computer System board components The following image displays the system board components 1 Slot 6 PCI 2 Slot PCI 3x16 3 Memory slots 4 CPU0 5 Memory slots 6 Front panel audio port 7 Power CPU port 8 System fan port Removing and installing components 59 ...

Page 60: ...17 24 pin power cable 18 Front panel port 19 Power remote 20 USB 2_INT 21 System fan 0 22 USB 2_flex 23 Front panel USB3 2 port 24 Front panel USB3 1 port 25 SATA 0 1 2 3 4 5 and ODD 0 1 ports 26 VROC_key NOTE PCIE0 Callout 10 is only present supported on motherboards designed for Xeon W Series Processors 60 Removing and installing components ...

Page 61: ...ower 5820 NOTE 32 GB DIMMs are only supported on systems using Xeon W Series CPUs Technologies list This section provides information about the technologies that comes with the Dell Precision 5820 Tower The following table lists the basic of technologies that are available on the Dell Precision 5820 Tower systems for Dell internal users only Table 2 Intel Xeon W Series CPUs No Category Technology ...

Page 62: ...P CLIENT Dell or other Branded Zero Client TERA Gen 2 Dell Wyse P25 DUAL Monitor Support HOST PCIe x1 PCoIP Dual Host Card TERA Gen 2 CLIENT Dell or other Branded Zero Client TERA Gen 2 Dell Wyse P45 QUAD Monitor Support HOST PCIe x1 PCoIP Quad Host Card TERA Gen 2 Support Dual Terra Card configurations NOTE For further information about the Teradici PCoIP Card host driver installation see Teradic...

Page 63: ...is will result in losing access to your mouse and keyboard when the driver software is removed To upgrade the PCoIP host driver software in this type of deployment do one of the following Connect to the host from a zero client Upgrade the software while connecting to the host through another desktop remoting protocol such as RDP or VNC Installing the PCoIP Host Driver Software on a Host PC 1 Downl...

Page 64: ...ers bring NVMe performance benefits to the storage tier by providing connectivity and data protection for SAS SATA interfaces Based on the dual core SAS3516 or SAS3508 RAID on Chip ROC and 72 bit DDR4 2133 SDRAM these controllers provide bandwidth and IOPS performance increases and are ideal for high end servers utilizing internal storage or connecting to large scale external storage enclosures NO...

Page 65: ...high bandwidth applications with PCIe 3 1 connectivity CacheVault flash back up at power fail Supports bad block management Balance protection and performance for critical applications with RAID levels 0 1 5 6 10 50 and 60 Table 4 Features of MegaRAID 9440 8i and 9460 16i controller 9440 8i 9460 16i Ports 8 internal 16 internal Connectors 2 x SFF8643 4 x SFF8643 x4 Storage Interface Support SATA E...

Page 66: ...re LSI Storage Authority LSA StorCLI command line interface CTRL R BIOS configuration utility HII UEFI Human Interface Infrastructure Regulatory Certifications USA FCC 47 CFR part 15 Subpart B class B Canada ICES 003 Class B Taiwan CNS 13438 Japan VCCI V 3 Australia New Zealand AS NZS CISPR 22 Korea RRA no 2013 24 25 Europe EN55022 EN55024 Safety EN IEC UL 60950 RoHS WEEE USA FCC 47 CFR part 15 Su...

Page 67: ...ors NOTE Intel Xeon W and Core X CPUs are not supported on the same motherboard Total cache Upto 24 75 MB Memory specifications Features Specifications Type DDR4 ECC RDIMMs Supported with Xeon W Series CPUs DDR4 Non ECC UDIMMs supported with Core X Series CPUs Speed 2666 MHz Connectors 8 DIMM Slots Capacity 4 channel memory up to 256 GB 2666 MHz DDR4 ECC memory with single CPUs on Xeon W Series CP...

Page 68: ...0 NVIDIA Quadro P400 NVIDIA NVS 310 NVIDIA NVS 315 NOTE The Asterisk Only supported on systems with Xeon W Series CPUs Audio specifications Features Specifications Type High Definition Audio Codec 2 Channel Controller Integrated Realtek ALC3234 Internal Speaker Power Rating 2W Internal microphone support no Network specifications Features Specifications Integrated Intel i219 Gigabit Ethernet contr...

Page 69: ...ly Accessible DVD ROM DVD RW 5 25 Bay Options BD DVD RW Internally Accessible M 2 NVMe PCIe SSDs Up to 4 x 1TB drives on 1 Dell Precision Ultra Speed Drive Quad x16 cards Front Flex Bay M 2 NVMe PCIE SSDs Up to 2x 2 TB drives when Xeon W Series CPUs are installed Up to 1x 1 TB drive when Core X Series CPUs are installed Up to 6 x 2 5 SATA drives Up to 5 x 3 5 SATA drives Slim ODD SAS available wit...

Page 70: ... 9 mm Width 176 5 mm Depth 518 3 mm Optional 19 rackmount rail kit Environmental specifications Temperature Specifications Operating 5 C to 35 C 41 F to 95 F NOTE Starting at 5000 ft the maximum operating ambient temperature is derated by 1 C 1 8 F per 1000 ft up to 10 000 ft Storage 40 C to 65 C 40 F to 149 F Relative humidity maximum Specifications Operating 8 to 85 non condensing Storage 5 to 9...

Page 71: ...Maximum Shock Specifications Operating 40 G half sine 2 5 ms pulse Storage 105 G half sine 2 5 ms pulse System specifications 71 ...

Page 72: ...and setup password General options Table 5 General Option Description System Information This section lists the primary hardware features of your computer The options are System Information Memory Configuration Processor Information PCI Information Device Information Boot Sequence Allows you to change the order in which the computer attempts to find an operating system The options are Diskette Dri...

Page 73: ...r Date Time Allows you to set the date and time The change to the system date and time takes effect immediately System configuration Table 6 System Configuration Option Description Integrated NIC Allows you to configure the integrated network controller Click one of the following options Disabled Enabled Enabled w PXE Default UEFI Network Stack Allows pre OS and early OS networking features to use...

Page 74: ...This field controls if the hard drive errors for the integrated drives are reported during system startup This technology is part of the SMART Self Monitoring Analysis and Reporting Technology specification Enable SMART Reporting This option is not set by default USB Configuration Allows you to enable or disable the internal USB configuration The options are Enable USB Boot Support Enable Front US...

Page 75: ...evice support capability The options are Enabled Thunderbolt Technology Support Enabled Thunderbolt Adapter Pre boot Modules Enabled Thunderbolt Adapter Boot Support Default NOTE The security level configures the Thunderbolt adapter security settings within the operating system USB PowerShare Allows you to configure the USB PowerShare feature behavior Enable USB PowerShare This option is not set b...

Page 76: ...al SD Card Read Only Mode Video Table 7 Video Option Description Primary Video Slot Allows you to configure primary boot video device Click any one of the following options Auto Default SLOT 1 SLOT 2 VGA Compatible SLOT 2 SLOT 3 SLOT 5 SLOT 6 Security Table 8 Security Option Description Admin Password Allows you to set change or delete the administrator admin password The entries to set password a...

Page 77: ...t the password NOTE For the first time login Enter the old password field is marked to Not set Hence password has to be set for the first time you login and then you can change or delete the password Strong Password Allows you to enforce the option to always set strong password Enable Strong Password This option is not set by default Password Configuration You can define the length of your passwor...

Page 78: ...le mode of the processor Enable CPU XD Support This option is set by default OROM Keyboard Access Allows you to determine whether users are able to enter the Option ROM Configuration screens via hotkeys during boot The options are Click one of the following options Enabled Default One Time Enable Disabled Admin Setup Lockout Allows you to prevent users from entering Setup when an administrator pas...

Page 79: ... 10 Performance Option Description Multi Core Support This field specifies whether the processor has one or all cores enabled The performance of some applications improves with the additional cores Active Processor Cores Choose any number from 01 08 NOTE To enable Trusted Execution mode all the cores must be enabled Intel SpeedStep Allows you to enable or disable the Intel SpeedStep mode of proces...

Page 80: ...ading in the processor Disabled Enabled Default Dell Reliable Memory Technology RMT Allows you to identify and isolate memory errors in system RAM Enable Dell RMT Default Clear Dell RMT System Isochronous Mode Allows you to enable or disable this mode to reduce latency of memory transactions at the expense of bandwidth Click one of the options Disabled Default Enabled RAS Support Allows you to rep...

Page 81: ...o enable USB devices to wake the system from standby Enable USB Wake Support This option is set by default Wake on LAN This option allows the computer to power up from the off state when triggered by a special LAN signal Wake up from the Standby state is unaffected by this setting and must be enabled in the operating system This feature only works when the computer is connected to AC power supply ...

Page 82: ...een logo if your image matches screen resolution Enable Full Screen Logo This option is not set by default Warnings and Errors Allows you to select different options to either stop prompt and wait for user input continue when warnings are detected but pause on errors or continue when either warnings or errors are detected during the POST process Click one of the following options Prompt on Warning...

Page 83: ...ther a Measured Virtual Machine Monitor MVMM can utilize the additional hardware capabilities provided by the Intel Trusted Execution Program Trusted Execution This option is not set by default Maintenance Table 15 Maintenance Option Description Service Tag Displays the service tag of your computer Asset Tag Allows you to create a system asset tag if an asset tag is not already set This option is ...

Page 84: ...Clear Log This option is not set by default Advanced configurations Table 17 Advanced configurations Option Description Pcie LinkSpeed Allows you to choose the Pcie linkspeed Click one of the following options Auto Default Gen1 Gen2 SupportAssist system resolution Table 18 SupportAssit System Resolution Option Description Auto OS Recovery Threshold The Auto OS Recovery Threshold setup option contr...

Page 85: ...spended before updating the BIOS the next time you reboot the system it will not recognize the BitLocker key You will then be prompted to enter the recovery key to progress and the system will ask for this on each reboot If the recovery key is not known this can result in data loss or an unnecessary operating system re install For more information on this subject see Knowledge Article http www del...

Page 86: ...d to secure your computer CAUTION The password features provide a basic level of security for the data on your computer CAUTION Anyone can access the data stored on your computer if it is not locked and left unattended NOTE System and setup password feature is disabled Assigning a system setup password You can assign a new System or Admin Password only when the status is in Not Set To enter the sy...

Page 87: ...e an existing System or Setup password if the Password Status is Locked To enter the System Setup press F2 immediately after a power on or reboot 1 In the System BIOS or System Setup screen select System Security and press Enter The System Security screen is displayed 2 In the System Security screen verify that Password Status is Unlocked 3 Select System Password alter or delete the existing syste...

Page 88: ...t Linux RHEL 7 3 Ubuntu 16 04 NeoKylin v6 0 NOTE Asterisk means that Only supported on systems with Xeon W Series CPUs Downloading drivers 1 Turn on the computer 2 Go to Dell com support 3 Click Product Support enter the Service Tag of your system and then click Submit NOTE If you do not have the Service Tag use the auto detect feature or manually browse for your system model 4 Click Drivers and D...

Page 89: ... if the Intel chipset and Intel Management Engine Interface drivers are already installed in the computer Graphics controller driver Verify if the graphics controller driver is already installed in the computer Ports Verify if the drivers for the ports are already installed in the computer Software 89 ...

Page 90: ...udio drivers are already installed in the computer Storage controller drivers Verify if the storage controller drivers are already installed in the computer Other drivers This section lists different driver details for all the other components in the Device Manager Security device drivers Verify if the security device drivers are already installed in the computer 90 Software ...

Page 91: ...ce drivers are already installed in the computer Human Interface Device drivers Verify if the human interface device drivers are already installed in the computer Firmware Verify if the Firmware drivers are already installed in the computer Software 91 ...

Page 92: ...ther of the methods suggested above 2 Once on one time boot menu use up down arrow key to navigate to ePSA or diagnostics and press return key to launch Fn PWR will flash diagnostics boot selected on screen and launch ePSA diagnostics directly 3 On the boot menu screen select the Diagnostics option 4 Press the arrow in the lower right corner to go to the page listing The items detected are listed ...

Page 93: ...se 1 white blink long pause then repeats Faulty System board To troubleshoot the issue with system board contact Tech support 1 2 1 amber blink followed by a short pause 2 white blinks long pause then repeats Bad system board Power Supply or Power Supply cabling If you can assist to troubleshoot narrow down the issue with PSU BIST Test reseat cable If nothing works contact Tech Support 1 3 1 amber...

Page 94: ...es have been detected but appear to be incompatible or in an invalid configuration If customer can assist to troubleshoot narrow down the issue by removing one by one the memory on motherboard to determine which one failed Contact Tech Support 2 6 2 amber blinks followed by a short pause 6 white blinks long pause then repeats Motherboard Chipset Fatal system board failure detected If customer can ...

Page 95: ... is missing Unplug power Install back all side covers back to the chassis and plug in power Contact Tech Support PCIe slots The PCIe slots on Precision 5820 have a different functionality depending on the processor installed Core i7 78xx has a limit of 28 lanes This results in a reduced PCIe lane count to the slots 1 and 4 as shown in the following table Slot 1 is closest to CPU memory complex Tab...

Page 96: ... service options Availability varies by country and product and some services may not be available in your area To contact Dell for sales technical support or customer service issues 1 Go to Dell com support 2 Select your support category 3 Verify your country or region in the Choose a Country Region drop down list at the bottom of the page 4 Select the appropriate service or support link based on...

Reviews: