Alignment and Troubleshooting
4-21
■ CLEANING YOUR MACHINE
To maintain print and scan quality, follow the cleaning procedures below each time the toner cartridge is
replaced or if print and scan quality problems occur.
Cleaning the outside
Clean the cabinet of the machine with a soft lint-free cloth. You can dampen the cloth slightly with water, but
be careful not to let any water drip onto or into the machine.
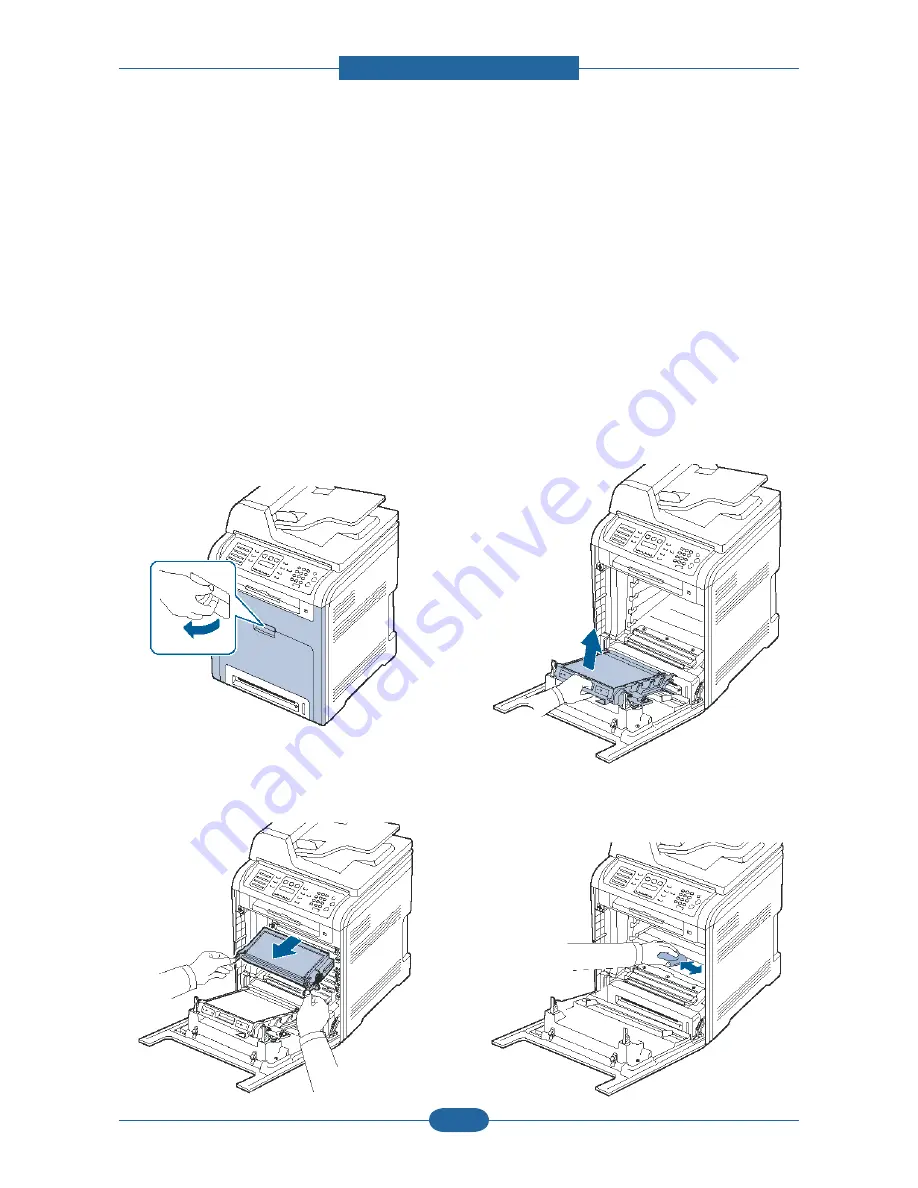
Cleaning the inside
During the printing process, paper, toner, and dust particles can accumulate inside the machine. This buildup
can cause print quality problems, such as toner specks or smearing. Cleaning the inside of the machine
clears or reduces these problems.
1. Turn the machine off and unplug the power cord.
Wait for the machine to cool down.
2. Using the handle, completely open the front
cover.
3. Grasp the handles on the toner cartridge and
pull to remove the cartridge from the machine.
4. Press the green release handle to release the
paper transfer belt.
Holding the handle on the paper transfer belt, lift
it out of the machine.
5. With a dry lint-free cloth, wipe away any dust
and spilled toner from the toner cartridges area
and their cavities.
Summary of Contents for 2145cn
Page 1: ... 6HUYLFH 0DQXDO 10 Mar 2009 ...
Page 6: ......
Page 64: ...Disassembly and Reassembly 3 17 3 3 15 Pick up roller 1 Remove the Pick up roller ...
Page 81: ...Alignment and Troubleshooting 4 17 2 3 1 4 ...
Page 151: ...5 11 5 4 MP Tray 0 1 5 6 7 2 3 4 8 Exploded View and Parts list ...
Page 155: ...5 15 5 6 Reverse Unit 0 2 1 3 4 5 Exploded View and Parts list ...
Page 157: ...5 17 5 7 Top Cover 0 1 7 5 6 5 6 11 11 2 4 3 2 4 3 9 9 10 Exploded View and Parts list ...
Page 161: ...5 21 5 9 Reverse Drive 0 1 11 2 3 4 4 4 4 4 5 6 7 8 9 10 Exploded View and Parts list ...
Page 165: ...5 25 5 11 Feed Drive 0 6 5 1 2 3 4 Exploded View and Parts list ...


