background image

Getting Ready to Embroider

16

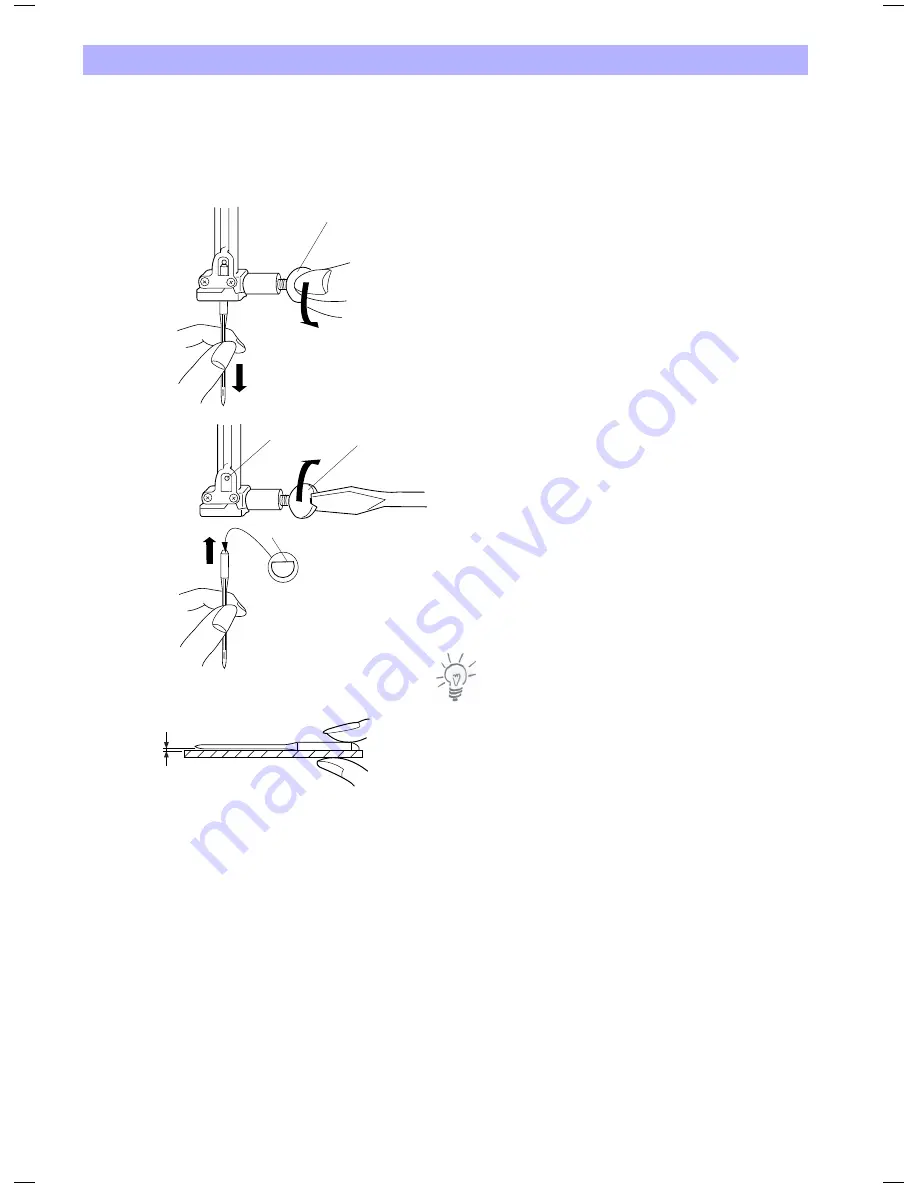
Change Needle

Turn off the power switch and disconnect the machine from the 
power supply.

Raise the needle by turning the handwheel and lower the presser 
foot.

Holding the needle tight, loosen the needle clamp screw by turning 
it counterclockwise.
Remove the needle from the clamp.

Insert a new needle into the needle clamp with the flat side of the 
needle to the rear.


1. 

Needle clamp screw


2. 

Flat side of the needle

When inserting the needle into the needle clamp, push it up against 
the stopper pin and tighten the needle clamp screw firmly. 


3. 

Stopper pin 

Note:

Never use a blunt needle. To check needle straightness, place the 
flat side of the needle onto something flat (a needle plate, glass 
etc.). A gap between the needle and the flat surface should be 
consistent. 

 4. Gap 

1

1

2

3

4

Summary of Contents for bernette 340

Page 1: ......

Page 2: ... Turn power switch to 0 off when making any adjust ments in the needle area such as threading or changing the needle threading the bobbin or changing the presser foot etc 10 Always unplug the sewing computer from the electrical outlet when removing covers lubricating or when making any other user servicing adjustments mentioned in this instruction manual 11 Never drop or insert any object into any...

Page 3: ...2 ...

Page 4: ...o Embroider 7 20 Important Embroidery Information 21 24 Key Operations 25 35 Embroidery 36 40 Lettering 41 45 Editing and Combining Designs 46 53 Design Transfer and Compatibility 54 58 Care and Maintenance 59 60 Troubleshooting 61 Index 62 Built in Design Chart Appendix Table of Preset Colors Appendix ...

Page 5: ... Needle 22 Embroidery foot 23 Carrying handle 24 Hole for extra spool pin 25 Bobbin winder stopper 26 Handwheel 27 Design Card slot 28 Design Card optional accessory 29 Card eject button 30 USB Stick socket 31 Power switch 32 Machine socket 33 Carriage for embroidery 34 Presser foot lifter Caution Always provide sufficient clearance for the embroidery carriage behind your machine before starting t...

Page 6: ...2 Lint Brush 3 Extra Spool Pin 4 Spool Pin Felt 5 Spool Stand 6 Spool Holder Large 7 Spool Holder Small 8 Scissors 9 Screwdriver 10 Screwdriver 11 Set of Needles 12 Instruction Book 13 Power Supply Cord 15 Hoop B with Template 14 Hoop A with Template 16 Spool Net ...

Page 7: ...ut the extension table toward you as illustrated To attach position the tabs on the base tab holes and push down gently 1 Extension table 2 Tabs 3 Base tab holes Sewing accessories are stored in the extension table Pull open the door to store the accessories 4 Door 1 2 3 1 4 ...

Page 8: ...that appear on the visual touch screen if it happens For Your Safety While in operation always keep your eyes on the embroidery area and do not touch any moving parts such as the thread take up lever handwheel or needle Always turn off the power switch and unplug the power supply when leaving the machine unattended when attaching or removing parts cleaning the machine Thread Cutter Button Press th...

Page 9: ...net is especially usefull to work from large or loose wound spools 6 Spool Net Use the spool stand if the thread tangles around the root of the spool pin 7 Spool stand Extra spool pin Use the extra spool pin when you need to wind the bobbin without unthreading the machine while working on a project When working with metallic thread the use of the extra spool pin is also highly recommended Insert t...

Page 10: ...se to the hole in the bobbin Press the Start Stop button again When the bobbin is fully wound it will stop automatically Press the Start Stop button to stop the machine then return the bobbin winder spindle to the left Remove the bobbin and cut the thread with the bobbin thread cutter 3 Bobbin thread cutter Notes Do not move the bobbin winder spindle while the machine is running For safety purpose...

Page 11: ...e bobbin holder Draw the thread to the left sliding it between tension spring blades 3 Front notch Continue to draw the thread lightly until the thread slips into side notch 4 Side notch Pull out about 10 cm 4 of thread to the rear Refer to the threading chart shown on the hook cover plate to check the threading Re attach the hook cover plate 5 Bobbin thread 6 Hook cover plate 7 Threading chart 1 ...

Page 12: ...ad around the bottom of the thread guide plate and up to the thread take up lever C 3 Thread guide plate Vorbereitungen zum Sticken 11 Nähfuss hochstellen Der Nähfusslifter stellt den Nähfuss hoch und senkt ihn Aus der oberen Position kann der Nähfuss zusätzlich noch um ca 6mm angehoben werden indem der Nähfusslifter nach oben gedrückt wird Dies ist besonders hilfreich beim Einfahren des Stickrahm...

Page 13: ...t channel 4 Slit 5 Eye of the take up lever Slip the thread behind the lower thread guide from the right 6 Lower thread guide Slip the thread in the needle bar thread guide from the left 7 Needle bar thread guide Thread the needle from front to back by hand or use the built in needle threader Note Refer to page 13 for built in needle threader 4 5 D 6 7 ...

Page 14: ...e Avoid applying sideways force to the needle threader lever as this could cause malfunction of the threader Draw the thread down around the threader guide and under the hook 3 Thread guide Release the threader lever slowly while holding the thread end with your fingers A loop of the thread is pulled up through the needle eye Remove the loop from the threader and pull out the thread end from the n...

Page 15: ...finger 1 Needle thread Turn the handwheel one complete turn toward you Draw the needle thread to bring up a loop of the bobbin thread 2 Loop of the bobbin thread Pass the needle thread through the hole in the embroidery foot and draw it up to the thread holder leaving an inch of free thread 3 Hole 4 Thread holder 1 1 2 3 4 ...

Page 16: ...the upper thread tension It is recommended to embroider first a sample for every project Adjust the upper thread tension according to the results on the sample Balanced thread tension Small amount of the needle thread shows on the wrong side of the fabric If the needle thread tension is too tight The bobbin thread shows on the right side of the fabric Reduce the tension by turning the tension dial...

Page 17: ...e clamp Insert a new needle into the needle clamp with the flat side of the needle to the rear 1 Needle clamp screw 2 Flat side of the needle When inserting the needle into the needle clamp push it up against the stopper pin and tighten the needle clamp screw firmly 3 Stopper pin Note Never use a blunt needle To check needle straightness place the flat side of the needle onto something flat a need...

Page 18: ...ew Please see your dealer for additional hoop sizes The following hoops are preset in the embroidery computer Hoop C for free arm embroidery 50 x 50 mm Hoop F round embroidery area 126 x 110 mm Templates When positioning the fabric into the hoop use the template to align the centerlines on the fabric with the center of the hoop First mark the centerlines on the fabric and place the fabric on the o...

Page 19: ...m on top of the outer hoop d Push the inner hoop into the outer hoop do not readjust the tightening screw on the outer hoop e Remove the template 6 Template Having finished step 2 the fabric should sit well stretched in the hoop You are now ready to attach the hoop with the fabric onto the Deco 340 Note It is only necessary to calibrate the hoop once if you are embroidering several pieces with the...

Page 20: ...Attaching knob 2 Carriage holes 3 Pins Turn the attaching knob clockwise Caution Always provide sufficient clearance for the embroidery carriage behind your machine before starting the machine Do not force to move the carriage by hand Return the carriage to the idle position before turning the power off Use the keys Utility and Return Carriage as described on page 25 ...

Page 21: ...s onto which motifs will be placed Use in conjunction with appropriate stabilizer Paper backed adhesive stabilizer place stabilizer in hoop paper side up use a pointed object e g scissors to score the paper and remove it to reveal the self adhesive surface position the piece of fabric to be embroidered on the stabilizer Application Intended for delicate fabrics such as jersey or silk or hard to ho...

Page 22: ...force with additional suitable stabilizer on the wrong side if necessary for lace embroidery place one or two layers of water soluble stabilizer in hoop as the motif is not embroidered on any fabric only the thread embroidered motif is left after dissolving lay the motif down flat and let dry water soluble stabilizer can also be removed by gently tearing it away when used as a topping on non washa...

Page 23: ...e embroidery or items that will not receive excessive wear and tear Metallic Wrapped Polyester Thread Metallic Thread Metallic thread is a light to mediumweight thread suitable for special effects in embroidery Preferably use with a Metafil 130 705 H MET needle or Organ needle of varying sizes Note For metallic thread it is highly recommended to use the extra spool pin see Page 8 and the Spool Net...

Page 24: ...hly down the long groove on the back of the needle The thread can be secured optimally Too Thin Thread or Too Thick Needle The thread does not travel smoothly in the groove Faulty stitches and damage of the thread can occur Too Thick Thread or Too Fine Needle The thread rubs on the edges of the groove and can get jammed This can break the thread Needle Summary BERNINA uses needle system 130 705 H ...

Page 25: ...reads Needle size 60 100 70 90 75 90 75 90 Special needles are available at your dealer Model Normal point slightly rounded Ball point Large eye slight ball point Large eye Many materials are easier to sew if the appropriate needle is used Checking the Needle Condition The needle condition should be checked and the needle replaced regularly A defective needle not only damages the sewing but also t...

Page 26: ...uch screen with hard or sharp pointed objects like pencils screwdrivers or the like Note The screen contrast as well as the adjustment of the touch screen can be adjusted by touching the utility key and then setup Standard Keys 1 Utility key Press this key to open the mode selection window There are 4 categories available in the mode selection window 2 Setup key Press this key to customize the use...

Page 27: ...e embroidery computer booted Ejecting the card Push the eject button to eject the card Caution Do not eject the card while stitching Never turn the power off or eject the card while the warning sign or hourglass is displayed Otherwise data stored in the memory may be lost or damaged warning sign USB Stick Optional accessory The USB Sticks can be used to save stitch data and transfer embroidery des...

Page 28: ...mode there are two tabs to choose from Setup tab Language selection tab 3 Setup tab Press this key to open the machine settings page 4 Language selection tab Press this tab to select the language for the screen display You can select one of 6 languages 5 Page keys Press either one of these keys to scroll between the pages of this menu 6 OK key Press this key to register the new settings 7 Close ke...

Page 29: ...rred 5 Touch screen calibration If the touch panel doesn t respond as expected the key positions might be out of alignment To realign press the Yes key Window A will show a sequence of crosses signs Press the cross with your finger tip Having pressed one cross the next will be shown Window B shows for a few second when the calibration is completed 6 Embroidery maximum speed The embroidery computer...

Page 30: ...ad calculation is disabled Instead the thread descriptions are shown as stored on the design card This accommodates the user to choose the best fitting colour independent of a brand Note The newly assigned colours are only displayed but not stored with the designs Formatting the memory If the internal memory the USB Stick or the ATA Design Card does not function due to damage to the memory bank yo...

Page 31: ...sable the lower thread and upper thread sensor Note There is an icon 5 shown in the embroidery screen indicating the status of the Thread Check ON OFF 4 Setting all to default Press the Yes key to return all settings to factory default Note The language setting remains unchanged Press the language tab to get to the Language Selection You can select one of the following 10 languages by pressing the...

Page 32: ...ext to the topic Press the Page keys to scroll through the pages of a help window Note To close the help window press the close key The illustrated help of the selected topic will be displayed on the screen Use the page keys to scroll through the pages of the instructions Press the close key to go back to the previous display Index Changing needles Inserting the bobbin Threading the machine Windin...

Page 33: ...previously saved into the internal memory Please refer to the next page Built in Personal key 2 Open for Lettering Monogramming There are three fonts for lettering Gothic Script and Cheltenham built into the Deco 340 Further there is a choice of 3 letter and 2 letter monogramming available Use this selection as well to open fonts from the optional Design Cards with alphabets 3 Open Designs on Card...

Page 34: ...Utility key Press this key to open the utility selection window refer to page 25 for more details 4 Design selection keys The pattern images of the available designs are shown on the pattern selection keys To select a design press the corresponding key The display will switch to the embroidery window Folders on USB Stick USB Sticks may contain design folders as well as design files If so the first...

Page 35: ...eichermedien nicht schreibgeschützt sind können Sie Stickmuster aus persönlichen Speicherkarten ATA Karten oder USB Sticks löschen 1 Drücken Sie im Stickmusterwahlfenster das entsprechende Register des Speicherorts in dem eine Datei gelöscht werden soll Hinweis Zum Löschen eines Stickmusters in einem Ordner auf dem USB Stick müssen Sie zuerst den korrekten Ordner anwählen 2 Delete Taste drücken Da...

Page 36: ... 2 Press the delete key and a dialog box with all designs on the USB will open 3 On the first pages all folders on the USB Stick are displayed 4 Press the key with the folder you want to delete 5 A confirmation dialog will open Press OK to delete the selected folder Note To cancel your selection without deleting the file press the close key USB Embf5 A B C 1 4 FOLDR1AB FOLDR2CD FOLDR3EF FOLDR4GH F...

Page 37: ...s the recommended thread Embroider specific color sections Skip unwanted color sections by pressing the color section page key until the desired color section is shown on the screen By pressing the Start Stop key the computer will start to stitch out the selected color 7 Close key Press this key to close the embroidery window and return to the pattern selection window 8 Metallic Thread key Auto th...

Page 38: ... in a rectangle circumscribing the selected embroidery pattern without stitching The carriage will return to the starting position after tracing and the screen will return to the previous display 6 Close key Press this key to close the window without tracing 7 Stitch back forward keys Press the Jog Stitch key to acitvate this mode Use this mode to trace the design as it is stitched out step by ste...

Page 39: ...struction window A Note The embroidery computer will not stop if Auto Stop is deactivated in the setup Raise the presser foot The screen will show the instruction window B Trim the thread tail close to the starting point and lower the presser foot Press the Start Stop button to start embroidering again and the machine will stop automatically when the first section is finished 1 Thread tail 2 Start...

Page 40: ...tomatically after a few seconds in order to give you free sight to the new colour to be used for threading Press Close to speed up this process Change the thread to the next color Lower the presser foot and press the start stop button to stitch the second color section Press the Carriage to Front key after finishing the last section to return the carriage to the unload position 1 Carriage to Front...

Page 41: ...move the hoop from the carriage C On the back side of your project remove the excessive threads with scissors D Place the hoop back onto the carriage E Replace upper thread spool if required and thread upper thread see page 11 for details F The last screen reminds you to move back several stitches in your project before continuing your work The number of stitches required is depending on how many ...

Page 42: ...ss the corresponding key Note When the screen language is switched to Russian there are three more fonts displayed to choose from 2 Built in card key Press this key to select the source of the monogramming i e built in monogramming or monogramming card 3 Close key Press this key to close the letter style selection window 4 Letter case key Press this key to select either upper or lower case letters...

Page 43: ...ange in the following order Left horizontal or Top vertical aligned Center aligned Right horizontal of Button vertical aligned When starting to emborider the carriage will first move to this position Stich 00001 Using the jog keys you may now align the position of the letter string exactly to your project AB AB G H I J K L M N O P Q R S T U V W X Y Z A B C D E F AB B Gothic A B C Edit A a A A A A ...

Page 44: ...or lettering Starting to embroider Lower the presser foot and press the Start Stop button The computer will stop automatically after stitching 5 stitches and requests the user to cut the thread tail Refer to detailed process description on Page 38 Starting to Embroider Depending on the setting of the Color change key the embroidery computer will stop after each letter and ask to change the thread ...

Page 45: ...ss the delete key The letter E will be deleted Inserting a letter Example To insert E to BAT Press the cursor key to shift the cursor under the next letter where you wish to insert a letter Select the letter E The letter E will be inserted between B and A AB B Gothic BEAT AB B Gothic BEAT AB B Gothic BAT AB B Gothic BAT AB B Gothic BAT AB B Gothic BEAT ...

Page 46: ...stead of editing Press the OK key The screen will change to the embroidery window Press the start stop button to start stitching Notes The 3 Letter monogram can be programmed in the same way as the 2 Letter monogram The 2 3 letters monogram will be stitched center aligned AB AB G H I J K L M N O P Q R S T U V W X Y Z A B C D E F AB B Gothic A B C Edit A a A A A A L M S AB AB G H I J K L M N O P Q ...

Page 47: ... tab to open the Editing Window The Hoop Selection Window will open first to allow you selecting the hoop size You can select one of the following hoops Hoop A Standard 126 x 110 mm 5 0 x 4 3 Hoop B Standard 140 x 200 mm 5 5 x 7 9 Hoop C Option 50 x 50 mm 2 0 x 2 0 Free Arm Hoop Hoop F Option 126 x 110 mm 5 0 x 4 3 Press the OK key and the Editing Window for the selected hoop will open Press the c...

Page 48: ... be shown in the Editing Window A frame around the pattern indicates it is selected Alternate Edit Entry Procedure Starting from the Embroidery Window with a design already selected you may press the Edit tab to open the current design for modification Even if you enter the Editing Mode like this you may add further design elements and save the new combination as one design B 140x200mm Edit X A B ...

Page 49: ...p Note Do not drag the pattern on the screen with a sharp pointed object 2 Close key Press this key to cancel editing and the screen will return to the last Pattern Selection Window 3 Hoop selection key In the Editing Window you can select the appropriate hoop Press this key to open the Hoop Selection Window Select the desired hoop from 3 options available Hoop A Standard F Option 126 x 110 mm 5 0...

Page 50: ...ation in stitch quality 2 Mirror image key Press the vertical mirror key to flip patterns from left to right Press the horizontal mirror key to flip the pattern from top to bottom 3 Rotate key Press this key to rotate the pattern 45 degrees clockwise Micro rotation When you press and hold the rotate key for one second or longer the rotate dialog box will open Press the plus key to rotate the patte...

Page 51: ... the Editing tab 3 Select the hoop B 4 Press the Lettering tab 5 Select S Upper case letter in Gothic style 6 Press the letter case key to select lower case letters AB AB G H I J K L M N O P Q R S T U V W X Y Z A B C D E F AB B Gothic A B C Edit A a A A A A L M S S AB AB AB B Gothic A B C Edit A a A A A A L M S B g h i j k l m n o p q r s t u v w x y z a b c d e f ...

Page 52: ...Position the letters by dragging or with by using the position keys 10 Press the OK key and the screen will change to the Embroidery Window Start the machine to embroider AB AB AB B Gothic A B C Edit A a A A A A L M S g h i j k l m n o p q r s t u v w x y z a b c d e f Sky ...

Page 53: ...s are not shown 5 New Folder key Press this key to create a new folder only available on USB Sticks 6 Page keys Press these keys to scroll between pages with designs On USB Sticks folders are shown first then individual designs 7 Page Number Indication Shows the actual page and the total number of all pages 8 Close key If you do not wish to save the file press this key to close the File Save box 9...

Page 54: ...le name The new file name will be shown in the File Save window Notes If the memory is full a warning message will appear Press the Close key The Edit Window will show up again Save your design temporarily to another memory location Then close the Edit Window and in the File Open Window delete some files that you do not need anymore This will create space for future saves If the same name already ...

Page 55: ...Memory Stick 1 ATA Personal Design Card 1 artista 200 PDC Capacity Designs not limited depending on actual memory size and handling considerable slower if many files in folder not limited depending on memory size Notes Preferred Media Files for Deco must be stored in a folder EmbF5 or any subfolder 1 level underneath Preferred Media Files for Deco must be stored in a folder EmbF5 Function on Deco ...

Page 56: ...BERNINA Embroider Software and transfer and transfer by any of the above memory media to Deco 340 Function on Deco Read only Read only Read only File Type s EXP ART EXP EXP ART not relevant for direct use with Deco 340 1 Any brand of USB Stick or ATA PCMCIA card may be used including PCMCIA Adaptors for other memory media such as CF SD MMC While we have run extensive tests with memory media availa...

Page 57: ...Card or a PCMCIA adapter card with other memory media to store embroidery designs from the Deco 340 These files may be stored on a PC and can be further processed with Bernina Embroidery Software or OESD Explorations Software A PCMCIA Card Reader or the appropriate reader for your memory media is required when working with a desktop PC Embroidery designs created on the PC with Bernina Embroidery S...

Page 58: ...software to a USB Stick or an ATA Personal Design Card in the subdirectory Emb5 EXP files do not carry colour info Please print from the internet for your reference Note If you don t use a Laptop PC you may require a BERNINA Card Reader Important Note This overview only briefly describes the possible operations Please refer to the documentation supplied with the respective products to learn more a...

Page 59: ...ersion of this EXP format Bernina extended EXP embroidery design format based on EXP with added color information In applications that use USB Stick or ATA Personal Design Card Windows based you will see a second file with the same file name but the extension INF For artista 630 640 there is even a third file with the extension BMP Caution To transfer the design completely to the sewing computer b...

Page 60: ...he bobbin holder with a lint brush 5 Lint brush d Clean the hook race with the lint brush 6 Hook race e Clean the hook race with a dry cloth You may also use a vacuum cleaner 7 Soft dry cloth f Insert the bobbin holder so that the knob fits next to the stopper in the hook race 8 Knob 9 Stopper g Re attach the needle plate aligning the needle plate guide pins with the guide holes on the needle plat...

Page 61: ...The bulb could be HOT wait until it has cooled down before touching it To remove Remove the cap and setscrew Remove the faceplate Pull out the bulb from the socket To replace Insert the bulb into the opening of the socket Attach the faceplate with the setscrew and attach the cap 1 Cap 2 Setscrew 3 Faceplate 4 Lamp Socket 5 Light bulb 4 5 1 2 3 ...

Page 62: ... embroidery hoop is not set properly 6 The fabric is not tightly pulled on the embroidery hoop 7 A stabilizer is not being used 1 A thread is caught in the hook race 2 The control circuit is not working correctly 1 Something is caught between the carriage and the arm 2 The carriage is bumping into something around the machine 1 The fabric is not pulled tightly on the embroidery hoop 2 The embroide...

Page 63: ... Design Card 26 Inserting the bobbin 10 K Key Operations 25 L Language Selection 30 Lettering 41 Deleting a letter 44 Inserting a letter 44 M Monogram 2 3 Letters 45 N Name of Parts 4 Needle Summary 23 Needle Threader 13 Needle Thread and Fabric 23 O On screen Help 31 Open Designs from internal memory 32 Overview Embroidery Computer 4 P Pattern Selection Window 32 R Raising the Presser Foot 11 Rem...

Page 64: ...13 04 EN 854800087 502060 06 63 Copyright 2011 Bernina International AG Steckborn ...

Reviews: