background image

27

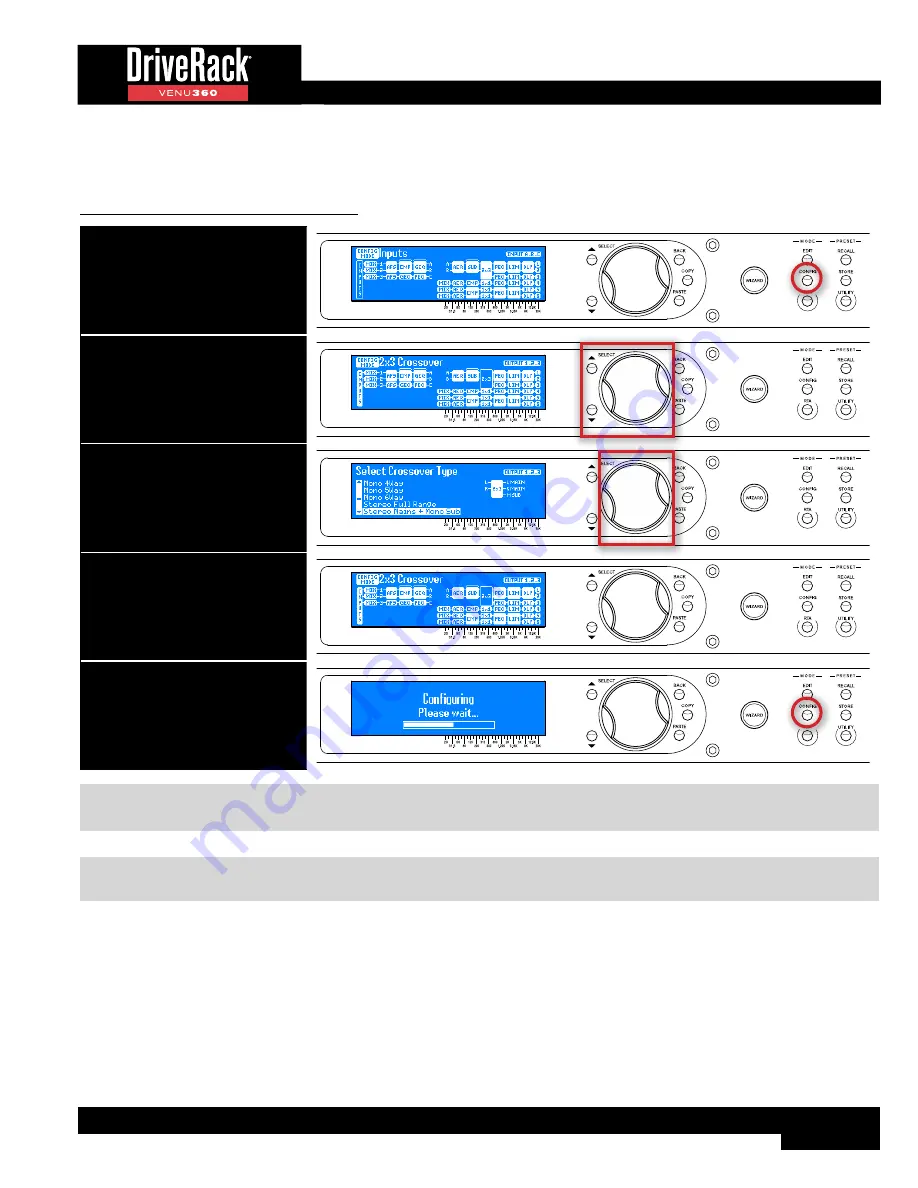
Configuring Crossover Types

Crossover types can be selected in Configuration mode. 

To configure Crossover module types:

1. Press the CONFIG button.

2. Select a Crossover module using 

the SELECT wheel and UP/DOWN 

buttons. Press the SELECT wheel 

to enter the Crossover Type 

Selection menu.

3. Select the desired option by 

turning then pressing the SELECT 

wheel. See TIP following table.

4. Repeat steps 2-3 to configure any 

additional Crossover modules.

5. When done, press the CONFIG 

button twice to apply the changes.

TIP: 

Outputs are automatically named when changing crossover configuration types. These output names can be edited if 

desired, see 

‘Naming Outputs’ on page 37

 for more information.

NOTE: 

When changing crossover configuration types, default crossover settings will automatically be set to get you 

started.

Summary of Contents for DriveRack VENU 360

Page 1: ...Owner s Manual ...

Page 2: ...with the sale of this product In no event shall dbx or its dealers be liable for special or consequential damages or from any delay in the performance of this warranty due to causes beyond their control Technical Support Service If you require technical support contact dbx Technical Support Be prepared to accurately describe the problem Know the serial number of your device this is printed on a st...

Page 3: ... 4 EQ The System In The Venue 50 5 Ring Out The System With AFS 51 6 Add Finishing Touches 52 Processing Modules Parameters 53 Inputs Module 53 Router Module 54 Mixer Module 55 Advanced Feedback Suppression AFS Module 57 Automatic Gain Control AGC Module 62 Delay DLY Modules 64 Compressor CMP Module 66 Graphic EQ GEQ Module 69 Noise Gate GAT Module 71 Parametric EQ PEQ Modules 73 AutoEQ AEQ Module...

Page 4: ...allow additional input signals to be fed to any available output processing chains for additional stage monitor zone or delay fill processing leaving no processing to waste The updated Wizards in the VENU360 offer step by step assistance with setup configuration loudspeaker optimization and feedback elimination Select your speaker and amp models from the Setup Wizard s tuning list to automatically...

Page 5: ...ull Range Up To Mono 6 Way Configurations Selectable Crossover Filter Types Slope Rates With Adjustable Polarity Variable Phase Control Up To 3000ms Total Cascaded Delay Time 3 Configurable Delay Modules At 1000ms Each 8 Band Output Parametric EQs For Speaker Tunings Output Driver Alignment Delays For Multi Way Systems dbx PeakStopPlus Output Limiters Built In Signal Generator RTA For System Fine ...

Page 6: ...ages to be optimized for the connected mixer and amplifiers or powered speakers See Analog Input Output Clip Levels under Utility Menu on page 87 for more information on the analog input and output clip level settings 3 Connect the VENU360 s outputs to the designated amplifier or powered speaker inputs 4 If you plan to calibrate the system using the built in Wizards connect the optional dbx RTA M ...

Page 7: ...e Network option If your computer is configured for Auto IP addressing i e the computer s IP address is 169 254 xx yy The default IP address and subnet mask in the VENU360 conform to the Auto IP addressing standard i e the IP address is 169 254 2 2 and the subnet mask is 255 255 0 0 To connect simply turn DHCP OFF in the VENU360 s Utility Network menu If your computer is configured with a static I...

Page 8: ... as auto MDI MDIX sensing 5 Apply power to the VENU360 ensure the amplifiers are powered off see Applying Power on page 4 for more information Wait for the VENU360 to initialize and give it time to negotiate with the network so it can be assigned an IP address this can take a few minutes You can ensure the VENU360 has been assigned an IP address by pressing the UTILITY button then selecting the SY...

Page 9: ...er on page 4 for more information Wait for the VENU360 to initialize and give it time to negotiate with the network so it can be assigned an IP address this can take a few minutes You can ensure the VENU360 has been assigned an IP address by pressing the UTILITY button then selecting the SYSTEM INFO option or by pressing the SELECT wheel from Home mode and selecting the SYSTEM INFO home screen opt...

Page 10: ...tion 4 SELECT Wheel This rotary encoder is used for scrolling menus selecting on screen options and parameters and editing selected on screen options and parameters Some functions are performed by turning the SELECT wheel and others are performed by pressing the SELECT wheel When in Home mode pressing the SELECT wheel will bring up a menu where you can select from the available home screens see Th...

Page 11: ...dicates that the VENU360 s inputs are being overdriven either at the physical XLR input or in the input Mixers Routers These LEDs feature a peak hold function so they will remain lit for a short period of time after the signal level drops back below the clip point The dbx Type IV conversion system built into the VENU360 will clamp down on excessively loud input signals to prevent the A D converter...

Page 12: ... 87 for information on the options and parameters available in the Utility menu 15 MIX ROUTE MUTE Buttons Pressing each of these buttons will enable disable the MASTER MUTE parameter inside each corresponding input Mixer Router module When enabled the signal will be muted prior to the front panel meters see DSP Block Diagram on page 108 to see a diagram of the signal flow The state of these mutes ...

Page 13: ...ese outputs in the Utility menu This can help optimize the analog signal to noise performance and gain structure between the VENU360 and amplifiers or powered speakers See ANALOG INPUT OUTPUT CLIP LEVELS under Utility Menu on page 87 for more information on the analog output clip levels 5 PIN1 Ground Lift Switch This switch lifts the pin 1 chassis ground on all XLR input connectors In most applica...

Page 14: ... wheel and UP DOWN buttons can be used to navigate the on screen configuration map to select a module to configure As each module is selected the title at the top of the screen will display descriptive information about it The icon in the upper right corner of the display indicates the input output channels affected by the selected module Once the desired module is selected pressing the SELECT whe...

Page 15: ...een indicates the output processing configuration The blocks represent the processing modules The brackets located at the top of some columns indicate configurable processing insert slots Configuration Map Home Screen Dynamics Gain Home Screen This home screen shows a global view of all gain changes applied by any configured dynamics processors i e Compressors Limiters AGCs and Noise Gates Any ins...

Page 16: ...s are pre the input signal processing chains The A B C bus points are post the input processing chains See Configuring Mixers Routers on page 23 and DSP Block Diagram on page 108 for more information on these bus points Bus Meters Home Screen System Info Home Screen This home screen shows the name of the VENU360 device currently installed firmware version and current IP status address System Info ...

Page 17: ...urn SELECT Wheel Press SELECT Press WIZARD Button WIZARD MODE Wizard Menu Run System Setup Wizard Run All Wizards Run AutoEQ Level Assist Wizard Run AFS Wizard Wizard Options Press CONFIG Button CONFIGURATION MODE Turn SELECT Wheel Press UP DOWN Press SELECT Turn SELECT Wheel Press UP DOWN Press SELECT Configuration Mode Selected Module s Edit Menu Press RTA Button Press RECALL Button Press STORE ...

Page 18: ... system by helping adjust your system level balance and analyzing your room and applying accurate room EQ in a fraction of the time it would take to manually analyze and calibrate the system To use the Wizards to configure and optimize a new system 1 Press the WIZARD button 2 Select the RUN ALL WIZARDS option using the SELECT wheel 3 Follow the on screen instructions Turn the SELECT wheel to edit ...

Page 19: ...you will be prompted to select how many mic positions you would like AutoEQ to analyze the selections are 2 3 or 4 The Level Assist and AutoEQ mic position 1 measurements should be taken with the microphone placed out in front of the speakers the same distance as the speakers are apart so that the three components form an equilateral triangle as shown in the Level Assist AutoEQ Mic Position 1 diag...

Page 20: ...tect the frequencies that are prone to feedback and notch them using Fixed filters When the AFS Wizard is complete it will automatically enable the Live filters for automated protection during system use To use the AFS Wizard simply set up all the microphones perform a sound check set up a rough mix for all microphones which will be used during the performance then follow the on screen instruction...

Page 21: ...nalog connections select either the INTERNAL 48 kHz or INTERNAL 96 kHz clock source setting In this configuration XLR 1 and 2 must be configured for analog operation these are the default settings from the factory Utility Settings Clock Source INTERNAL 48 kHz or INTERNAL 96 kHz XLR 1 Input Format Analog 1 SRC N A XLR 2 Input Format Analog 2 SRC N A VENU360 Inputs Analog Device AES Connections From...

Page 22: ...are connected to the AES input jacks you will need to select one to clock to and enable SRC for the other In this configuration XLR 1 and 2 must be configured for AES operation Utility Settings Clock Source AES 1 2 XLR 1 Input Format AES 1 2 SRC OFF XLR 2 Input Format AES 3 4 SRC ON VENU360 Inputs Optional Analog Device Digital Device 2 AES 3 4 Clock 2 Digital Device 1 AES 1 2 Clock 1 NOTE SRC is ...

Page 23: ...an Configure signal routing and mixing for input and output processing chains Edit processing module insert types Link unlink processing modules Configure crossover types Edit output names It is also possible to create an entire configuration from scratch in Configuration mode For example you can load any existing or empty preset then edit the configuration from there To use Configuration mode 1 P...

Page 24: ...NU360 will load the new configuration and automatically mute all outputs this is a safety feature When ready to audition the system unmute the outputs NOTE The VENU360 can intelligently determine which modules have been modified in the configuration and make the necessary changes without losing the settings in all other untouched modules in the configuration ...

Page 25: ... mid output processing chains Input Mixer Router Chain Options Description Routing Diagram Route IN1 Analog 1 Route IN2 Analog 2 Route IN3 Analog 3 Route IN4 AES 1 Route IN5 AES 2 Route IN6 AES 3 Route IN7 AES 4 Mix Inputs Mid Output Mixer Router Chain Options Description Routing Diagram Route IN1 Analog 1 Route IN2 Analog 2 Route IN3 Analog 3 Route IN4 AES 1 Route IN5 AES 2 Route IN6 AES 3 Route ...

Page 26: ...Router Mixer module types 6 Press the CONFIG button twice to apply the changes TIP When multiple Mixers Routers of the same type need to be configured the COPY PASTE buttons can be used to copy one Mixer Router type and paste it to another Mixer Router location rather than entering the Mixer Router Selection menu for each one Input Mixer Router types can be copied and pasted to other Input Mixer R...

Page 27: ... Module Inserts The two input processing insert slots allow the following processing module insert types to be configured Automatic Gain Control Backline Delay Compressor Graphic EQ Noise Gate Parametric EQ 12 Band with Narrow Notch Capabilities Subharmonic Synth NOTE Processing modules of the same type cannot be inserted back to back in the input insert slots The mid processing insert slot allows...

Page 28: ...l insert modules See TIP following table for information on copying pasting insert module types 6 When done press the CONFIG button twice to apply the changes TIP Insert types can also be copied and pasted using the COPY PASTE buttons rather than entering the Insert Type Selection menu for each one Simply select an inserted module and press the COPY button Now select the desired insert slot destin...

Page 29: ...ired option by turning then pressing the SELECT wheel See TIP following table 4 Repeat steps 2 3 to configure any additional Crossover modules 5 When done press the CONFIG button twice to apply the changes TIP Outputs are automatically named when changing crossover configuration types These output names can be edited if desired see Naming Outputs on page 37 for more information NOTE When changing ...

Page 30: ...e following table shows all the crossover configuration types available in the VENU360 Crossover Types Ref Of Inputs Outputs Crossover Name Crossover Configuration Icon Supported Speaker Configuration 1 1x1 Mono Full Range 2 1x2 Mono Main Mono Sub 3 2x2 Mono Main Aux Sub 4 1x2 Mono Mains x2 5 1x3 Mono Mains x2 Mono Sub 6 2x3 Mono Mains x2 Aux Sub LEGEND M Mono L Left C Center R Right A Aux LEGEND ...

Page 31: ...n 7 2x3 Mono Mains x2 Aux Sub 8 1x4 Mono Mains x2 Mono Subs x2 9 2x4 Mono Mains x2 Aux Subs x2 10 1x3 Mono Mains x3 11 1x4 Mono Mains x3 Mono Sub 12 2x4 Mono Mains x3 Aux Sub 13 1x5 Mono Mains x3 Mono Subs x2 LEGEND M Mono L Left C Center R Right A Aux LEGEND FR Full Range S Sub AS Aux Sub H High M Main or Mid L Low ...

Page 32: ...figuration 14 2x5 Mono Mains x3 Aux Subs x2 15 1x6 Mono Mains x3 Mono Subs x3 16 2x6 Mono Mains x3 Aux Subs x3 17 1x2 Mono 2Way 18 1x3 Mono 2Way Mono Sub 19 2x3 Mono 2Way Aux Sub 20 1x4 Mono 2Way x2 LEGEND M Mono L Left C Center R Right A Aux LEGEND FR Full Range S Sub AS Aux Sub H High M Main or Mid L Low ...

Page 33: ...onfiguration 21 1x5 Mono 2Way x2 Mono Sub 22 2x5 Mono 2Way x2 Aux Sub 23 1x6 Mono 2Way x2 Mono Subs x2 24 2x6 Mono 2Way x2 Aux Subs x2 25 1x6 Mono 2Way x3 26 1x3 Mono 3Way 27 1x4 Mono 3Way Mono Sub LEGEND M Mono L Left C Center R Right A Aux LEGEND FR Full Range S Sub AS Aux Sub H High M Main or Mid L Low ...

Page 34: ...pported Speaker Configuration 28 2x4 Mono 3Way Aux Sub 29 1x6 Mono 3Way x2 30 1x4 Mono 4Way 31 1x5 Mono 5Way 32 1x6 Mono 6Way 33 2x2 Stereo Full Range 34 2x3 Stereo Mains Mono Sub LEGEND M Mono L Left C Center R Right A Aux LEGEND FR Full Range S Sub AS Aux Sub H High M Main or Mid L Low ...

Page 35: ...ation 35 3x3 Stereo Mains Aux Sub 36 2x4 Stereo Mains Mono Subs x2 37 3x4 Stereo Mains Aux Subs x2 38 2x4 Stereo Mains Stereo Subs 39 2x4 Stereo 2Way 40 2x5 Stereo 2Way Mono Sub 41 3x5 Stereo 2Way Aux Sub LEGEND M Mono L Left C Center R Right A Aux LEGEND FR Full Range S Sub AS Aux Sub H High M Main or Mid L Low ...

Page 36: ...iguration 42 2x6 Stereo 2Way Mono Subs x2 43 3x6 Stereo 2Way Aux Subs x2 44 2x6 Stereo 2Way Stereo Subs 45 2x6 Stereo 3Way 46 3x3 LCR Full Range 47 3x4 LCR Mains Mono Sub 48 3x5 LCR Mains Mono Subs x2 LEGEND M Mono L Left C Center R Right A Aux LEGEND FR Full Range S Sub AS Aux Sub H High M Main or Mid L Low ...

Page 37: ...ver Configuration Icon Supported Speaker Configuration 49 3x6 LCR Mains Mono Subs x3 50 3x5 LCR Mains Stereo Subs 51 3x6 LCR Mains LCR Subs 52 3x6 LCR 2Way LEGEND M Mono L Left C Center R Right A Aux LEGEND FR Full Range S Sub AS Aux Sub H High M Main or Mid L Low ...

Page 38: ...ECT wheel 4 Turn the SELECT wheel clockwise to link with lower processing modules Turn the SELECT wheel counter clockwise to unklink selected processing modules 5 Press the SELECT wheel to confirm and continue Pressing the BACK button will cancel the change and return to the previous screen 6 Repeat steps 2 5 to link unlink any additional modules 7 When done press the CONFIG button twice to apply ...

Page 39: ...an also be copied and pasted from one output to another To name outputs 1 Press the CONFIG button 2 Use the SELECT wheel and UP DOWN buttons to navigate the on screen configuration map and select the Output module you wish to rename Press the SELECT wheel to confirm and continue 3 Follow the on screen instructions to select from the name list and or edit the name 4 When done editing the name press...

Page 40: ...eters and options See TIP 1 and TIP 2 following table 4 When done editing press the BACK button to exit the menu Repeat steps 2 and 3 to edit additional modules 5 When done editing press the BACK button repeatedly to return to the Home screen TIP 1 The menu can be navigated using either the UP DOWN buttons or by pressing the SELECT wheel to jump back and forth between columns for DriveRack PA2 sty...

Page 41: ...copy paste settings from one processing module to another 1 Press the EDIT button 2 Select the module you wish to copy using the SELECT wheel and UP DOWN buttons 3 Press the COPY button 4 Select the like module you wish to paste the settings to using the SELECT wheel and UP DOWN buttons 5 Press the PASTE button Repeat steps 2 5 to copy paste additional settings 6 When done editing press the BACK b...

Page 42: ...reset to start with edit the preset then store the changes to any one of the 75 user preset memory locations All settings created when running the Wizards modifications made in Configuration mode and all settings located in the processing modules e g GEQ Limiter Delay Crossover etc will be stored to the preset The exceptions are the Utility and RTA settings which are global and are not stored to i...

Page 43: ...e STORE button a third time or the SELECT wheel to store the preset TIP Pressing the STORE button three times in succession will perform a Quick Store function allowing you to quickly update a preset after making changes Performing this operation will store the updated settings to the current memory location with the current preset name NOTE The STORE button will light whenever a preset s settings...

Page 44: ...40 2 Press the STORE button 3 The current name of the preset will be shown in the LCD display and you now have the option to keep it or rename it If you do not wish to rename the preset proceed to step 4 If you do wish to rename the preset follow the on screen instructions 4 Press the STORE button a second time 5 Turn the SELECT wheel to select the user preset memory location you wish to copy the ...

Page 45: ...shown in the LCD display Press and hold the STORE button for 2 seconds 3 Use the SELECT wheel and or UP DOWN buttons to select the preset you wish to delete 4 Press the SELECT wheel to delete the selected preset 5 A confirmation screen will appear Select the YES option using the SELECT wheel to confirm and delete the preset WARNING The preset residing in the selected memory location will be perman...

Page 46: ...unings If you can t find tunings for your particular speakers or amplifiers you will need to select the Not Listed option in the list The VENU360 will automatically set usable default settings which may sound and work just fine however you may wish to manually calibrate the VENU360 in order to realize the full potential of the sound system and ensure the loudspeakers are protected Providing full d...

Page 47: ...ising the low end response of the sound system try auditioning BW 24 BW 48 filter types Note that the VENU360 may automatically set a high pass filter after configuration This is a precautionary measure and these settings can easily be adjusted as just described See Crossover Module on page 79 for information on editing the crossover Once the crossover frequencies have been set it s time to set th...

Page 48: ...n the previous paragraph can also be used for determining if driver alignment delay is necessary Play the selected sine tone through the system once again the sine tone frequency should match the set crossover frequency of the drivers being tested and invert the polarity on the lower driver so that the two drivers are out of phase If necessary adjust the drivers levels until the most phase cancell...

Page 49: ...witch the polarity back so the drivers are once again in phase Optimizing these parameters using this test will allow your system to work in harmony and improve its magnitude phase and polar response 3 Setting Gain Structure Limiters Now that the crossover settings are optimized and the loudspeaker drivers are in phase it s time to calibrate the gain structure of the system This will provide ample...

Page 50: ...highly unlikely that you are using tube amplifiers since they are not practical for sound reinforcement use please note that most tube amplifiers can be damaged if operated without a load the speaker connected Therefore do not perform the following procedure if using tube amplifiers unless you have verified they can be operated without a load connected This is not an issue with modern solid state ...

Page 51: ...e summing of the input Mixer channels i e 6 db for two channels and an additional 3 db for each additional channel being summed This will maintain unity gain through the Mixer module 7 Now go to each amp channel and slowly raise its attenuator until the amp channel s clip LED just begins to light TIP If any of your amp channels clip with the attenuators all the way down or you can t turn them up v...

Page 52: ...system in the venue The VENU360 s built in AutoEQ Wizard does a great job of equalizing a sound system in a timely manner so we recommend using it Once the AutoEQ Wizard is complete you can adjust the four user bands in the AutoEQ menu bands 11 14 to add to the equalization Or if you prefer you can directly edit any of the 10 AutoEQ bands set by the AutoEQ Wizard bands 1 10 if you want to get back...

Page 53: ...ssion See Advanced Feedback Suppression AFS starting on page 56 for further information on the available AFS TYPE options 8 Go to the FIXED FILTERS parameter and set it to 12 9 Slowly raise the main mixer faders or aux send master if ringing out stage monitors until you reach your target gain described in step 1 or run out of Fixed filters whichever happens first 10 Now lower the main mixer faders...

Page 54: ... mode 6 Add Finishing Touches The system is now ready for use Additional processing can now be applied to add the finishing touches For example subharmonic synthesis can be applied to enhance the system s bass response and compression can be applied to add a touch of mixbus style compression For tips on setting these processing module settings see Compressor CMP Module on page 66 and Subharmonic S...

Page 55: ...ginning of the processing chain and has no parameters to edit It can be used for referencing the input channel assignments and provides direct input signal level metering and clip indication These direct input meters and clip indicators can also be seen in the Input Meters home screen see The Home Screens on page 13 for more information To view the Inputs module 1 Press the EDIT button 2 Select th...

Page 56: ...hen in a menu pressing and holding the EDIT button for approximately 2 seconds will advance to the next module below in the configuration map wrapping around through the available modules This allows quick navigation between menus of a column and improves efficiency when performing repetitive tasks within like modules Router Parameters MASTER GAIN 120dB 6dB Adjusts the output gain of the Router MA...

Page 57: ...enter the module s menu 3 Use the SELECT wheel and UP DOWN buttons to navigate the menu and edit parameters TIP When in a menu pressing and holding the EDIT button for approximately 2 seconds will advance to the next module below in the configuration map wrapping around through the available modules This allows quick navigation between menus of a column and improves efficiency when performing repe...

Page 58: ...m the Mixer NOTE The front panel Mix Route meters monitor the signal level from the configured input Mixers Routers The front panel Mix Route Mute buttons enable the MASTER MUTE parameters inside the configured input Mixers Routers ...

Page 59: ...etermine if it is safe to lift the filter preventing blaring feedback from suddenly returning AFS uses precision frequency detection and state of the art processing to determine the exact range of feedback frequencies to remove instead of indiscriminately removing large sections of audio In the past graphic equalizers were used to eliminate feedback from a system This was an acceptable method for ...

Page 60: ...ext module below in the configuration map wrapping around through the available modules This allows quick navigation between menus of a column and improves efficiency when performing repetitive tasks within like modules AFS Parameters AFS OFF ON Turns the AFS module on and off If AFS is off the filters are bypassed and the algorithm is halted the filters are not updated If AFS is on the filters ar...

Page 61: ...e operation behind the scenes TYPE SPEECH SPEECH MUSIC MUSIC This parameter sets the width and sensitivity of the AFS filters The available options are SPEECH Constant bandwidth of 11 Hz below 76 Hz constant Q of 7 at or above 76 Hz This option is optimized for speech sound reinforcement where wider notch filters are less noticeable Select this option when using the sound reinforcement system for ...

Page 62: ...ive filters goes down then the first Live filter set will be cleared The Fixed Live filter allocation is indicated above the graphic in the AFS menu F indicates Fixed filters and L indicates Live filters A highlighted F or L indicates a filter that is set or in use LIVE LIFT OFF ON This parameter turns the LIVE LIFT feature on and off When turned on a timer is enabled Turn LIVE LIFT on when you wa...

Page 63: ... this parameter to the frequency below which you want AFS to ignore SELECTED FILTER 1 12 This parameter selects between the available filters in the graph and provides information on each As you select each filter the filter blocks above the graph on the right hand side of the menu will indicate which filter is selected L represents a Live filter and F represents a Fixed filter If the selected fil...

Page 64: ...page 25 for more information on configuring inserts The following section provides a description of each of the AGC module parameters and how to edit them To edit an AGC module 1 Press the EDIT button 2 Select an AGC module using the SELECT wheel and UP DOWN buttons Press the SELECT wheel to enter the module s menu 3 Use the SELECT wheel and UP DOWN buttons to navigate the menu and edit parameters...

Page 65: ...vided to control the loud fast acting signals The LIM THRESHOLD parameter adjusts the level at which limiting will occur and can be set from the top of the AGC window up to 0dBFS The Limiter Threshold Indicators shown to the right indicate when signal is below threshold or above threshold THRESHOLD INDICATOR Signal Below Threshold Signal Above Threshold LIM AUTO OFF ON Turns Auto mode for the AGC ...

Page 66: ...d idea if you may have to apply some delay offset for your subs or simply reposition your mains on top of the subs if possible Note that small differences in distance e g a few inches between low and sub drivers is negligible and should not be of much concern due to the large size of these low frequency waveforms If your subs are placed off to the side of the stage or somewhere other than between ...

Page 67: ...s the EDIT button 2 Select a Delay module using the SELECT wheel and UP DOWN buttons Press the SELECT wheel to enter the module s menu 3 Use the SELECT wheel and UP DOWN buttons to navigate the menu and edit parameters TIP When in a menu pressing and holding the EDIT button for approximately 2 seconds will advance to the next module below in the configuration map wrapping around through the availa...

Page 68: ... do the trick It s subtle but it can help add a little extra girth punch and level to the sound if set properly Be careful not to apply too much compression as doing so can have the adverse affect of making things sound smaller creating pumping breathing artifacts or exacerbating feedback NOTE If using subharmonic synthesis placed before the compressor the strong low frequency energy from the sub ...

Page 69: ... a setting of 1 5 to 2 1 will yield best results for most applications where the compressor is used GAIN 20dB to 20dB This parameter is used to compensate for the gain lost due to compression Typically you can look at the gain reduction meter and then apply a matching amount of gain Or you can turn the compressor on and off to A B the compressed signal with the uncompressed signal and adjust the g...

Page 70: ... RELEASE settings will be ignored ATTACK 100µs 200ms Sets the speed at which the compressor starts to reduce the signal level once it has exceeded threshold When AUTO is on this parameter is ignored and set dynamically HOLD 0s 500ms Sets a timer which starts when the signal falls back below threshold and once the time has elapsed allows the compressor to release thereby preventing the compressor f...

Page 71: ...wing section provides a description of each of the GEQ module parameters and how to edit them To edit a GEQ module 1 Press the EDIT button 2 Select a GEQ module using the SELECT wheel and UP DOWN buttons Press the SELECT wheel to enter the module s menu 3 Use the SELECT wheel and UP DOWN buttons to navigate the menu and edit parameters TIP When in a menu pressing and holding the EDIT button for ap...

Page 72: ...es small coffee shops or clubs for example It offers some low end boost with low mid cut which enhances the low end while preventing the system from sounding too muddy The high end is slightly attenuated to remove any harshness and further help optimize gain before feedback SPEECH This option is optimized for speech sound reinforcement Use it to enhance the intelligibility of speech for spoken wor...

Page 73: ...s and making the gate sound more natural Gate modules can be inserted in either the input or mid processing insert slots see Configuring Processing Module Insert Types on page 25 for more information on configuring inserts The following section provides a description of each of the Gate module parameters and how to edit them To edit a Gate module 1 Press the EDIT button 2 Select a Gate module usin...

Page 74: ... these artifacts THRESHOLD INDICATOR Signal Below Threshold Gate Closed Signal Above Threshold Gate Open RATIO 1 1 1 15 Determines how much the signal will be attenuated once it drops below threshold This control works opposite from that of the compressor or limiter ratio control If a RATIO of 1 4 is selected a signal that is 1dB below threshold will be reduced in gain so that it becomes 4dB below...

Page 75: ...esponse of the loudspeaker system before taking the room into account When you select your main and sub speakers in the Setup Wizard the output PEQs will automatically be adjusted By applying speaker tuning EQ loudspeaker frequency response can be improved These output PEQs can also be adjusted so you can manually enter speaker tuning parameters if your speakers aren t listed in the Setup Wizard b...

Page 76: ...type filter BAND 1 12 FREQUENCY 20Hz 20kHz Adjusts the center cutoff frequency of the selected EQ band BAND 1 12 GAIN 20dB 20dB Adjusts the gain of the selected EQ band BAND 1 12 Q 0 1 128 This parameter is only available with BELL type filters and adjusts the width of the selected filter Lower Q settings provide wider filters affecting a wider range of frequencies when adjusted Higher Q settings ...

Page 77: ...er subsequent runs of the AutoEQ Wizard This means that each time you run the AutoEQ Wizard your manual user adjustments will automatically be applied on top of the AutoEQ ed response curve If you decide to manually adjust AutoEQ bands 1 10 such manual settings will be wiped out each time the AutoEQ Wizard is run AutoEQ modules are fixed pre crossover The following section provides a description o...

Page 78: ...ency Each band allows you to select between these three band types so any band can be a bell or shelving type filter BAND 1 14 FREQUENCY 20Hz 20kHz This parameter adjusts the center cutoff frequency of the selected EQ band BAND 1 14 GAIN 20dB 20dB Adjusts the gain of the selected EQ band BAND 1 14 Q 0 1 128 This parameter is only available with BELL type filters and adjusts the width of the select...

Page 79: ...e meters while adjusting the Subharmonic Synthesizer s parameters to see how much of the effect you are adding to the mix Subharmonic Synthesis Level Meters When using an aux fed subwoofer configuration the VENU360 allows the sub synth effect to be applied only to the aux fed sub processing chain completely eliminating processing artifacts on other instruments and vocals See Application 3 Bi Ampli...

Page 80: ...s produces extremely low frequency audio signals that some speakers may not be designed to reproduce Attempting to achieve enhanced bottom end with these systems may not be possible and may result in over stressing or even damaging your loudspeakers It is generally not a good idea to use this feature without a subwoofer In any case please refer to your subwoofer speakers frequency response specifi...

Page 81: ...ted option for any such components will set safe and usable crossover settings These settings may work perfectly fine for you but if you would like to dig your heels in know that you can likely improve system performance by fine tuning the crossover parameters See Manually Optimizing A System Using The VENU360 on page 44 for more information Different Crossover types can be configured in Configura...

Page 82: ...cy by the number of degrees indicated This parameter only needs to be adjusted when utilizing bands containing both a high and low pass filter such as a mid band in a 3 way crossover or when a high pass filter is engaged on a subwoofer crossover band to filter out subsonic frequencies This adjustment is useful for correcting the positive phase shift caused by the band s high pass filter and allows...

Page 83: ... the Setup Wizard and select your amplifiers from the tuning list If tunings aren t listed for your amplifiers check the ever growing online database using the VENU360 control app to see if they ve been added If tunings cannot be found for your amps select the Not Listed option Note that the Limiters will not be set for your amps when selecting the Not Listed option Therefore the Limiters will nee...

Page 84: ...the limiter When set to OFF the limiter will function as a hard knee limiter making it sound more aggressive as described above Setting this parameter to a setting between 1 10 will cause the limiter to act as a soft knee limiter yielding more gradual smooth and natural limiting The OVER EASY parameter s 1 10 range is referred to as VariKnee Lower values provide a slightly softer knee than a hard ...

Page 85: ...iter is looking at an average signal while a peak limiter looks at the instantaneous peak signal An averaging limiter will be less responsive and will not actually limit every peak where a peak limiter will PeakStopPlus involves a two stage process of dynamic limiting The first stage of PeakStopPlus is the Instantaneous Transient Clamp which clamps the signal with a soft logarithmic clamp function...

Page 86: ...ach of the RTA parameters and how to edit them To access and use the RTA and signal generator 1 Press the RTA button 2 Use the SELECT wheel and UP DOWN buttons to navigate the menu and edit parameters RTA Parameters RTA SOURCE RTA MIC A B C A B B C A B C 1 2 3 1 2 2 3 1 2 3 IN1 IN7 SIGNAL GENERATOR Selects the source signal to route to the RTA Signals can be routed from the RTA MIC INPUT jack the ...

Page 87: ...r to read the amplitude levels of all frequencies GRAPH OFFSET 0 dB 40 dB Adjusts the signal level entering the RTA Adjust this parameter so that the full frequency spectrum of the monitored signal can be displayed within the RTA graph GRAPH TYPE OPT1 OPT6 Selects between six different RTA graph view types Select the type which looks best to you GRAPH HOLD 0 5s 5 0s Sets the length of time the RTA...

Page 88: ...Signal Generator signal The options are IN1 IN7 or ALL inputs When the Signal Generator is enabled the signal will be routed to the selected SIGNAL ROUTE muting the signal that normally feeds the configured input and replacing it with the Signal Generator s signal This allows the Signal Generator to be used not only for identifying system issues but also for verifying signal routing within a loade...

Page 89: ... you could set the Analog Output Clip Levels to around 4 dBu to attenuate the analog output levels and prevent the amplifier from clipping WARNING The Analog Output Clip Levels will be set for you automatically when selecting your amp models in the Setup Wizard To prevent amplifier clipping and loudspeaker damage use caution when manually changing these settings If changing the Analog Output Clip ...

Page 90: ...immediately power cycled before the VENU360 has time to auto save it the parameter change will not be retained after a power cycle MUTES POWERUP CURRENT MUTE ALL Determines whether the VENU360 will boot with the output mute settings last used when the device was powered down CURRENT or if it will always boot with all outputs muted MUTE ALL NETWORK Here you can configure DHCP assign a static IP add...

Page 91: ...of presets available for use For example if you use only the first 5 presets you can narrow the list size to the first 5 presets to hide all others The preset recall list size is selectable from preset 1 up to 25 so when using this feature make sure the presets you want access to reside in the lowermost numbered preset memory locations If required presets at memory locations higher than 25 can be ...

Page 92: ...with mutes on 1 Press and hold any MUTE button then power on the VENU360 Keep the button pressed until the LCD display reads MUTE BUTTON HELD All outputs will be muted after initialization then release the MUTE button 2 The VENU360 will now initialize with all outputs muted regardless of the mutes previous state when the VENU360 was last powered down NOTE The INITIALIZE WITH MUTES ON option is a o...

Page 93: ...ar function and output mutes To clear the AFS filters when this option is selected press the EDIT button select the AFS module to clear using the SELECT wheel or UP DOWN buttons press the SELECT wheel to enter the AFS module then press the SELECT wheel one more time to clear the filters TIP Before enabling any of the above lockout with AFS clear options make sure to enter the AFS modules and set t...

Page 94: ...ENU360 Keep the button help until the SOFT RESET Release UTILITY button message appears in the LCD display then release the button 3 Press the WIZARD button to perform the Soft Reset procedure Pressing the UTILITY button will cancel the operation Factory Reset The Factory Reset function resets all user presets and Utility settings in the VENU360 back to their factory default state WARNING Performi...

Page 95: ...ns as described in Making Connections on page 4 then apply power to the system according to the instructions described in Applying Power on page 4 Press the WIZARD button then run the Setup Wizard and follow the on screen instructions Or if you know your speakers and amps aren t listed in the Setup Wizard you can simply load preset 76 and start from there Note that some manual configuration change...

Page 96: ...w your speakers and amps aren t listed in the Setup Wizard you can simply load preset 78 and start from there Note that some manual configuration changes may be necessary when using the remaining outputs for zone or delay fill use See Using Configuration Mode on page 21 for further information on making manual configuration changes in the VENU360 1 2 1 2 Main Amp 1 2 1 2 Sub Amp 1 2 1 2 Zone Delay...

Page 97: ...oofer levels so when altering master system level both the master fader and aux sub aux send master control will have to be altered equally to maintain the relative levels between the main and sub speakers Note that care should be taken to prevent such alteration of the relative levels between the subwoofer and main speaker as this can alter the frequency and phase response of the system Applicati...

Page 98: ...ng Power on page 4 Press the WIZARD button then run the Setup Wizard and follow the on screen instructions Or if you know your speakers and amps aren t listed in the Setup Wizard you can simply load preset 97 and start from there or or C R L Wireless Router Windows or Mac Computer iOS or Android Tablet iOS or Android Phone or or or LEGEND Left Channel L R Right Channel Center Channel C Aux Channel...

Page 99: ...he WIZARD button then run the Setup Wizard and follow the on screen instructions Or if you know your speakers and amps aren t listed in the Setup Wizard you can simply load preset 99 and start from there 1 2 1 2 Monitor 1 Amp 1 2 1 2 Monitor 2 Amp 1 2 1 2 Monitor 3 Amp or or Wireless Router Windows or Mac Computer iOS or Android Tablet iOS or Android Phone or or or Monitor 5 Monitor 6 Monitor 3 Mo...

Page 100: ...ess the WIZARD button then run the Setup Wizard and follow the on screen instructions Or if you know your speakers and amps aren t listed in the Setup Wizard you can simply load preset 100 and start from there 1 2 1 2 Monitor 1 Amp 1 2 1 2 Monitor 2 Amp 1 2 1 2 Monitor 3 Amp or or Wireless Router Windows or Mac Computer iOS or Android Tablet iOS or Android Phone or or or Monitor 3 Monitor 2 Monito...

Page 101: ...fiers must have link parallel jacks to do this This frees up 2 outputs so that up to 4 stage monitors can be connected to the VENU360 outputs Application Notes Make sure your mixer and amplifiers or powered speakers are turned off before making connections Make connections as described in Making Connections on page 4 then apply power to the system according to the instructions described in Applyin...

Page 102: ...s 2 77 Stereo Mains Mono Sub 3 78 Stereo Mains Stereo Subs 4 79 Stereo Mains Aux Subs x2 5 80 Stereo Mains x4 Mono Sub 6 81 Stereo Mains x4 Stereo Subs 7 82 Stereo 2Way Mains 8 83 Stereo 2Way Mains Mono Sub 9 84 Stereo 2Way Mains Stereo Subs 10 85 Stereo 2Way Mains Aux Subs x2 11 86 Stereo 3Way Mains ...

Page 103: ...no Mains x2 Mono Sub 14 89 Mono Mains x2 Mono Subs x2 15 90 Mono Mains x2 Aux Subs x2 16 91 Mono 2Way Mains x2 17 92 Mono 2Way Mains x2 Mono Sub 18 93 Mono 2Way Mains x2 Mono Subs x2 19 94 Mono 2Way Mains x2 Aux Subs x2 20 95 Mono 3Way Mains x2 21 96 LCR Full Range Mains 22 97 LCR Mains LCR Subs ...

Page 104: ...ve 1x1 full range crossovers configured for any remaining available outputs The signal feeding these outputs will be fully attenuated in the Mid Mixers for safety reasons However you can easily edit the settings in these Mid Mixers or quickly modify the configuration and change the mixing routing options on these outputs for additional stage monitor zone or delay fill use ...

Page 105: ...om Crown JBL dbx and more NOTE You can control one VENU360 device on the network at a time using the VENU360 control app Multiple control devices can be connected to the VENU360 simultaneously however it is best to control the VENU360 from only one device at a time for best performance For example you may have the app running on a laptop that sits next to the mixing console and remains active duri...

Page 106: ...net Subnet A small network within a larger network For example a TCP IP network might be a subnet of a venue s network which could include computers throughout the building or a network might be divided into subnets For example in a large installation there may be one subnet per rack or room DHCP Dynamic Host Configuration Protocol This is a protocol for automatically assigning IP addresses to dev...

Page 107: ...ghting try swapping out the connected Ethernet cable for another known working cable If an Ethernet port s LEDs begin lighting after reconnecting or swapping out cables wait a few minutes then try reconnecting with the VENU360 control app If you still can t connect go to step 3 3 Check IP Addresses Network Settings To check the VENU360 s IP address press the UTILITY button then select the System I...

Page 108: ...hibited by a software or hardware firewall If connecting using a switch or router that has an enabled hardware firewall try disabling the firewall and then relaunching the VENU360 control app If this fixes the problem refer to your switch router documentation on how to reconfigure the firewall to allow the VENU360 control app or ports 19272 TCP and UDP and port 21 FTP to pass through the firewall ...

Page 109: ...ity application When a firmware update becomes available this Firmware Update Utility application will be found on the VENU360 product page at dbxpro com If using the DriveRack VENU360 control app you can also update the VENU360 via the Ethernet port straight from the application regardless of the device you re using for control i e iOS Android Mac or Windows device Follow the included instruction...

Page 110: ...gnal Generator can be routed to any single input IN1 IN7 or all inputs simultaneously IN1 IN7 Input channels are unrouted when Signal Generator is routed to a channel RTA source selections includes RTA Mic Input Signal Generator IN1 IN7 or Buses including bus summing options listed below The following routing mixing options are available for each output procesing chain IN1 IN2 IN3 IN4 IN5 IN6 IN7 ...

Page 111: ...e Blue 6 6 Green 7 7 White Brown Crossover CAT5 CAT5e or CAT6 crossover Ethernet cables can be used with network switches routers which support auto MDI MDIX sensing This feature allows the switch router to detect whether a straight through or crossover cable is connected and re configure itself accordingly Crossover cables must be used when connecting a desktop or laptop computer directly to the ...

Page 112: ...HOT SLEEVE GROUND HOT TIP HOT SLEEVE GROUND SLEEVE RCA PHONO TO TS PHONE FROM SOURCE DEVICE OUTPUT TO NEXT DEVICE INPUT TIP HOT SLEEVE GROUND HOT SLEEVE TIP HOT SLEEVE GROUND TRS PHONE TO TS PHONE FROM SOURCE DEVICE OUTPUT TO NEXT DEVICE INPUT TIP HOT RING COLD SLEEVE GROUND HOT TIP HOT SLEEVE GROUND COLD SLEEVE TS PHONE TO RCA PHONO FROM SOURCE DEVICE OUTPUT TO NEXT DEVICE INPUT TIP HOT SLEEVE GR...

Page 113: ...111 Dimensions 19 1 75 17 25 7 875 PASTE COPY BACK SELECT 20 31 5 50 80 125 200 315 500 800 1 25K 2K 3 15K 5K 8K 12 5K 20K MIX ROUTE ...

Page 114: ...mic Range 129 dB with transient material A weighted 22 kHz BW 126 dB with transient material unweighted 22 kHz BW 121 dB typical with program material A weighted 22 kHz BW D A PERFORMANCE D A Converter 24 bit D A Dynamic Range 116 dB A weighted 113 dB unweighted 22 kHz BW SYSTEM PERFORMANCE Internal Processing Wordlength 32 bit floating point Supported Sample Rates 48 96 kHz 32 192 kHz using sampl...

Page 115: ...ditional Resources dbx Website http dbxpro com DriveRack VENU360 Product Page http dbxpro com en US products driverack VENU360 dbx Support http dbxpro com en US support dbx User s Forum http dbxpro com forum ...

Page 116: ...a registered trademark of Microsoft Corporation in the U S and other countries Android is a registered trademark of Google Incorporated Phone 801 566 8800 Website dbxpro com Support dbxpro com en US support dbx Professional Products is a registered trademark of Harman 2015 Harman All rights reserved DriverRack VENU360 Owner s Manual PN 5058681 A ...

Reviews: