17
models are listed. If your components are not listed, check the cloud using the VENU360 control app to see if they’ve been
added. If they haven’t been added, select the “Not Listed??” option – default settings will still be set to get you started. This
Wizard will also configure the XLR inputs for analog or AES operation and the master clock source.
TIP:
If re-configuring a preset which was initially configured using the Setup Wizard, you will receive a prompt asking if
you would like to, “Start from default settings?”. Select the “YES” option to default the Setup Wizard settings and start from
scratch. Selecting the “NO” option will present the Setup Wizard with the options selected when initially running the Setup
Wizard to create the preset. Note that if you’re updating a preset by re-running the Setup Wizard – for example, if you’ve
upgraded amps or speakers – any changes that were made to the preset in Configuration mode or to processing module
settings will be lost! Therefore, it’s recommended that you first copy your stored preset to another memory location before
re-running the Setup Wizard. This way you can use the original preset for reference as well as copy/paste processing
module settings from the original preset to the new preset.
Run AutoEQ/Level Assist Wizard
When used with the optional dbx RTA-M
measurement microphone, these Wizards help
you balance speaker levels and automatically
equalize the system to the current room
environment.
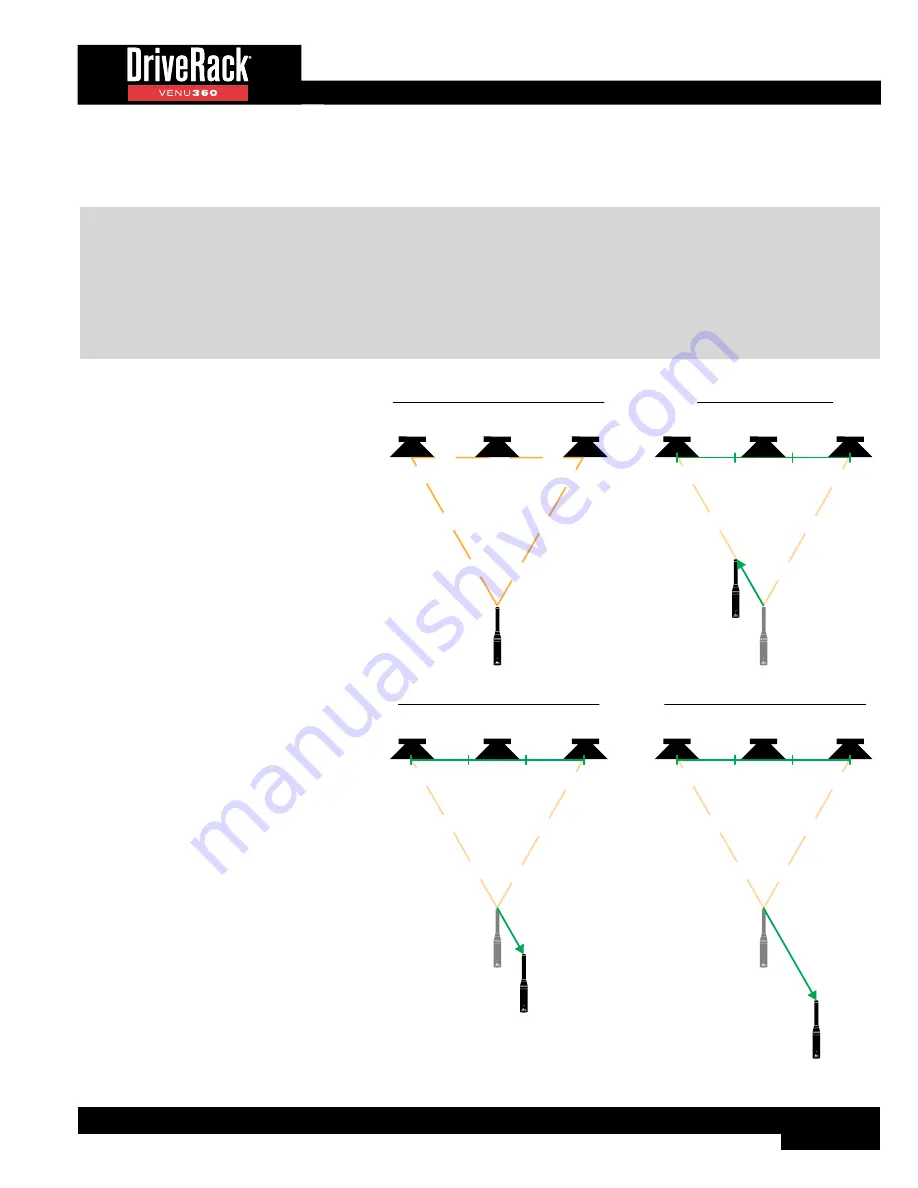
The diagrams to the right show the
recommended Level Assist and AutoEQ RTA-M
mic positions. When running AutoEQ, you will be
prompted to select how many mic positions you
would like AutoEQ to analyze – the selections
are: 2, 3, or 4.
The Level Assist and AutoEQ mic position
1 measurements should be taken with the
microphone placed out in front of the speakers
the same distance as the speakers are apart, so
that the three components form an equilateral
triangle, as shown in the Level Assist/AutoEQ
Mic Position 1 diagram. If analyzing a mono
speaker, place the mic in the position that
makes the most sense. For example, if analyzing
a stage monitor, place the mic in the location
where the artist monitoring the signal will be.
Each time you move the RTA-M mic position it
should move approximately 1/3rd the distance
the speakers are apart from the initial “RTA-M
Mic Placement 1 Reference”, as shown in the
AutoEQ Mic Position 2-3 diagrams. If analyzing
a mono speaker, move the mic by around 1-2’ in
the same direction shown in the diagrams.
Mic position 4 is the exception as it should be
placed 2/3rds the distance from the RTA-M Mic
Placement 1 Reference. If analyzing a mono
speaker, move the mic by a distance of around
3’ in the same direction shown in the diagram.
AutoEQ Mic Position 4 (Optional)
RTA-M Mic
Placement 1
Reference
Left Speaker
Right Speaker
1/3
rd
1/3
rd
1/3
rd
AutoEQ Mic Position 3 (Optional)
RTA-M Mic
Placement 1
Reference
Left Speaker
Right Speaker
1/3
rd
1/3
rd
1/3
rd
AutoEQ Mic Position 2
RTA-M Mic
Placement 1
Reference
RTA-M Mic
Placement 2
1/3
rd
RTA-M Mic
Placement 3
RTA-M Mic
Placement 4
2/3
rds
Left Speaker
Right Speaker
1/3
rd
1/3
rd
1/3
rd
1/3
rd
Level Assist/AutoEQ Mic Position 1
Left Speaker
Right Speaker
Speakers & Mic Form an
Equilateral Triangle
RTA-M Mic
Placement 1
Center/Mono Speaker
Center/Mono Speaker
Center/Mono Speaker
Center/Mono Speaker
Summary of Contents for DriveRack VENU 360
Page 1: ...Owner s Manual ...


