DriveRack
®
DriveRack® 260 User Manual
51
Remote Control
Section 6
1.
3.
4.
2.
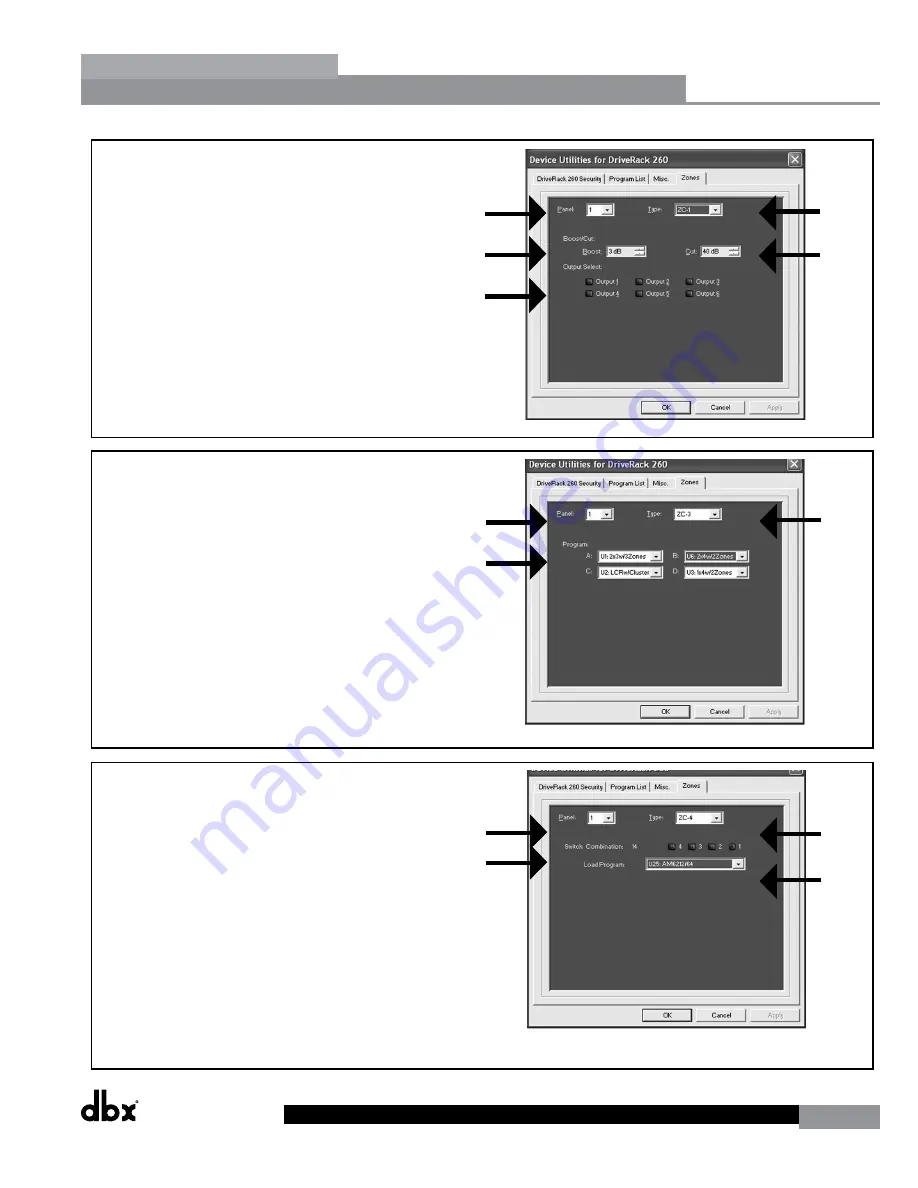
ZC-4
1. Select the ‘Panel’ number (this must match
the Dip Switch setting (ID#) set on the
ZC-4).
2. Select a ZC-4 as the ‘Type’.
3. Select which ‘Switch Combination’ (binary #)
you would like to program.
4. After the correct Switch Combination
number is selected, select which
‘Program’ will be loaded when this Switch
Combination is triggered from the custom
switches, which are connected to the ZC-4
5. Repeat steps 3 and 4 for all remaining
Switch Combinations.
1.
3.
5.
4.
2.
ZC-1 & ZC-2
1. Select the ‘Panel’ number (this must match
the Dip Switch setting (ID#) set on the ZC
wall panel).
2. Select a ZC-1 (or ZC-2 if using a ZC-2) as
the ‘Type’.
3. Set the maximum amount of ‘Boost’ that will
be applied (0 dB typical).
4. Set the maximum amount of ‘Cut’ that will
be applied (40 dB typical).
5. Select which ‘Output(s)’ you would like this
ZC to control.
1.
3.
2.
ZC-3
1. Select the ‘Panel’ number (this must match
the Dip Switch setting (ID#) set on the ZC
wall panel).
2. Select a ZC-3 as the ‘Type’.
3. Select which ‘Program’ will be loaded when
selecting each corresponding position (A-D)
on the ZC wall panel.
Summary of Contents for DriveRack 260
Page 9: ...DriveRack DriveRack 260 User Manual 7 Getting Started Section 1 Step by step Setup Procedure...
Page 10: ...8 DriveRack DriveRack 260 User Manual Getting Started Section 1...
Page 11: ...DriveRack DriveRack 260 User Manual 9 Getting Started Section 1...
Page 12: ...10 DriveRack DriveRack 260 User Manual Getting Started Section 1...
Page 13: ...DriveRack DriveRack 260 User Manual 11 Getting Started Section 1...
Page 14: ...12 DriveRack DriveRack 260 User Manual Getting Started Section 1...
Page 15: ...DriveRack DriveRack 260 User Manual 13 Getting Started Section 1...
Page 16: ...14 DriveRack DriveRack 260 User Manual Getting Started Section 1...


