background image

16

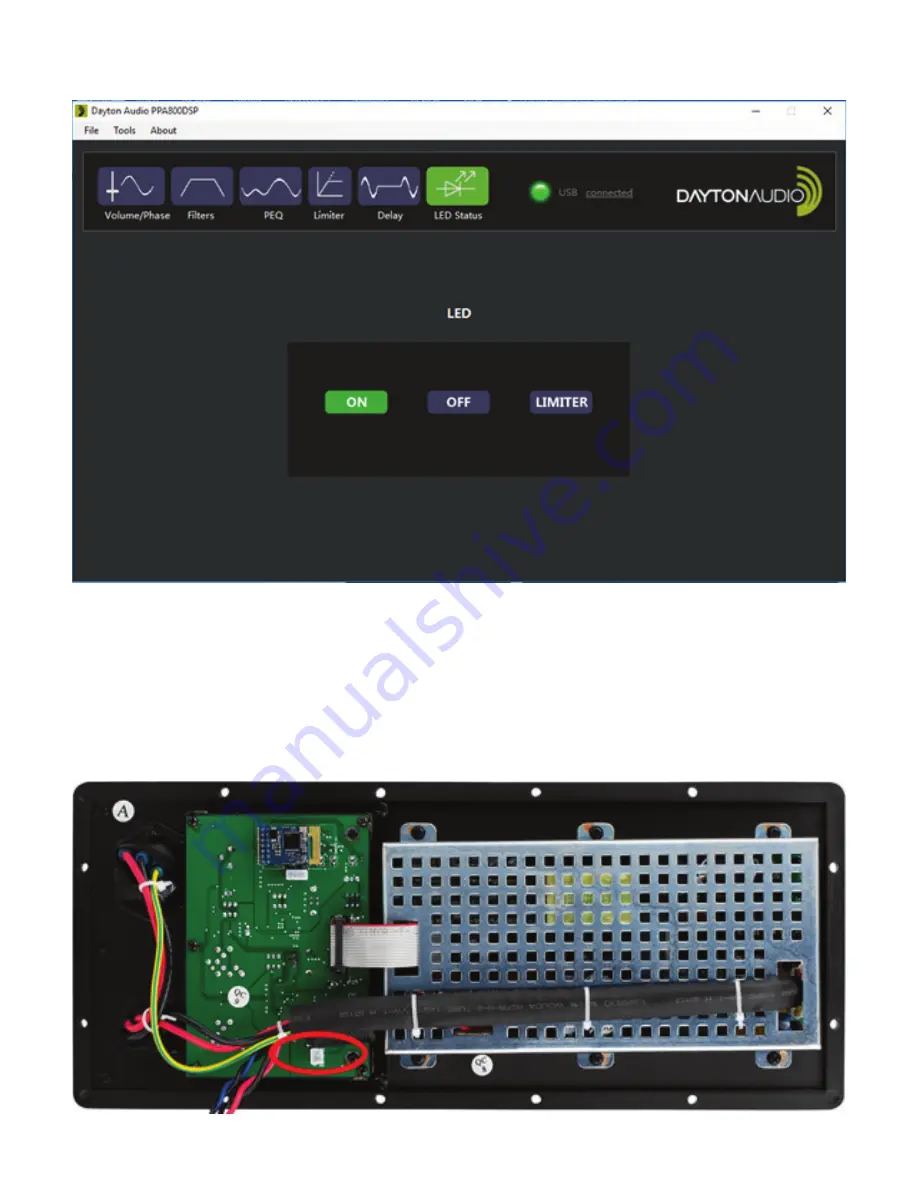
Software - External LED Status

● 

An external LED can be attached to the back of the device through the 2 pin male header on 

the exposed board. It is circled in red in the image below.

● 

There are 3 possible settings for this LED.

 i.


ON

 – The LED stays on the whole time the device is on.

 ii.


OFF

 – The LED is always off.

 iii.


LIMITER

 – The LED status is attached to the limiter. When limiting is happening, it will be  


  on. It will be off otherwise.

Summary of Contents for PPA800DSP

Page 1: ...Model PPA800DSPUserManual 2 WAYPLATEAMPLIFIER 800W2 CHANNELwith DSPandBLUETOOTH...

Page 2: ...s been spilled or objects have fallen into the apparatus the apparatus has been exposed to rain or moisture does not operate normally or has been dropped 15 WARNING To reduce the risk of fire or elect...

Page 3: ...oftware Installation 7 8 5 Driver Installation 9 6 Connecting the PPA800DSP to the Windows Software 10 7 Software Control 11 16 a Volume and Phase Controls 11 b Filter Controls 12 c Parametric EQ 13 d...

Page 4: ...e allows easy DSP adjustment Windows compatible 5 programmable EQ presets per output for various applications Bluetooth input summed to mono for use with phones tablets or laptops 2 channel mixer buil...

Page 5: ...when using a line level source such as a mixing console or other audio device 7 Combination Jack for INPUT 1 Balanced or unbalanced XLR or 1 4 connector 8 Volume Control for INPUT 2 9 MIC LINE Switch...

Page 6: ...on your mixer or other audio devices then turn on this amplifier 5 Adjust levels of INPUT 1 and INPUT 2 and OUTPUT selector if applicable to suit your needs Use the volume control on your Bluetooth d...

Page 7: ...n Guide Download the software from the Dayton Audio Website and double click PPA800DSP exe using a Windows PC to open the installer Follow the prompts as shown below Accept the terms in the license ag...

Page 8: ...ide Continued Fill out your desired user name and organization and press Next Make sure Launch the program is checked in the screen below This will open the driver setup file Press Finish to complete...

Page 9: ...ntrol asks you to allow the program to make changes to the com puter allow it Without installing the driver the hardware is not guaranteed to connect to the software Press INSTALL and wait for a messa...

Page 10: ...SB You will see a glowing green circle in the top right corner when the software is successfully connected Troubleshooting steps 1 Ensure the PPA800DSP is powered on and connected to a USB port on the...

Page 11: ...r by entering a value into the text box i The polarity of the output can be set to either POL or POL by clicking the circle next to the desired choice The default setting is POL C High Pass Volume Con...

Page 12: ...he current state of the filter i Slope Change the slope of the filter by picking one of the many options in the slope drop down box This selection will be immediately represented in the graph to the l...

Page 13: ...to edit the high pass output section blue wires C Graph The graphic equalizer allows for a visual representation of the selected settings i The green line represents the simulated response of the outp...

Page 14: ...y be shown in the graph i The threshold of the limiter can be adjusted by entering a value into the box pressing the up and down arrows or by dragging the slider ii The attack of the limiter can be ad...

Page 15: ...y moving the slider up or down The value of the delay is represented on the right in milliseconds meters and feet B High Pass Output Delay Adjust the delay of the high pass output by moving the slider...

Page 16: ...header on the exposed board It is circled in red in the image below There are 3 possible settings for this LED i ON The LED stays on the whole time the device is on ii OFF The LED is always off iii LI...

Page 17: ...and pair as you would any other device The LED will blink blue while it is trying to pair and become solid blue when it is connected 3 Bluetooth input can be turned off by holding down the bluetooth b...

Page 18: ...18 Default Preset Settings CUSTOM...

Page 19: ...19 Default Preset Settings VOCAL...

Page 20: ...20 Default Preset Settings MUSIC...

Page 21: ...21 Default Preset Settings LOW CUT...

Page 22: ...22 Default Preset Settings HIGH CUT...

Page 23: ...Dayton Audio Last Revised 10 17 2018 daytonaudio com tel 937 743 8248 info daytonaudio com 705 Pleasant Valley Dr Springboro OH 45066 USA 5 Year Limited Warranty See daytonaudio com for details...

Reviews: