background image

vPad-Mini OPERATORS MANUAL

4.5 Saving Results

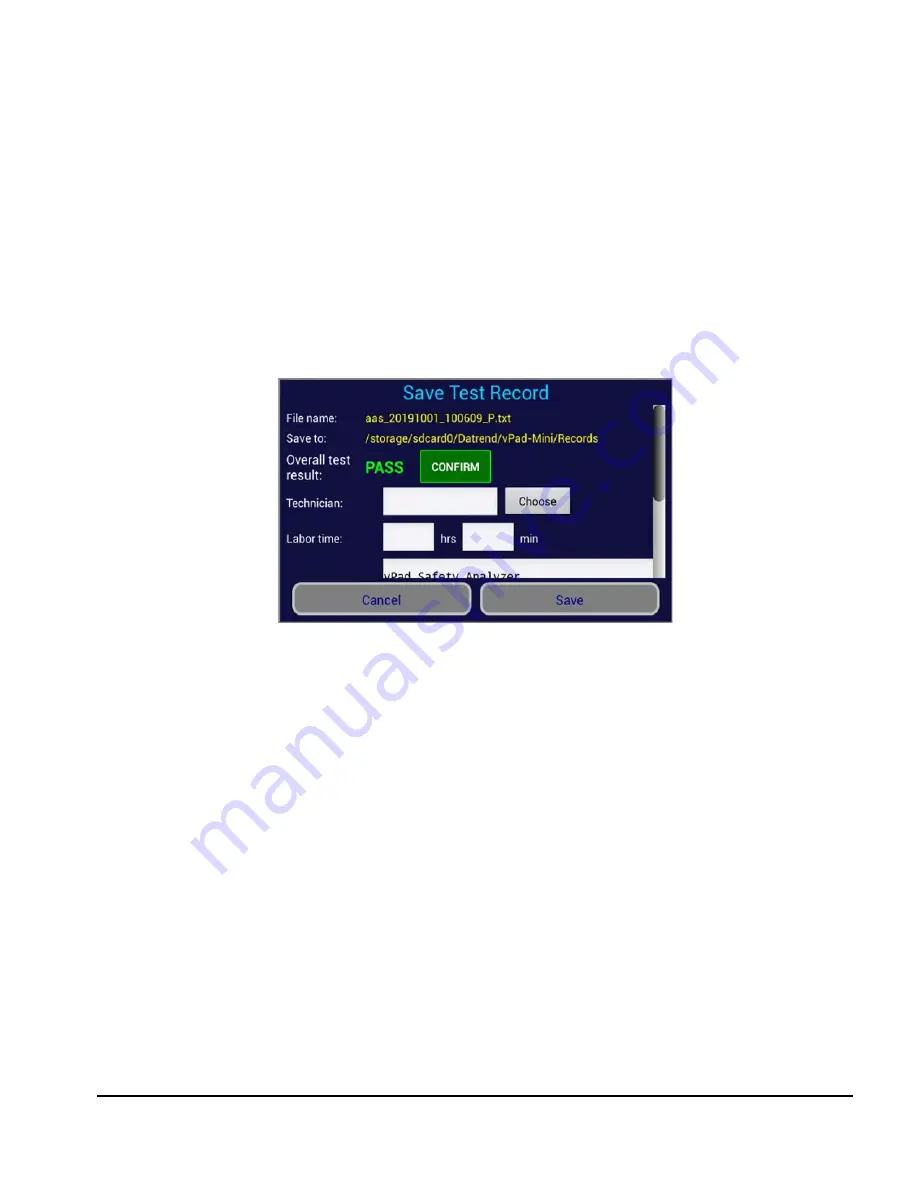
As measurements are made, the test and the results are stored to a file on the vPad-Mini.  The test report is
a text file which is stored in the Datrend/vPad-Mini/Records folder.  The user can optionally assign some
descriptive information to the test report, including Technician and actual Labor Time.  If the parameter has
a Choose button available, there is a corresponding file on the vPad-Mini which contains the list of options.  
These text files are located in the vPad-Mini/Lists folder, and each selection is a text line followed by a
carriage return.

The Technician and Test Report Title are ‘sticky’ fields - once entered, they will re-appear in subsequent
tests until changed.

The ConfigMini.txt file which was previously discussed contains the ConfirmResult setting status.  If it is
true, the overall Pass/Fail result will be shown on the Save Test Record screen and the user will be required
to Confirm the result.  The Cancel and Save buttons will be disabled until the Confirm button is pressed.  If
the Overall Test Result is a Pass, the indication will be in Green; if it is Fail, the indication will be in Red. 
This Confirmation process is solely to try and ensure the user has acknowledged the status of the overall
result.

To remove the need to press the Confirm button, the ConfirmResult setting can be changed to ‘false’.

Figure 63

Operation/Chapter 4 

#

 Page 41

Summary of Contents for vPad-Mini

Page 1: ...Operating Manual MN 125b vPad Mini vPad Safety Analyzer ...

Page 2: ......

Page 3: ...afety Analyzer Operating Manual 2019 2020 Datrend Systems Inc Unit 130 4020 Viking Way Richmond BC CANADA V6V 2L4 Tel 800 667 6557 North America Only or 604 291 7747 Fax 604 294 2355 e mail customerservice datrend com ...

Page 4: ......

Page 5: ...credit Non serialized parts and accessory items cables carrying cases auxiliary modules etc are not eligible for return or refund In order to receive a partial refund credit the product must not have been damaged and must be returned complete meaning all manuals cables accessories etc within 90 days of original purchase and in as new and resalable condition The Return Procedure must be followed So...

Page 6: ...ll prevail By using the App you agree to these terms and Conditions IN NO EVENT SHALL DATREND SYSTEMS INC BE LIABLE FOR CONSEQUENTIAL DAMAGES DSI DISCLAIMER ALL OTHER WARRANTIES EXPRESSED OR IMPLIED INCLUDING ANY WARRANTY OF MERCHANTABILITY OR FITNESS FOR A PARTICULAR PURPOSE OR APPLICATION vPad vPad XPORT vPad ES vPad 353 vPad AS vPad A3 vPad Record Manager vPad RM vPad EQM vPad Check vPad Cal vP...

Page 7: ...vPad Mini OPERATORS MANUAL Table of Contents TABLE OF CONTENTS III 1 OVERVIEW 1 2 MANUAL TESTING 3 3 RECORDING RESULTS 17 4 AUTOMATED TESTING 23 5 UPGRADES AND MAINTENANCE 45 Table of Contents Page iii ...

Page 8: ...vPad Mini OPERATORS MANUAL Table of Contents Page iv ...

Page 9: ...n environment with limited need for Applied Parts testing Options are available to a record measurements create test records and use Bluetooth communications to print or transfer the records or b automate the safety test according to the following standards IEC62353 IEC61010 AU NZ 3551 or NFPA99 Overview Chapter 1 Page 1 ...

Page 10: ...vPad Mini OPERATORS MANUAL Overview Chapter 1 Page 2 ...

Page 11: ...he main menu of the application is shown Figure 1 Note that the main menu appearance will change as the recording and the automation options are enabled the number of buttons will change from 2 to 3 to 4 respectively The UI of the main menu includes image buttons which launch other activities of the app including measurement activities such as voltage equipment current ground resistance and leakag...

Page 12: ...ialize Service is required No response to hardware initialization command or No response to hardware idle command Unable to calibrate voltmeter Service is required No response to voltmeter calibration command Voltmeter offset is too high Service is required Response to command exceeds maximum of counts The Close button dismisses the dialog and retries making a communication connection If the hardw...

Page 13: ...rovided by measurement activities of the app as well as nomenclature which is displayed by those activities Figure 4 Standards supported by vPad Mini are AAMI ES1 NFPA 99 IEC 60601 IEC 62353 IEC 61010 VDE751 and AU NZ 3551 On first run of the app the default standard will be AAMI ES1 The selected standard appears on most menus of the app including the main menu where it is shown above the button I...

Page 14: ...nt that had the receptacle ON or having the AC Power turned OFF whenever you return to the Main Menu Always OFF The button displays the Android Settings of the phone Figure 6 Except for language and perhaps the sound volume users will normally have no need to change the settings of the phone itself However access to the Apps submenu of the Android Settings will be necessary if the vPad Mini app ne...

Page 15: ... button of the main menu launches a voltage measurement Figure 7 A numeric readout occupies the entire upper half of the screen The measured value is updated approximately once per second Image buttons occupying the bottom half of the screen enable the user to control the safety analyzer The button finishes the measurement and returns the UI to the main menu The phone s BACK button is disabled The...

Page 16: ...1 GND L2 GND and point to point voltage The nomenclature of the pick list depends on the standard which has been selected via the Settings Menu of Section 2 AAMI and NFPA standards measure line voltages IEC standards measure mains voltages 2 3 4 When an item on the pick list is chosen the list is dismissed and the schematic on the central button is updated to reflect the new test and the selection...

Page 17: ...ent and returns to the main menu The phone s BACK button is disabled The button displays help information relevant to this menu A schematic diagram is shown between and buttons which represents the test configuration This is an image only not a button A description of the test is placed in a text field above the schematic On entering the menu the test receptacle is automatically switched ON if it ...

Page 18: ... of the screen enable the user to control the safety analyzer The button finishes the measurement and returns the UI to the main menu The phone s BACK button is disabled The button displays help information relevant to this menu The large central button selects the type of measurement to be performed 2 5 1 The button displays a schematic image which represents the measurement being displayed on th...

Page 19: ...power cord resistance IEC standards measure protective earth resistance 2 5 4 When a item on the pick list is chosen the list is dismissed and the schematic on the central button is updated to reflect the new test and the label for the selection is copied to the text field above the schematic The toggle button at bottom right controls the test receptacle Note that it will be OFF when testing the p...

Page 20: ... when the standard is set to AAMI only For all other standards the IEC filter is used When the standard is set to IEC61010 and the selected test is Accessible Voltage an alternative measurement process is used which is analogous to the point to point measurement of the voltage activity Image buttons on the bottom half of the screen enable the user to control the leakage test On initial entry to le...

Page 21: ...n may be disabled or hidden depending on the selected leakage test For any NFPA leakage test the neutral button is disabled its image is set to the closed or default icon and receptacle line 2 is maintained in the closed state For IEC62353 equipment leakage and for AAMI isolation or IEC MAP tests the neutral button is hidden and receptacle line 2 is maintained in a state appropriate for the test c...

Page 22: ... the UI are hidden and a button which controls the MAP test voltage is then shown see Figure 14 On initial selection of the test the MAP button defaults to OFF and the leakage readout is blanked as shown When the MAP button is pressed the analyzer activates the test voltage Figure 15 Per Figure 15 the text field in the middle of the screen is used to display a timer which counts down from 20 secon...

Page 23: ...akage MAP test point to point leakage IEC 62353 Equipment leakage applied part leakage point to point leakage IEC 61010 Touch current point to point leakage accessible voltage test VDE701 702 Touch current earth Leakage When a item on the pick list is chosen the list is dismissed Receptacle polarity is not modified when a new test is selected from the list however neutral line 2 is restored to nor...

Page 24: ...rence tables Figure 19 The app design supports internationalization through sets of HTML help files which are selected by the app according to the language which has been chosen via the phone s Settings menu The WebView control supports pinch and zoom gestures The button closes the help activity and returns the UI to the menu from which the help was opened If the WebView control is scrolled from t...

Page 25: ...e saved to a test record file which is identified by a file name which includes a device identifier the date and the time The recording option is integral to the vPad Mini firmware and is activated by an activation file installed on the phone The activation file is provided through the Datrend dealer on purchase of the option and is tabletID phone specific Once activated the main menu of the app c...

Page 26: ...tart test button This can also be accomplished using a press and hold action on the button Once a test is started the icon for this button will change to the test in progress icon If you return to the main screen the records button will also indicate a test in progress icon If we press the above icon button the test in progress screen Figure 22 will be displayed This screen will show all of the me...

Page 27: ... a dialog box for the device ID input which becomes part of the filename for the test report To make a test measurement go to the Main Screen and select one of the measurement icons On the screen for the test parameter eg Figure 25 a test measurement will be displayed To save the measurement to the test measurement clipboard touch on the numerical measurement An animation of the save process will ...

Page 28: ...21 note the listing of the test records currently in memory Touching on one of the records will display the contents of the test record and provide further options Figure 26 In addition to being able to review the contents of the test record the test record can be deleted or it can be sent to a Bluetooth printer or device If you chose to send the file the Bluetooth connections will be presented fo...

Page 29: ...once using the multiple files button on the Recording screen Figure 21 Touch the button to display a list of files with a checkbox associated with each file Check the box for the files of interest Figure 30 If you wish to select or de select all of the files press and hold on the button now amber in colour again Four buttons are available to control the sorting of the file list by name by date asc...

Page 30: ...me one or more meeting the search criteria can be found and displayed You can recursively search on the short list of files returned above Enter 2 or more characters of a filename that contains the characters and press Contains to see if a filename one or more meeting the search criteria can be found and displayed You can recursively search on the short list of files returned above To restore the ...

Page 31: ... devices such as defibrillators or pulse oximeters and is stored in a file which has been named deviceTYPE seq referred to as a named sequence If a device is being tested for the first time the user will be taken to the test by Standard screen initially If you run a protocol directly from the Standards screen pages 1 4 a deviceID ats file will be created and referred to in the deviceID eqr file wh...

Page 32: ...r but may be referred to by other labels such as Control ID Device ID Asset ID etc On this Equipment ID input screen there are two check boxes If input is required in all uppercase check Caps Lock If you wish to enter the Equipment Information screen check the Edit Info box If you are using a barcode scanner and it has gone to sleep and needs to be re connected activate the scanner again and click...

Page 33: ...will be saved to a file associated with the Equipment ID device_ID eqr This Equipment Information may then be optionally recalled in the future if a previously tested Equipment ID is entered to begin a test Basic Equipment Information is as indicated below in Figure 35 Additionally when a test protocol has been identified defined and a test record is created saved at the end of a test the test pro...

Page 34: ...h is for the device Make A hint is provided as to what the Input box is for in this case Make It is not necessary to delete the hint simply begin typing with the Make of the device Next will take you to the next input box Once again the hint will indicate the type of input expected or if there was text already in the input box it will be displayed If you wish to exit the Next cycle of input use th...

Page 35: ...nd of the Facility line in Figure 38 to gain access to any facilities available in an existing list The list of facilities for instance is a text file resident on the vPad Mini The file can be created on a PC and transferred to the Mini tablet or it can be created as new devices are tested In the above screen the Search has been entered with a blank initial value as indicated by the blank text inp...

Page 36: ...n will open with the value pre entered in the Input text box Simply touch the Add icon to put the value in the list To delete a value from the List type or import the value into the Input box and touch the Delete icon In some cases the List may be very long To find a value in the List type 2 or more characters that you know to be in the value into the Input box Select the Search method Starts with...

Page 37: ...ted and Saved This is useful if you are performing incoming inspections on multiple new devices and wish to cut and paste the last equipment information data to the next test Note that the test must be saved to store the equipment information data to memory for later recall Accepting the Equipment Information will move forward to the test definition screen Figure 45 If an Equipment ID Number is en...

Page 38: ...ns will be skipped over but the answers will be assumed to be Yes and the info from the files will be used Note that the name of the last test performed on this equipment will be a seq type filename if the protocol was based on a named sequence rather than a Standard Operation Chapter 4 Page 30 ...

Page 39: ...t protocol are shown in yellow on the right of the screen with a check mark if the default protocol will perform the step Additional optional steps are also shown but do not have a checkmark The default protocol may be changed if desired Contact your local distributor for assistance The default protocols for the four available standards are EC 62353 NFPA99 IEC61010 AU NZ 3551 Default Setting for S...

Page 40: ...onditions If false the next line will define which icons will be displayed If Territory_NA is true an icon will appear next to the Class designation that shows a typical plug for North America grounded for Class I and no ground for Class II If Territory_NA is false the electrical symbol fo ground or double insulated will be used The ConfirmResult setting will be used in the saving of test results ...

Page 41: ... the Mains test condition is about to happen or where user input is required If no more changes to the protocol are required touch the Run icon to start the test Otherwise touch the Next page icon to continue changes or the back icon to go back one page Page 4 Figure 48 provides the final test configuration options Protective Earth Mains Voltage and Device Current When selections are complete you ...

Page 42: ... to use a name that is similar to an existing name a list of the existing named sequences is available as a dropdown list per Figure 50 from which a name can be selected and edited To use a named Sequence to define the protocol for a test use the Swipe icon on Page 1 to change from the Standards List to the Sequence List and select the Sequence from the list Figure 48 Figure 49 Figure 50 Operation...

Page 43: ... the screen will be enabled These buttons are Edit Trash and Run Once created the content of a named sequence is not intended to be easily changed To make changes it is necessary to first select Edit which will take you to the Standards screen where the parameters from the Sequence will be reflected in the parameter list If you choose to Run the test from the Standards screen the test protocol rec...

Page 44: ...can not be turned on in advance of power being available at the receptacle or there needs to be a delay due to the startup time as the device boots up or the power needs to be turned OFF and then back ON as you reverse the polarity of the input power lines If the Semi Auto mode is enabled for a test protocol the safety tester will pause at the appropriate times to allow the user to make any power ...

Page 45: ...ion before continuing An advisory to turn the EUT OFF in an orderly manner prior to removing power from the receptacle This could happen in preparation for reversing the polarity on the receptacle or at the end of a test prior to saving results Figure 54 Figure 55 Figure 56 Operation Chapter 4 Page 37 ...

Page 46: ... it reaches operational mode This would typically be seen after applying Reverse Polarity During testing test measurements are taken and compared to limits set out in the protocol A typical Leakage Current test is shown below Figure 57 Figure 58 Operation Chapter 4 Page 38 ...

Page 47: ...specification The IEC61010 standard is for laboratory devices which are not intended to come in contact with a patient This type of device does not have applied parts The IEC 62353 standard calls for all leads of each Applied Part by function to be connected together and each Applied Part then subjected to a Mains on Applied Part test This is repeated for each Applied Part function for each Applie...

Page 48: ...the Functions_list file The list contains a B BF or CF prefix to allow the functions to be filtered If a function can be more than one Applied Part Type an entry must exist for each Type When a Mains on Applied Part MAP test is encountered during a test IEC 62353 and AU NZ 3551 the user will be prompted to connect the leads according to the requirements of the standard Note the Caution related to ...

Page 49: ...e Technician and Test Report Title are sticky fields once entered they will re appear in subsequent tests until changed The ConfigMini txt file which was previously discussed contains the ConfirmResult setting status If it is true the overall Pass Fail result will be shown on the Save Test Record screen and the user will be required to Confirm the result The Cancel and Save buttons will be disable...

Page 50: ...col based on the device ID All of the functions of the Recording option are available for files saved in the Automation option 4 6 Other Test Start Options When you first elect to start an automated test it is expected that you will be testing a device that has some sort of an ID associated with it However there may be some other reasons for starting a test To see the other options touch on the gr...

Page 51: ...e_id or when modifying a sequence there is no Equipment Information to pre load Each time you go to the Equipment Information screen it will be blanked but can if required be loaded with the data from the last saved test by using the Load Last button However when you return to the Standards screen a default standard test may be loaded which overwrites any changes you have made Make any test protoc...

Page 52: ...vPad Mini OPERATORS MANUAL Operation Chapter 4 Page 44 ...

Page 53: ... come to the attention of DSI These shall generally be referred to as maintenance upgrades In other cases the changes may be to improve performance or add features which would enhance the overall functionality of the App The decision to apply a charge to any upgrade shall be solely at the discretion of DSI Datrend Systems Inc Unit 130 4020 Viking Way Richmond BC CANADA V6V 2L4 Tel 604 291 7747 or ...

Page 54: ...vPad Mini OPERATORS MANUAL ...

Reviews: