


7 Installation
Installation manual
16
EZESHP20 EZLSHP20AUAW1B
Exigo E1500 Trailer Refrigeration Unit
4P726857-1 – 2023.03
e
h
c d
f g
×4 ×4
×15
×15
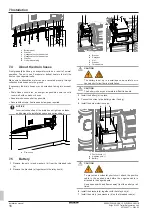
c
Bottom panel
d
Washer
e
Hexagonal socket head screw
f
Hexagonal socket head screw
g
Washer
h
Grid electrical plug
7.4
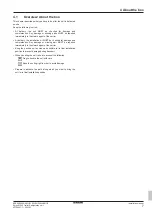
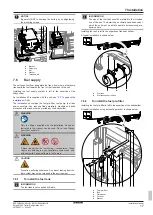
About the drain hoses
Frost gradually builds-up on evaporator coils as a result of normal
operation. The unit uses 3 evaporator defrost heaters to melt the
frost on the evaporator coils.
Make sure condensation water can be evacuated properly through
collection drain hoses onto the ground.
If necessary the drain hoses may be extended, taking into account
that:
▪ Drain Hoses should run as straight as possible down the cold
room wall, with no kinks or bends.
▪ Keep drain hoses as short as possible.
▪ Secure with screws, tie wraps and clamps as required.
NOTICE
Incorrect connection of the drain hose might cause leaks,
and damage the installation space and surroundings.
a
a
a
Drain hose
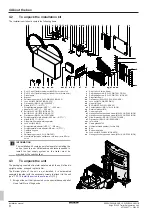
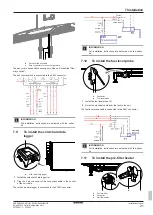
7.5
Battery
1
Remove the nuts (c) and washers (d) from the threaded rods
(e).
2
Remove the brackets (a) together with the relay box (b).
b
b
e
d
c
a
a
1
2
a
Bracket
b
Relay box
c
Nut
d
Washer
e
Threaded rod
CAUTION
The battery is set up in a small space, be careful not to
cause a short circuit during installation.
CAUTION
The battery is heavy and therefore difficult to handle.
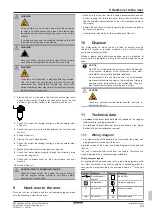
3
Install the battery (h) in place.
4
Connect the wires to the battery poles (f and g).
5
Install the pole protection caps.
g
f
h
f
Positive pole (+)
g
Negative pole (-)
h
Battery
CAUTION
To prevent an accidental short circuit, attach the positive
cable to the positive pole before the negative cable is
attached to the negative pole.
Keep open sparks and flames away from the battery at all
times.
6
Install the brackets (a) together with the relay box (b).
7
Install the nuts (c) and washers (d) on the threaded rods (e).


