


7 Installation
Installation manual
14
EZESHP20 EZLSHP20AUAW1B
Exigo E1500 Trailer Refrigeration Unit
4P726857-1 – 2023.03
6
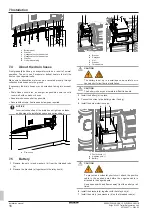
Place a washer (e) and lock-nut (f) on the bolt (c) accessible
through the hatch opening, and hand tighten the lock nuts (f).
e
c f
g
h i
e
c f
e
c f
c
Exigo frame bolt
e
Flat washer (Ø13×35×5, DIN 6340 INOX)
f
Lock nut (M12, DIN 982 ZINC.)
g
Hatch
h
Screw
i
Washer
7
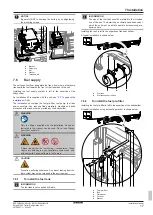
Open the unit's service doors.
8
Place a washer (e) and lock-nut (f) on each of the 4 bolts (c)
accessible through the door openings, and hand tighten the
lock nuts (f).
e
c f
e
c f
e
c f
e
c f
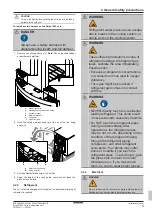
The controller (j) must be rotated to give access to the bolt location
in the bottom right-hand corner inside the unit.
NOTICE
The wiring of the controller is connected to the unit. Be
careful not to break the wiring while rotating or removing
the controller.
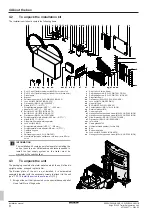
9
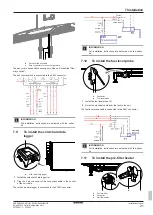
Open unit's service doors.
10
Loosen the lock nuts (k). The screws (l) and nuts (k) do not
have to be removed.
j
n
k
l m
k
l m
m
k
l
m k
l
j
Controller
k
Lock nut
l
Screw
m
Washer
n
Mounting plate
11
Rotate the controller mounting plate (n), liberating it from the
open slot.
12
Slide the controller mounting plate (n) to the left and rotate the
mounting plate (n) completely.
Result:
The frame bolt is now accessible.
k
l
n
m
×4
×4
×4
c
3
2
1
k
Lock nut
l
Screw
m
Washer
n
Mounting plate
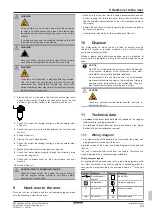
13
Place a washer (e) and lock-nut (f) on the bolt (c), and hand
tighten the lock nut (f).
e
c f


