background image

41

Operation 

(Reference)

System Settings 

Menu Item

Description

Automatic 
Changeover

4.Because this control automatically switches the operation mode, if the air 
   conditioner is not a cooling / heating free unit, always register indoor units which have 
   the right to select cooling or heating for the same cooling system to the same 
   automatic cooling / heating switch group, when controlling indoor units which do not 
   have such rights.

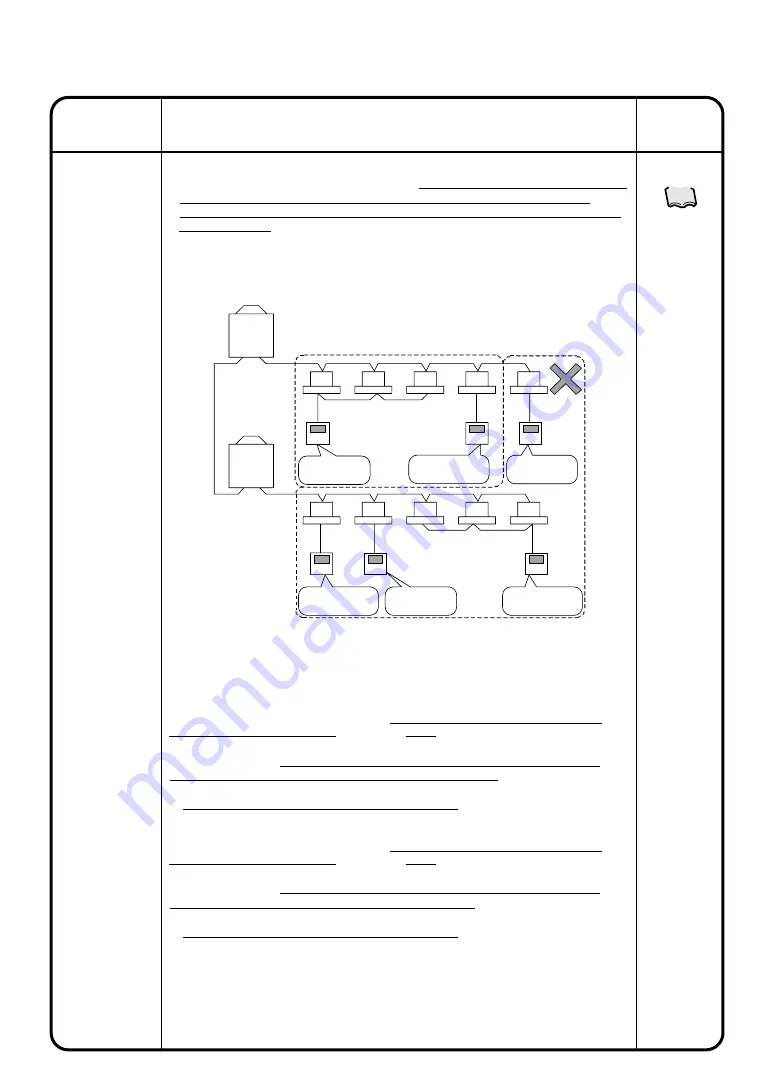
Unexpected things may happen if control is done using the following 
incorrect automatic cooling / heating switch group settings.

If indoor units (address 1-02) which do not have the right to select cooling or heating 
for the same cooling system are not registered to the same automatic cooling / 
heating switch group, address 1-02 will behave in the following way.

[Actions related to operation mode]
If the room temperature of Group 1 rises, group 1 will switch to cooling as per this 
control and the set temperature will become 25

°

C (if the temperature difference is 

5

°

C).

When this happens, the set temperature of the indoor unit at 1-02 will continue at 
23

°

C although only the operation mode will change to cooling, i.e. in a different 

operation mode from the other indoor units in Group 2.

The operation mode will be determined by Group 1.

[Actions regarding set temperature]
If the room temperature of Group 2 rises, group 2 will switch to cooling as per this 
control and the set temperature will become 28

°

C (if the temperature difference is 

5

°

C).

When this happens, the operation mode of the indoor unit at 1-02 will continue in 
heating and only the set temperature will change to 28

°

C, i.e. in a different operation 

mode from the other indoor units in Group 2.

The set temperature will be determined by Group 2.

Outdoor

unit

Outdoor

unit

Has right to select 
cooling or heating

Does not have right 

to select cooling or 

heating

Does not have right 

to select cooling or 

heating

Automatic cooling / heating 

switch group 1

Automatic cooling / heating 

switch group 2

1-00

1-01

1-02

1-03

1-04

1-05

Operation mode : Heating, set 
                             temperature 20

°

C

Operation mode : Heating, set 
                             temperature 23

°

C

Has right to select 
cooling or heating

Does not have right 

to select cooling or 

heating

Does not have right 

to select cooling or 

heating

81

See page

Summary of Contents for DCS601C51

Page 1: ... Model DCS601C51 Maintenance Precautions 96 Maintenance LCD Maintenance 97 When Leaving the Product Turned OFF for a Long Time 97 Troubleshooting 98 Maintenance For Your Information Before use Operation Before use Safety Precautions Be sure to follow the instructions below 1 System Overview 3 Features and Functions 4 Part Names and Functions 5 Part Names on the Monitoring Screen and the Functions ...

Page 2: ...oes not exceed the concentration limit in the event of a leakage Otherwise this may lead to an accident due to oxygen depletion Contact professional personnel about attachment of accessories and be sure to use only accessories specified by the manufacturer If a defect results from your own workmanship it may result in water leaks electric shock or fire Consult your local dealer regarding relocatio...

Page 3: ...play with the unit or its remote controller Accidental operation by a child may result in impairment of bodily functions and harm health Do not let children play on or around the outdoor unit If they touch the unit carelessly injury may be caused Consult your dealer regarding cleaning the inside of the air conditioner Improper cleaning may cause breakage of plastic parts water leakage and other da...

Page 4: ...f the air conditioners With the optional DCS002A51 A group of indoor units include Zone control with the intelligent Touch Controller Zone control which allows collective settings for more than one group is available with the intelligent Touch Controller which facilitates the setting operations q One indoor unit without a remote control e Up to 16 indoor units controlled with one or two remote con...

Page 5: ...the zone or collectively 1 Start Stop 2 Operation Mode 3 Temperature Setting Remote control Inhibited Remote control Inhibited Remote control Inhibited Remote control Permitted Remote control Permitted Remote control Permitted Priority Zone Control Simplifying Complicated Setting Operations Up to 64 groups can be controlled with the intelligent Touch Controller More than one group can be consolida...

Page 6: ...be operated with the touch pen Be sure to use the touch pen provided for operation PCMCIA Card Slot Used when using the optional Power Proportional Distribution DCS002C51 or updating the intelligent Touch Controller software to a newer version and downloading the other data Touch Pen 5 Be sure to operate with the touch pen and take care not to lose it In the event it is lost contract your dealer U...

Page 7: ...oor units compulsorily by contact input The size of terminal block is M3 5 Terminal block for watt hour meter and force stop input of indoor units When monitoring and operating the indoor units using the optional Web and E mail function software sold separately connect to LAN via Ethernet cable Ethernet connector for web Securely connect the earth wire Terminal size is M4 Earth terminal block Conn...

Page 8: ...gistration in the System Settings Mode Filter Element Sign Displayed when there is any air conditioner showing a filter or element sign in the zone or the group Target of Automatic Control Displayed when any air conditioner has a registered schedule in the zone or group Monitoring Screen Legend Pressing the button shows more detailed legend Button to Switch to the System Settings Mode Use this but...

Page 9: ...lligent Touch Controller Display Mode Selection Select the mode among icon list detailed icon See Icont Displays on Pages 9 10 See Detailed Icon Displays on Pages 11 12 Group Zone Start Button Button to start operation of the group zone selected Group Zone Stop Button Button to stop operation of the group zone selected Group Zone Configure Button Makes settings temperature setting temperature cont...

Page 10: ...lue flame Zone Group Name Set the names in the Group Registration or Zone Registration in the System Settings Mode Filter Element Sign Displayed when there is any air conditioner showing a filter or element sign in the zone or the group Target of Automatic Control Displayed when any air conditioner has a registered schedule in the zone or group Monitoring Screen Legend Pressing the button shows mo...

Page 11: ...the air conditioners connected to intelligent Touch Controller Display Mode Selection Select the mode among icon list detailed icon See List Displays on Pages 7 8 See Detailed Icon Displays on Pages 11 12 Group Zone Start Button Button to start operation of the group zone selected Group Zone Stop Button Button to stop operation of the group zone selected Group Zone Configure Button Makes settings ...

Page 12: ... highlighted in blue frame Zone Group Name Set the names in the Group Registration or Zone Registration in the System Settings Mode Filter Element Sign Displayed when there is any air conditioner showing a filter or element sign in the zone or the group Target of Automatic Control Displayed when any air conditioner has a registered schedule in the zone or group Monitoring Screen Legend Pressing th...

Page 13: ...the air conditioners connected to intelligent Touch Controller Display Mode Selection Select the mode among icon list detailed icon See List Displays on Pages 7 8 See Icon Displays on Pages 9 10 Group Zone Start Button Button to start operation of the group zone selected Group Zone Stop Button Button to stop operation of the group zone selected Group Zone Configure Button Makes settings temperatur...

Page 14: ...ion or fan speed To change the range of operation allowed with remote control To change the ventilation mode To change the ventilation volume To permit prohibit the remote control at hand for ventilation Air Conditioner Operation Monitoring To monitor by zone or by group To monitor detailed information To monitor the operation condition for ventilation To set release the lock of screen operation T...

Page 15: ... mail To review the history of errors To set the locale To set the icon color To set the network To set the activation key To change the Automatic Changeover To change the temperature limit To change the heating optimization settings See page See page See pages to See pages to See pages to See pages to To change the FC Change Over settings See pages to See pages See page See page See page See page...

Page 16: ...vating collective start or stop press the No button Start or stop collectively the operation of devices connected On the Monitoring screen operation is allowed with either Zone or Group as the display mode and with either Icon or List as the display type In the example on the left the display mode is Group in the collective mode and the display type is Icon On Screen 1 Monitoring press the Start A...

Page 17: ...ame Canteen 2 Select a zone that includes the group of which the operation is to be started or stopped w 3 4 Select a group to be started or stopped as in e and press the Start button r or Stop button t Starting Stopping Operation by the Group Screen 2 Monitoring Group 1 2 3 4 5 Select a group from the button q Screen 2 Monitoring Group appears Zone Name Canteen 1F North 1F West 1F South 1F East 2...

Page 18: ...elect a zone from the button q 2 Starting Stopping Operation by the Zone 1 3 4 2 Select the zone of which the operation is to be started stopped as shown in w 3 Press the Start button e or Stop button r Start or stop by zone the operation of groups of air conditioners set in zones The example on the left shows a screen for starting or stopping the operation of air conditioners in the canteen Proce...

Page 19: ...ilable are Fan Cool Heat and Auto If Changeover option is not available for any air conditioner in the zone Fan and Dependent are the available operation modes 2 Select with w a zone or a group of which the operation mode is to be switched 3 Press the Configure button e Screen 2 Operation is displayed 4 Select the operation mode to be set from the pull down menu r 5 Switching the Operation Mode Sc...

Page 20: ...ng press the Modify button r Setpoint dialog is displayed and input temperature for setting Ex For the following zone setting the temperature settings available are between 20 C and 30 C inclusive When the temperature setting is 30 C the actual temperature settings for air conditioners are as shown below Note Range of temperature settings available is the range specified in accordance with the fol...

Page 21: ...e filter or element sign is to be reset w 3 Press the Configure button e Screen 2 Operation is displayed 4 Press the Advanced Settings button r Screen 3 Advance Settings is displayed 5 To reset the filter element sign select Filter Sign Reset in pull down menu t Then press the OK button y To cancel the setting press the Cancel button Screen 2 Operation is displayed again Resetting the Filter Eleme...

Page 22: ... displayed again 5 Changing the Direction Fan Speed Screen 2 Operation 6 To cancel the setting press the Cancel button 1 2 3 4 5 6 8 7 Screen 3 Advanced Settings The larger the value for airflow direction setting 0 6 the closer to vertical the direction becomes The value 7 indicates automatic swing Note See the figure below The description given above may not exactly apply depending on the model C...

Page 23: ... Changing the Range of Operation Allowed with Remote Control Screen 2 Operation 6 1 3 2 4 9 8 Screen 3 Advanced Settings 5 6 7 To cancel the setting press the Cancel button Screen 2 Operation is displayed again To cancel the setting press the Cancel button Press the OK button i after setting t u Then press the OK button o on Screen 2 Operation Item Setting Meaning Start Stop Prohibited The remote ...

Page 24: ...odes of all the ventilation groups of a zone select the zone and switch the ventilation mode When changing the ventilation mode of a group select the group and switch the ventilation mode Not all models permit the above settings 2 To select a zone or group subject to ventilation mode switching push the icon w 3 4 Select a desired ventilation mode on the pull down menu r 5 Last press OK button t To...

Page 25: ...5 Lastly push OK button t To cancel above settings press Cancel button Procedure Push Configure button e to display the Operation Screen Screen 2 Perform the following procedure to change the ventilation volume On the monitoring screen you can select any of the following display types Icon Detailed Icon or List When changing the ventilation volumes of all the ventilation groups of a zone select th...

Page 26: ... w 3 4 Push Advanced Settings button r to display the Advanced Settings Screen Screen 3 5 Make a desired setting on the pull down menu t You can enable or disable the following setup items for remote control Prohibited Stop Only Permitted No change After making the setting push OK button y to display Operation Screen 2 again To cancel above settings push Cancel button Procedure Push Configure butt...

Page 27: ...a more detailed legend display the Legend Description Screen Screen 4 on the next page by pushing the button y To return to the previous screen push Close button i displays the current zone or group You may select another zone or group by pushing the screen On Screen 1 u displays the settings of the zone or group selected at i Icon display only Display takes place in the following order Upper Deta...

Page 28: ...ate the zone representative machines When the display type is icon Leftmost group on the top line When the display type is detailed icon or list Groups on the top line 0 displays the operation status of an air conditioner For zone list display display takes place as shown below When no problem is found and one or more air conditioners are operating Display in red When no problem is found and no ai...

Page 29: ...us Cool Setpoint setting status 24 0 C 3 Push Advanced Settings button u to display the Advanced Settings Screen Screen 3 To return to the Monitoring Screen Screen 1 push Cancel button o 4 Check the settings and push Cancel button 6 0 displays the settings made for start and stop remote control operations Prohibited Stop Only or Permitted is displayed 1 displays the settings made for remote contro...

Page 30: ...n are examples for group selection 6 Push Error history button 8 to display the Error History Screen Screen 6 For group selection Details Zone name Description Detailed zone name Sequential Start Enabled or disabled No of Regist Grp Number of groups registered in a zone Schedule Enabled or disabled Name group name Detailed name Detailed group name Error log Time Error occurrence time Err Code 2 di...

Page 31: ...sh up The following describes in order the contents of display data on the Advanced Settings screen Screen 3 Display data on Screens 2 and 3 is updated each time the respective screens are displayed Once these screens are displayed data is not updated unless they are closed and opened again 1 Select either Zone or Group by pushing the button q Note that the screens in the left hand column are exam...

Page 32: ...tem 2 Lock method Lock method 3 While the lock icon is displayed push the button q Air conditioner Operation button or System Operation button to display the Password to release Screen Lock Screen 3 4 Enter the password assigned for unlock password protection on P57 e Toggle button for switching uppercase letters to lowercase letters r Correction button for characters Backspace button to erase inc...

Page 33: ...nth day hour minute and second The clock is used for scheduled operation saving history power distribution optional and demand operation optional Note Adjusting the clock may affect scheduled operation power distribution or demand operation For details of adjustment effects read the following bullets and for power distribution and demand operation refer to the instruction manual Impact of changing...

Page 34: ...central management include up to 64 addresses 1 00 1 01 1 15 2 00 4 15 During use of D plus adaptor addresses are 128 1 1 00 to 2 4 15 NOTE The temperature setting limit is a function to allow operation only within the preset temperature limit to prevent too much cooling or heating The limit function above does not work when the operation mode of the air conditioners is Auto Ex Temperature setting...

Page 35: ...sary you can check the current license or add the new license This setting is usually done by sales engineer of our company Activation Key Input See page 69 See page 70 72 See page 73 See page This menu permits you to set the Port number of intelligent Touch Controller REMARKS When using Web software option you can set Web server Set according to the environment requirements of your system Setting...

Page 36: ...day to Saturday and 10 special settings Ex1 to Ex10 have been made EXAMPLE Setting for starting zone 1 at 9 00 and stopping it at 17 00 A maximum of 16 operations can be registered for each date A maximum of 8 schedules can be registered when the above settings are handled as a single schedule The following describes how to make the settings showing a few examples 1 Utilization of floors 1F Recept...

Page 37: ...d Disabled Disabled Time 8 30 12 00 13 00 17 00 22 00 Target zone Zone 2F Zone 2F Zone 2F Zone 2F Zone 2F Start stop Start stop Start Disabled stop Setting temperature Disabled Disabled Disabled Disabled Disabled Remote control code Assign priority to key pushed later Disabled Assign priority to key pushed later Only stop operation permitted Remote control operation prohibited Operation mode Disab...

Page 38: ...th of these conditions is designated the main indoor unit and the set temperature and room temperature of that indoor unit are designated the main set temperature and main room temperature If none is found that satisfies these conditions the main set temperature and main room temperature are determined using the Fixed Air Conditioner Method shown above 3 Average Method All the indoor units that ar...

Page 39: ...1 C 1 2 qConditions for switching from heating to cooling Main room temperature main set temperature temperature difference 1 C EXAMPLE 28 1 C 26 C 1 C 1 C wConditions for switching from cooling to heating Main room temperature main set temperature temperature difference 1 C EXAMPLE 24 9 C 27 C 1 C 1 C qConditions for switching from heating to cooling Main room temperature main set temperature tem...

Page 40: ... the air conditioners When implementing the control the following operation modes and set temperature instructions are executed NOTE When the Average method is selected the temperature is not specified to the indoor unit which the operation mode is not changed When conditions are met for switching from heating to cooling Operation mode Set temperature Heating Automatic heating cooling main unit se...

Page 41: ...air conditioner or operating air conditioner The following control is performed because it is possible that the operation mode of air conditioners other than the main unit in the group might be in violation of the purpose of control and not automatically switch if the conditions for implementing control using this function are not satisfied EXAMPLE Heating Mode Matched Control When the main unit i...

Page 42: ...mperature of the indoor unit at 1 02 will continue at 23 C although only the operation mode will change to cooling i e in a different operation mode from the other indoor units in Group 2 The operation mode will be determined by Group 1 Actions regarding set temperature If the room temperature of Group 2 rises group 2 will switch to cooling as per this control and the set temperature will become 2...

Page 43: ...ner is stopped once the room temperature rises sufficiently far above the lower temperature limit lower temperature limit 4 C or more during heating due to this control q Controlled air conditioners This controls auto start and auto stop for each air conditioner based on the temperature set for each room temperature limit control group This control is not applicable to air conditioners which are a...

Page 44: ...ooling operation Cooling operation is controlled when the room temperature is higher than the upper limit of room temperature and the unit is stopped wStart condition of heating operation Heating operation is controlled when the room temperature is lower than the lower limit of room temperature and the unit is stopped eStop condition The air conditioners under cooling heating control by this funct...

Page 45: ... group with an indoor unit having cooling heating selection right in the same cooling system the operation of the address 1 02 will be as follows Actions related to operation mode When the room temperature of the group 1 rises the operation mode of the group 1 is switched to cooling operation by this control and the automatic operation continues At this time only the operation mode of the indoor u...

Page 46: ...tion interruption by this function is the optimum control for turning off of the thermo switch during heating operation the system regards this status as in operation and the screen display on the unit remains In operation After the unit is interrupted by this function it restarts when the specified conditions are met Therefore the user s explicit stop command is effective Operation restart contro...

Page 47: ... of this function for the air conditioner is changed from enabled to disabled during operation interruption the operation is restarted Operation mode Automatic Changeover control Start control When the operation mode of the air conditioner in interruption is changed by this function the air conditioner is restarted e Precautions for the use of this control 1 The stoppage operation interruption by ...

Page 48: ...re should be lower than the room temperature You can specify HRV and or an air damper which is connected to a D Dio unit as the ventilation equipment You can configure a control group of indoor units and ventilation equipment for FC Change Over up to 64 groups Groups cannot overlap Each group is controlled independently You can specify the preset cooling and heating setpoints for each group and th...

Page 49: ...om temperature within the predetermined comfortable range a change to Cool or Heat mode happens when the room temperature goes outside the preset temperature range by 1 C in either direction To avoid frequent changeovers a change from Cool or Heat mode to Fan happens after the room temperatures has been inside the range for 30 minutes While it is in Cool or Heat mode the Controller overrides the i...

Page 50: ...outside air temperature reaches the indoor temperature free cooling will be suspended 2 Room temperature should be higher than the minimum free cooling temperature Free cooling is permitted while the room temperature is above the minimum free cooling target temperature which is the intermediate temperature between the preset cooling and heating setpoints See page 84 88 to 1 2 Temperature Room temp...

Page 51: ...minimum free cooling setpoint as outside air temperature increases above the room temperature free cooling would be prohibited 2 Outside air temperature decreases to 4 C below room temperature permitting free cooling operation Outside air is then introduced by the HRV and or outside air damper 3 Room temperature is satisfied at 1 C above the minimum free cooling setpoint while outside air temperat...

Page 52: ...unit for that group The return air temperature of the representative indoor unit is used for FC Change Over as the room temperature in the zone If the representative indoor unit utilizes a remote temperature sensor the temperature at the sensor location is the reference temperature value Configuring a comfortable temperature range for the control group Preset the cooling setpoint maximum temperatu...

Page 53: ...oup 1 changes As the room temperature in Group 1 increases the operation mode of Group 1 switches over to Cool At this time the operation mode of the 1 02 indoor unit was turned to the same mode as that of the 1 00 unit Consequently only the 1 02 indoor unit in Group 2 was switched to a different mode from other indoor units in Group 2 Example when the operation mode of Group 2 changes When the ro...

Page 54: ... the representative indoor unit to prevent short cycling the FC Change Over sequence of operation 4 When D Ai is not connected The FC Change Over function uses the D Ai to detect the outdoor temperature When the D Ai for outdoor temperatures is not connected to the system has a failure or is in communication error state the FC Change Over function does not work 5 Ventilation equipment When an isol...

Page 55: ...em Validity Invalidity of e mail function SMTPServer Sending Conditions E mail Description Setting of Invalidity does not allow sending e mails Specifies URL IPaddress of the SMTP server Specifies a port number of the SMTP server Select the authentication method for sending mail No Authentication POP bofore SMTP SMTP AUTH Specifies URL IP address of the POP server Specifies a port number of the PO...

Page 56: ...nt after the sending time interval will have elapsed During the sending time interval if a new malfunction occurs r in the figure below an e mail will be sent after the sending time interval will have elapsed When the sending time interval has elapsed if no malfunction is found in the groups the system will move from the resend state to the normal state The mark represents occurrence of a malfunct...

Page 57: ...lure A test run mail was sent E mail outgoing history The history file can contain a maximum number of 300 events of successes failures in sending e mails For details refer to the History on Page 89 Operation Reference Description From iTouch daikin co jp To user012 daikin co jp Subject Fault occurs DAIKIN Head Office 04 02 14 11 Office A9 04 02 14 10 ConfRoom E0 Remaining mails 1 Originating e ma...

Page 58: ... initiated 4 Any one or more of the groups OFF When any one or more of the groups registered as the input points turn off to stop the control function is initiated 5 All OFF When all of the registered groups as the input points turn off to stop the control function is initiated 1 Selecting Any one or more of the groups ON or OFF while some interlock input points are already ON or OFF will not init...

Page 59: ...the specified condition the interlock control function cannot be initiated When Any one or more of the groups ON is selected the state change shown in the left figure cannot initiate the interlock control function Example 3 When a communication error occurs in an interlock input point and consequently the specified condition is met the interlock control function cannot be initiated Even when All O...

Page 60: ...hown in the figure below represents a key In this example locking the key to the Di unit allows a closing ON connection point to be connected Before the interlock control is activated While the interlock control is active Operation Reference Description 2 03 open Air conditioning unit 1 00 in operation Di unit 2 03 locked Zone Name Zone 1F Zone Name Zone 1F 2 03 closed HRV 1 00 1 01 1 02 HRV 1 00 ...

Page 61: ...terlock input point 1 00 Input Condition Any one or more of the groups ON Control Item Stop Interlock Output 1 Control Target 1 00 Input Condition No detection Control Item Interlock Output 2 Control Target Interlock Program Number Program 1 Interlock input point 1 00 Input Condition Any one or more of the groups ON Control Item Start operation Interlock Output 1 Control Target 1 01 Input Conditio...

Page 62: ... You can customize the name of the simple interlock program such as the name that reflects its functionality Determine the validity invalidity of the simple interlock setting Lastly whether the simple interlock setting is valid or invalid can be specified The program set to invalid will not run Operation Reference Description 94 See page 94 See page ...

Page 63: ...on Menu for adjusting the positions of buttons on the touch panel used as the screen of the intelligent Touch Controller If repeatedly pressing a particular button on the screen does not activate operation use this menu to calibrate the touch panel Version information This provides maintenance information The menu shows the version number of the software for the intelligent Touch Controller curren...

Page 64: ...etting screen selected appears 3 3 Select an item from pull down menu w A System B Automatic Control 3 1 When the setting has been made on the setting screen press Close OK or Cancel Detailed operation is described in the following items 3 4 Screen 2 reappears The setting selected is complete 3 5 If another item is to be set repeat the operation in 3 1 3 5 If there is no more item to be set press ...

Page 65: ...ars Enter the password as described in 4 Screen 3 appears 7 Pressing the Close button y completes the setting MEMO To change the password press the Modify Password button u and repeat the operation in 4 7 above NOTE Password is case sensitive see r Use caution and enter the exact password A password can be as long as 32 characters When a wrong character is entered by mistake press the Back Space b...

Page 66: ...etting dialog in Screen2 is displayed 3 Press the number key button to set the year month day hour minute and second 4 5 Data Time 3 1 2 4 When the setting has been made press the OK button e Screen 3 Confirmation appears See the Note on page 32 If changing the time setting causes no problem press the Yes button r Deta Time is complete To cancel setting press the No button System Settings Menu Ope...

Page 67: ...he backlight should be automatically turned ON when any error is generated in air conditioners by selecting Enabled or Disabled e 6 Backlight Press the OK button r To cancel the setting press the Cancel button For longer service life of the backlight select Enabled whenever the backlight does not need to be illuminated all the time The backlight once turned OFF is illuminated again when the panel ...

Page 68: ...creen 2 Group Settings reappears 8 Select the position with the Down or Up button 7 for showing the group currently selected within the zone 9 6 Press the or button 1 to select an icon The selection of icon does not affect the operation of the group Group Settings System Settings Menu Operation Screen 1 Zone Group Screen 2 Group Settings Screen 3 Enter Group Name Screen 4 Setpoint Range 1 3 10 14 ...

Page 69: ...e zone one by one rather than at one time select Enabled for Interval Start 3 To start the groups at one time select Disabled If you select Enabled press the Modify button 4 and set the interval time for group sequential start NOTE For the zone Collective the factory setting is Enabled for Interval Start and 2 seconds for Interval Zone Settings How to use the keyboard u Button to select between up...

Page 70: ...f Screen 3 shown on the left 1F Lobby is the representative unit for the zone 1F When all editing has been completed press the OK button 2 To cancel the setting press the Cancel button Zone Settings 2 Screen 3 Registered Groups Edit 19 17 21 18 22 20 System Settings Menu Operation 1 Select Locale at Screen 2 A on page 63 2 Confirm that the Locale screen Screen 1 will be displayed in the left hand ...

Page 71: ...odify button e and enter a Subnet mask on the resulting input screen 6 Push the Modify button r and enter a Default gateway on the resulting input screen 7 Push the Modify button t and enter a Preferred DNS on the resulting input screen 8 Push the Modify button y and enter a Alternate DNS on the resulting input screen 9 After making the settings push the OK button u To cancel the settings made pus...

Page 72: ...ed Enter the desired value The user settings default value is 8080 The input range is 1024 65535 5 After the desired value has been entered click the OK button r Screen 1 Web Server will be displayed 6 Push the OK button t Screen 3 Confirmation as shown on the left will be displayed 7 If you wish to enable the setting push the Yes button y Rebooting will commence and the setting will be completed ...

Page 73: ...he radio button q to change the start stop icon color on the Icon color screen Note that the stop icon color is light green and the start icon color red at factory setting and the start icon color red at factory setting 4 Push the OK button w To cancel the settings made push the Cancel button Icon Color Screen 1 Icon color 2 1 1 System Settings Menu Operation 72 Operation ...

Page 74: ... r Button for deleting a character input by pressing the incorrect character key You can delete any number of characters from the cursor position to the left by pushing this button as many times as necessary t Button for moving the cursor After making the necessary settings push the OK button y To cancel the settings made push the Cancel button and return to the Activation key input screen Screen ...

Page 75: ...creen 1 will be displayed as shown in the left hand column 3 Select a schedule from q to set or change the calendar 4 Push the Calendar button w to display the calendar screen Screen 2 Initially the weekly settings are made Select a month for change at e and a day for change at r Then select a pattern for the selected day from t Check a Set checkbox to display a radio button for each pattern This ...

Page 76: ...e displayed For details on event setup operation refer to the descriptions given on the next page t Copy Use this button to make the same setting as for the previously set event Select the previously set event from o Push the copy button t to copy the event Push the Modify button y described below to modify the copy event y Modify Use this button to change the previously registered event Select th...

Page 77: ... shown on the next page After setting the operation and making the advanced settings on the next page push the OK button 9 To cancel the settings made push the Cancel button 0 to return to Screen 2 on the previous page When making additional settings repeat the operations shown in steps 5 and 6 After making the necessary settings push the OK button on Screen 2 of the previous page Start Stop Selec...

Page 78: ...Setpoint Set the temperature of a zone or group Push the Modify or Disabled button 2 according to purpose When displaying a keyboard to register a temperature and entering a desired temperature on that keyboard push the Modify button The Disabled button is displayed only when the Modify button is pushed once and the desired temperature is set Push the Disabled button to cancel the temperature set ...

Page 79: ...ame button w and enter a desired special day name A special day name can be entered in up to 8 characters 1 Last enable or disable a schedule Perform the following operations on the schedule Screen 3 Select a schedule from the list q and enable or disable the schedule at w On the confirmation screen push the Yes button to enable the schedule and the No button to disable it Then check to see the di...

Page 80: ...describes in order the functions of buttons r to 0 Select a day of the week for a copy source at r and that for a copy destination at t In an example of the left hand column Mon is selected as a day of the week for the copy source and Tues as that for the day of the copy destination Then select the event to be copied at y and push the button i to copy the event No 01 from Monday to Thursday Push t...

Page 81: ...the copy source is schedule 1 and that of the copy destination schedule 2 Next select the setup item to be copied of schedule 1 from the pull down menu t The following setup items can be selected Copy All Copy Calendar After selecting either of the above items push the Apply button y Last push the OK button u to terminate the copy procedure To cancel the settings made push the Cancel button i and ...

Page 82: ...e screen 1 select the cooling heating automatic change over group to be enabled at q and press the button 5 to enable Confirm the group status enabled disabled displayed on 6 Only the cooling heating automatic change over group set to enabled is controlled automatically 10 Lastly when all the setting changes are correct press the OK button 7 To cancel press the Cancel button 8 When the OK button 7...

Page 83: ...utton o To cancel press the Cancel button 0 Screen 3 Confirmation Display appears When there is no problem in setting change press the Yes button 1 Screen 1 which is shown on the top on this page appears To add or change the settings in the room temperature upper lower limit control group mentioned above press the No button 2 Screen 2 appears 7 On the screen 1 select a room temperature upper lower...

Page 84: ...hen all indoor units are registered press the OK button t To cancel press the Cancel button y Screen 2 Confirmation Display appears When there is no problem in setting change press the Yes button u This menu is ended and System Settings Menu appears To continue the change press the No button i The screen 1 appears Before performing Heating Mode Optimization thoroughly read the Heating Mode Optimiz...

Page 85: ...from 64 Because the Ai Unit DAM101A51 must be set 1 4 15 to enable the FC Change Over function Thus the other D3 Address are 1 1 00 to 1 4 14 When D NET Plus adaptor is enabled 1 1 00 to 1 4 14 and 2 1 00 to 2 4 15 NOTE 2 When in FC Change Over function mode the following function does not work instead of FC Change Over function ID Unit Group Settings Setpoint Range Limitation Automatic Control He...

Page 86: ... Restrictions Use the Master ITC to make settings No setting is possible from the Slave ITC Description of the FC Change Over window q Outdoor Temp Indicates the present outdoor temperature w Current time Indicates the current time e The control group list shows the following items Name Name of control group Status of Enable Disable control Status Rep Model Err Out Temp Sense Err Rep Model Stop Di...

Page 87: ...en making settings for Ventilation Device in a control group press Modify button u to show the Ventilation Device registration screen See page 88 6 Press OK button i to save the settings Press Cancel button o to cancel the settings How to use the keyboard Button for switch uppercase to lowercase and vice versa Button for deleting a character input by pressing the incorrect character key You can de...

Page 88: ... Down button y 6 Press OK button u to save the settings and return to the Control group setting screen The settings will be saved when the OK button in the Control group setting screen is pressed Press Cancel button o to cancel the settings Setting error When any of the following errors occurs during setting an error screen will appear When no indoor units are registered screen 2 When no represent...

Page 89: ...press button e The deleted Ventilation Device is then relocated to the Unregistered list w 4 Press OK button t to save the settings and return to the Control group setting screen The setting will be saved when the OK button in the Control group setting screen is pressed Press Cancel button y to cancel the settings Setting of the FC Change Over System Settings Menu Operation Restrictions A single V...

Page 90: ... shown above except the item Power prop division History disappear when turning off the power of the contoroller 7 To return to the History screen Screen 1 touch the Close button u 9 After checking the log record touch the Close button r 8 When saving the stored log records in a memory card insert a commercially available PCMCIA flash memory card into a slot provided at the left side of the contro...

Page 91: ... down menu Select No Authentication POP before SMTP or SMTP AUTH for the authentication method setting y 9 Push the Modify button u Enter the POP server address on the input screen Enter the address only if POP before SMTP is selected for the authentication method 10 Push the Modify button i Enter the POP server port No on the input screen Enter the port No only if POP before SMTP is selected for ...

Page 92: ...5 Enter the e mail address to send e mail to on the input screen 22 After making the necessary settings push the OK button 7 to return to the Alarm E mail screen on the previous page Screen 1 To cancel the settings made push the Cancel button 19 To add an address for sending e mail to in the event of an air conditioner fault or other fault push the Add button 1 Enter the e mail address to send e m...

Page 93: ...terlock input point to initiate the interlock control function From the pull down menu see i select either of Not detect Any turned ON All turned ON Any turned OFF All turned OFF Target In this box select a target of interlock control Press the Modify button to select Zone or Group See o Start Stop In this box select an operation performed when the interlock condition is met From the pull down men...

Page 94: ...tioning unit Setpoint In this box set a temperature of Zone or Group Pressing the Modify button see 8 will display the keyboard for registering a temperature where you can input the desired temperature The Disable button will be shown after pressing the Modify button once to set a temperature Pressing the Disable button will cancel the temperature specified by the Modify operation described above ...

Page 95: ...settings of the simple interlock function In the simple interlock setting screen shown in the figure of the Screen 6 follow the steps described below From q select a simple interlock program for which you want switch between the Enable Disable settings Then pressing the button w will switch between the Enable Disable settings In the confirmation screen displayed press Yes to make the change effect...

Page 96: ...left shows an example It may be different from the actual version 3 When the version number has been checked press the Close button q This is a menu for checking the version number of the software for the intelligent Touch Controller currently used Generally it is not necessary to check Version Information Screen 1 Version Information 1 System Settings Menu Operation 95 ...

Page 97: ...turned to ON when the unit is installed Do not touch them unless the power has been turned off for a long time See the next page for details on what to do if the power has been off for long periods of time Location and Setting of Switches Note Do not touch other switches Avoid turning the switch ON and OFF with excessive force otherwise such operation may lead to parts damage and failure OFF ON is...

Page 98: ...ting the clock in power failure The battery mentioned above is for power failure only and it may be completely discharged if no power is provided for a long time The capacity is worth about 2 years of in total if no power is supplied To use the intelligent Touch Controller again turn the switch ON As shown in the figure set the battery switch on the left side of this controller to OFF switch knob ...

Page 99: ...t be operated or monitoring is not available Press and hold down the RESET button on the left screen of the intelligent Touch controller for 5 seconds Pressing this switch initialize the intelligent Touch Controller Pressing this switch does not erase the settings for groups zones or schedule intelligent Touch Controller Note Do not touch other switches Avoid turning the switch ON and OFF with exc...

Page 100: ... cleaned in the zone On the Zone Monitoring screen of the intelligent Touch Controller a filter or element sign was shown for a certain zone Cleaning the filter or element of air conditioners and resetting the cleaning sigh with a remote control does not turn out the filter or element sign The positions of buttons on the touch panel may be shifted over time See page 90 and perform touch panel cali...

Page 101: ...controller and ON OFF controller and enables commands from iPU Interface for use in BACnet only When this setting is made System Central controlled indication is shown on the intelligent Touch Controller When the setting is released the System Central controlled indication disappears and operation with the intelligent Touch Controller becomes available Item Description and Corrective Action Collec...

Page 102: ...med with the central unit 3 Is the schedule of starting the air conditioner registered with the schedule function of the unit 4 Is Temperature Limit function of this unit activated The above function operates the air conditioner automatically to avoid excessive increase or decrease of room temperature For details see P42 44 The air conditioner is supposed to be stopped but it is operating The foll...

Page 103: ...conditioners connected to the central management device While the command is input neither the central management devices nor remote controller can operate air conditioners When the forced stop input command is canceled the System Forced Stop disappears which allows control with the intelligent Touch Controller Item Description and Corrective Action Collective Operation Start and Stop buttons are ...

Page 104: ...ple interlock function In the case described below the air conditioning unit 1 01 will not operate Once both units 1 00 and 1 01 are started then the unit 1 01 will be stopped by the simple interlock control function Item Description and Corrective Action The air conditioning unit does not operate Before Having the Product Serviced In this case even though the unit 1 01 has been scheduled to be st...

Page 105: ...ws all kinds of operation with the remote control of air conditioners in about 5 minutes When there is any other central management device turn the power OFF for all of the devices Item Description and Corrective Action Failure occurs in the intelligent Touch Controller while the remote control is disabled with the intelligent Touch Controller and start stop setting etc of air conditioners cannot ...

Page 106: ... screen contrast volume switches are located in sequence from the top as shown below Adjustment Method If electric components in the intelligent Touch Controller are charged with static electricity it may cause failure Be sure to discharge the static electricity accumulated in your body before attempting any operation To discharge yourself touch a ground metal object such as a control panel Note S...

Page 107: ...ary Unification adaptor for computerized control CN2 LAN F1 F2 F1 F2 F1 F2 F1 F2 F1 F2 F1 F2 F1 F2 F1 F2 D3NET plus adaptor RS 232C Outdoor unit Outdoor unit The number of connectable indoor units is up to 64 units maximum where the Power Proportional Distribution Software as option is used The number of connectable indoor units is up to 64 units maximum when the Power Proportional Distribution So...

Page 108: ... Size Mass Weight AC100 240V 50 60Hz 10 W maximum 230 147 107 W H D 1 2kg Normally open contact Contact current approximately 10 mA The specification and appearance of the product may be modified for improvement without prior notice 147 90 230 50 57 Specification 107 ...

Page 109: ...ll be charged Guarantee period one year from the date of installation Model Date of installation Circumstances as detailed as possible Address name phone number Questions For after sales service contact the vendor you purchased the product from or the nearest service station Transfer Transfer requires professional technique Be sure to contact the vendor you purchased the product from or service st...

Page 110: ...S 1002 Head office Umeda Center Bldg 2 4 12 Nakazaki Nishi Kita ku Osaka 530 8323 Japan Tokyo office JR Shinagawa East Bldg 2 18 1 Konan Minato ku Tokyo 108 0075 Japan Zandvoordestraat 300 B 8400 Oostende Belgium ...

Reviews: